


Your device needs to be eSIM compliant and carrier-unlocked to utilize an eSIM. To determine if your device supports eSIM technology, please refer to the updated list below (restrictions may vary depending on your country and carrier).
Remember:
As new eSIM-compatible devices become available, this list will be updated.
Despite our best efforts to include every device, the list is not exhaustive; even if your device isn't listed, it might still be eSIM compatible.
- iPhone 16e
- iPhone 16
- iPhone 16 Plus
- iPhone 16 Pro
- iPhone 16 Pro Max
- iPhone 15
- iPhone 15 Plus
- iPhone 15 Pro
- iPhone 15 Pro Max
- iPhone 14
- iPhone 14 Plus
- iPhone 14 Pro
- iPhone 14 Pro Max
- iPhone 13
- iPhone 13 Mini
- iPhone 13 Pro
- iPhone 13 Pro Max
- iPhone 12
- iPhone 12 Mini
- iPhone 12 Pro
- iPhone 12 Pro Max
- iPhone 11
- iPhone 11 Pro
- iPhone 11 Pro Max
- iPhone XS
- iPhone XS Max
- iPhone XR
- iPhone SE (2020)
- iPhone SE (2022)
- iPad (7th generation)
- iPad (8th generation)
- iPad (9th generation)
- iPad (10th generation)
- iPad Air (3rd generation)
- iPad Air (4th generation)
- iPad Air (5th generation)
- iPad Air (6th generation)
- iPad Pro 11-inch (1st generation)
- iPad Pro 11-inch (2nd generation)
- iPad Pro 11-inch (3rd generation)
- iPad Pro 11-inch (4th generation)
- iPad Pro 12.9-inch (3rd generation)
- iPad Pro 12.9-inch (4th generation)
- iPad Pro 12.9-inch (5th generation)
- iPad Pro 12.9-inch (6th generation)
- iPad Pro 13-inch (7th generation)
- iPad Mini (5th generation)
- iPad Mini (6th generation)
- iPhone devices from Mainland China.
- iPhone devices from Hong Kong and Macao (except for the iPhone 13 Mini, iPhone 12 Mini, iPhone SE 2020, and iPhone XS).
The following devices support eSIM as of March 2025:
APPLE
*The eSIM feature is NOT available on the following Apple devices:
*For iPads and iPhones bought in Turkey:
If you're activating your smartphone after June 23, 2020, the installation process will activate your eSIM; if not, get in touch with your carrier.
To activate your eSIM on devices set up before June 23, 2020, follow the instructions found in this link. It's possible that the process will require you to erase the data on your device, so please ensure you have a backup before beginning.
*The only supported iPad models are those with Wi-Fi + Cellular capabilities.
SAMSUNG
- Samsung Galaxy S21 5G
- Samsung Galaxy S21+ 5G
- Samsung Galaxy S21 Ultra 5G
- Samsung Galaxy S22 5G
- Samsung Galaxy S22+ 5G
- Samsung Galaxy S22 Ultra 5G
- Samsung Galaxy S23 5G
- Samsung Galaxy S23+ 5G
- Samsung Galaxy S23 Ultra 5G
- Samsung Galaxy Note20 5G
- Samsung Galaxy Note20 Ultra 5G
- Samsung Galaxy Z Fold2 5G
- Samsung Galaxy Z Fold3 5G
- Samsung Galaxy Z Fold4 5G
- Samsung Galaxy Z Flip 5G
- Samsung Galaxy Z Flip3 5G
- Samsung Galaxy
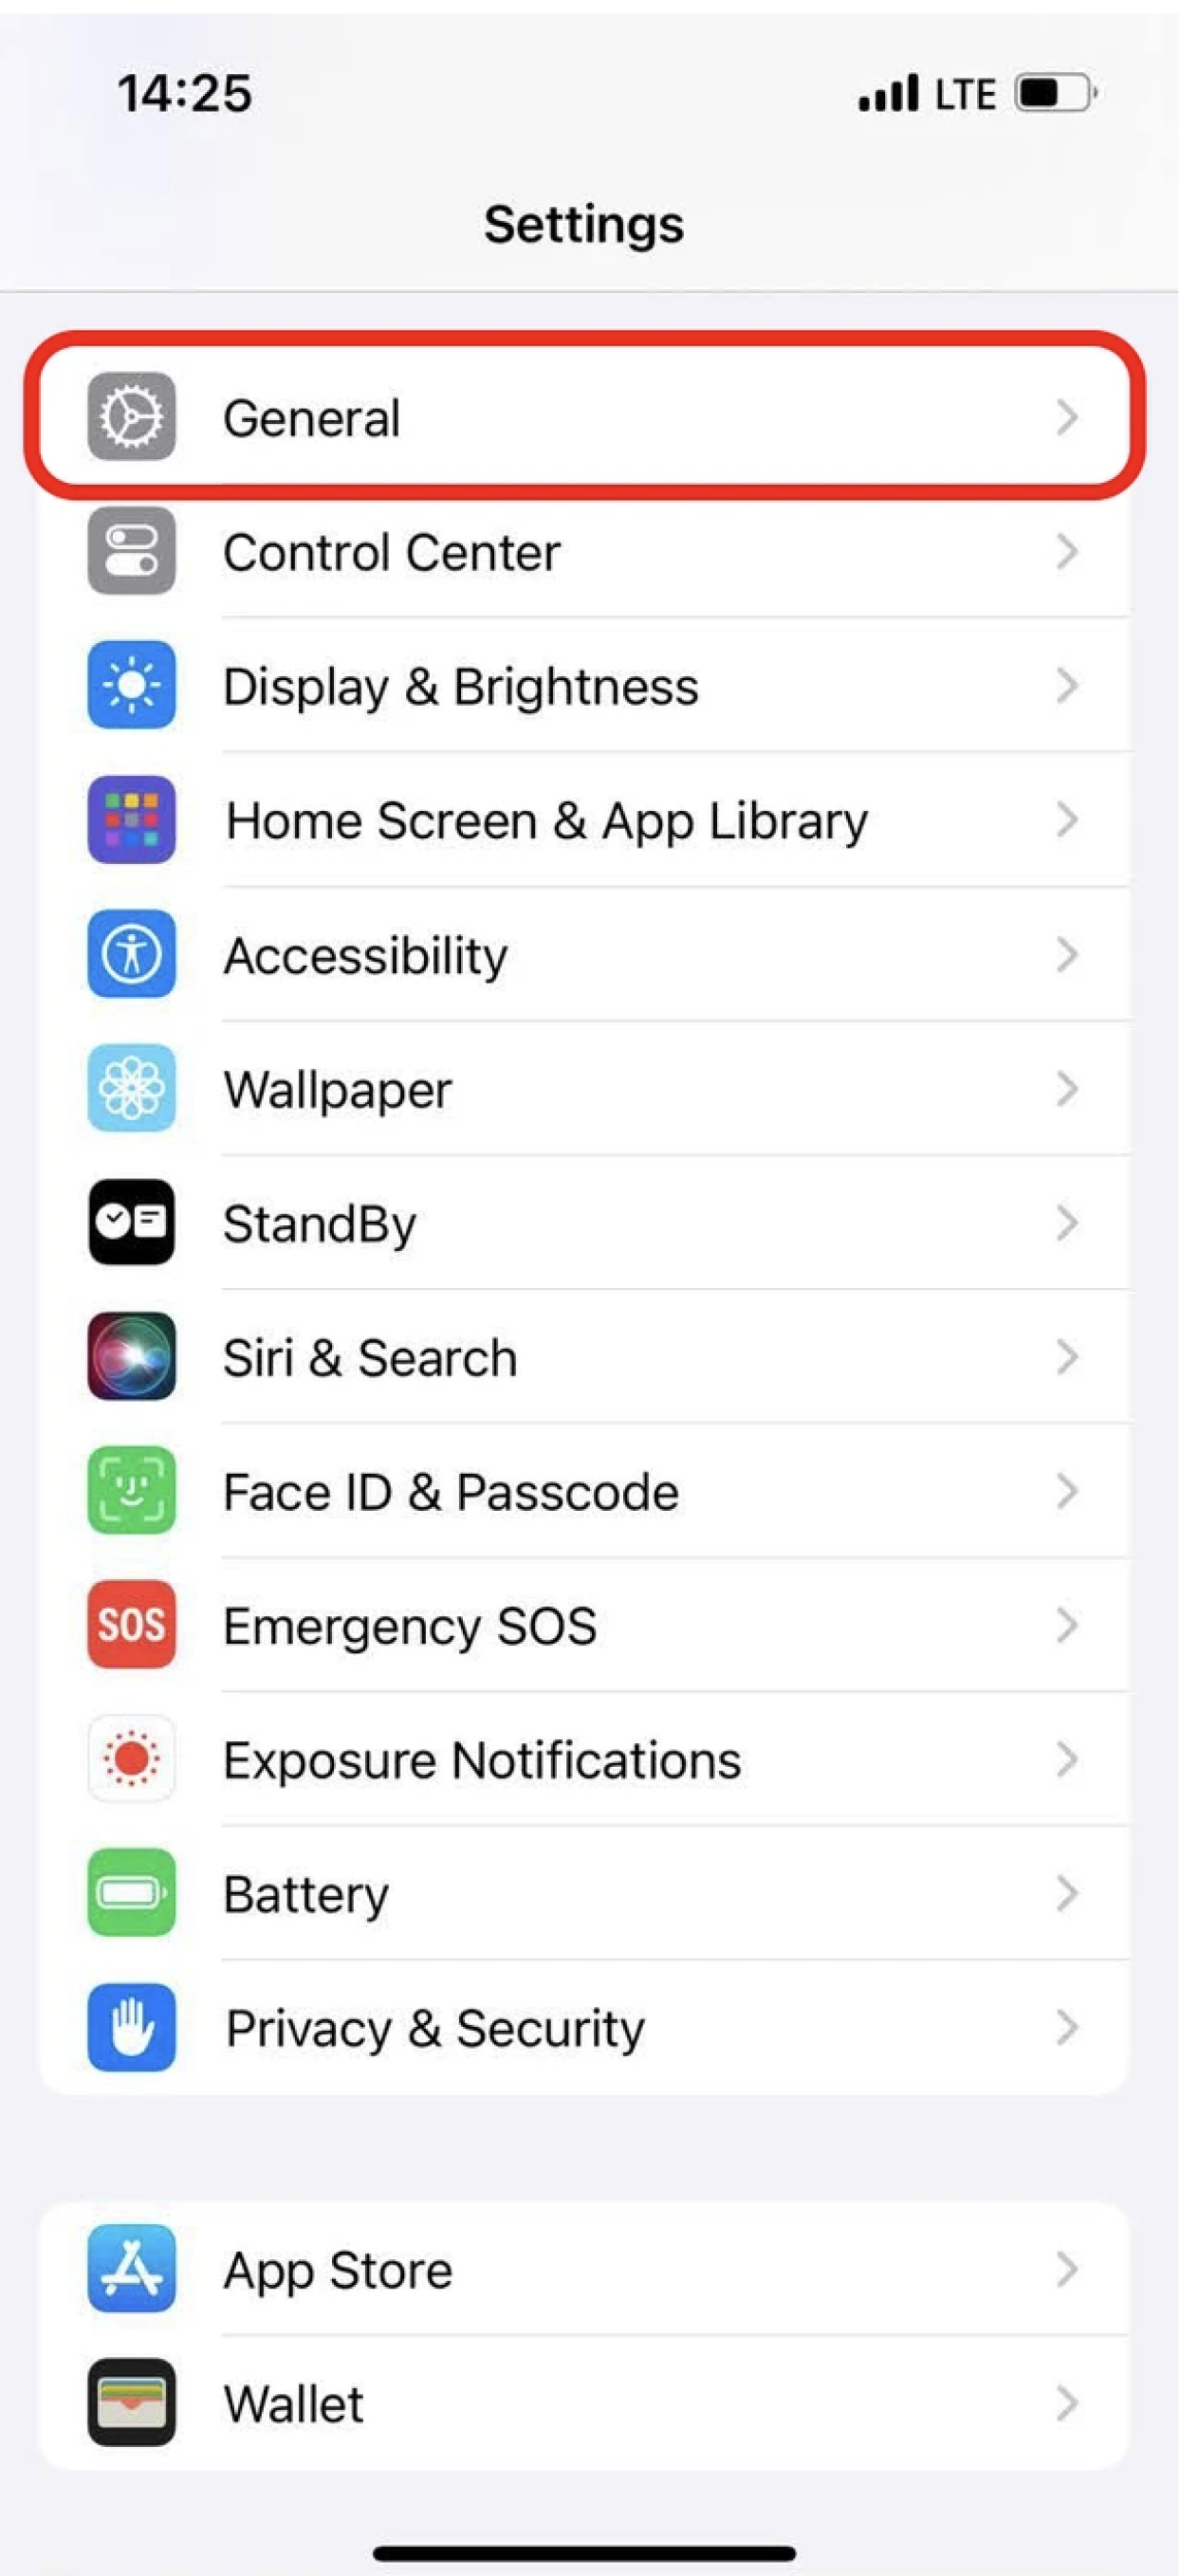
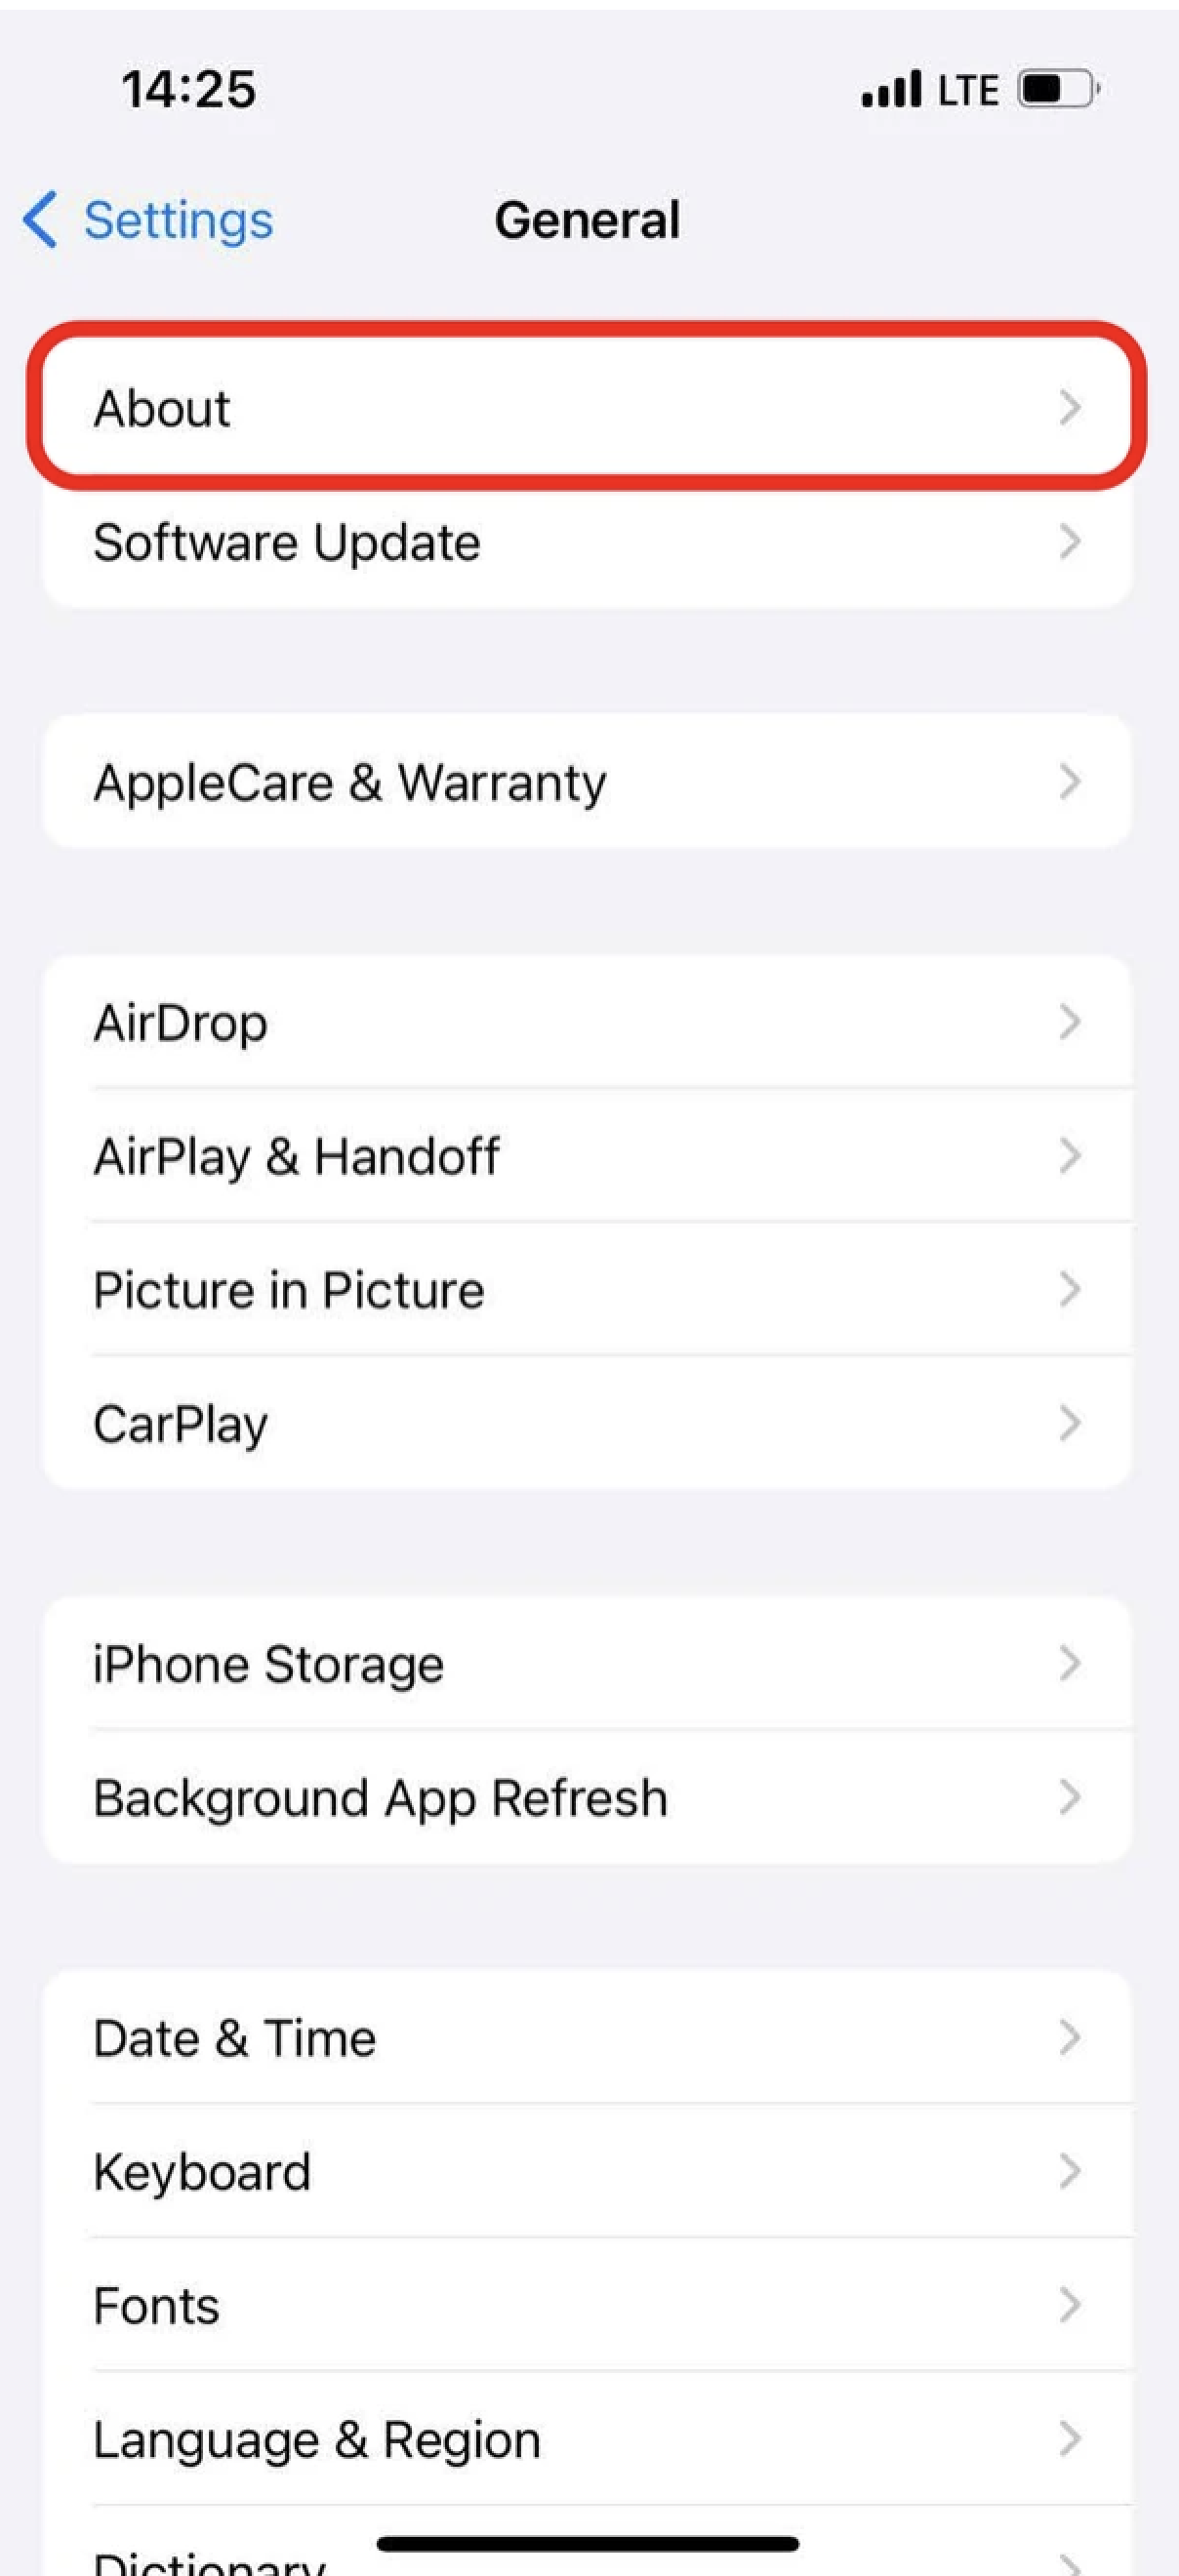
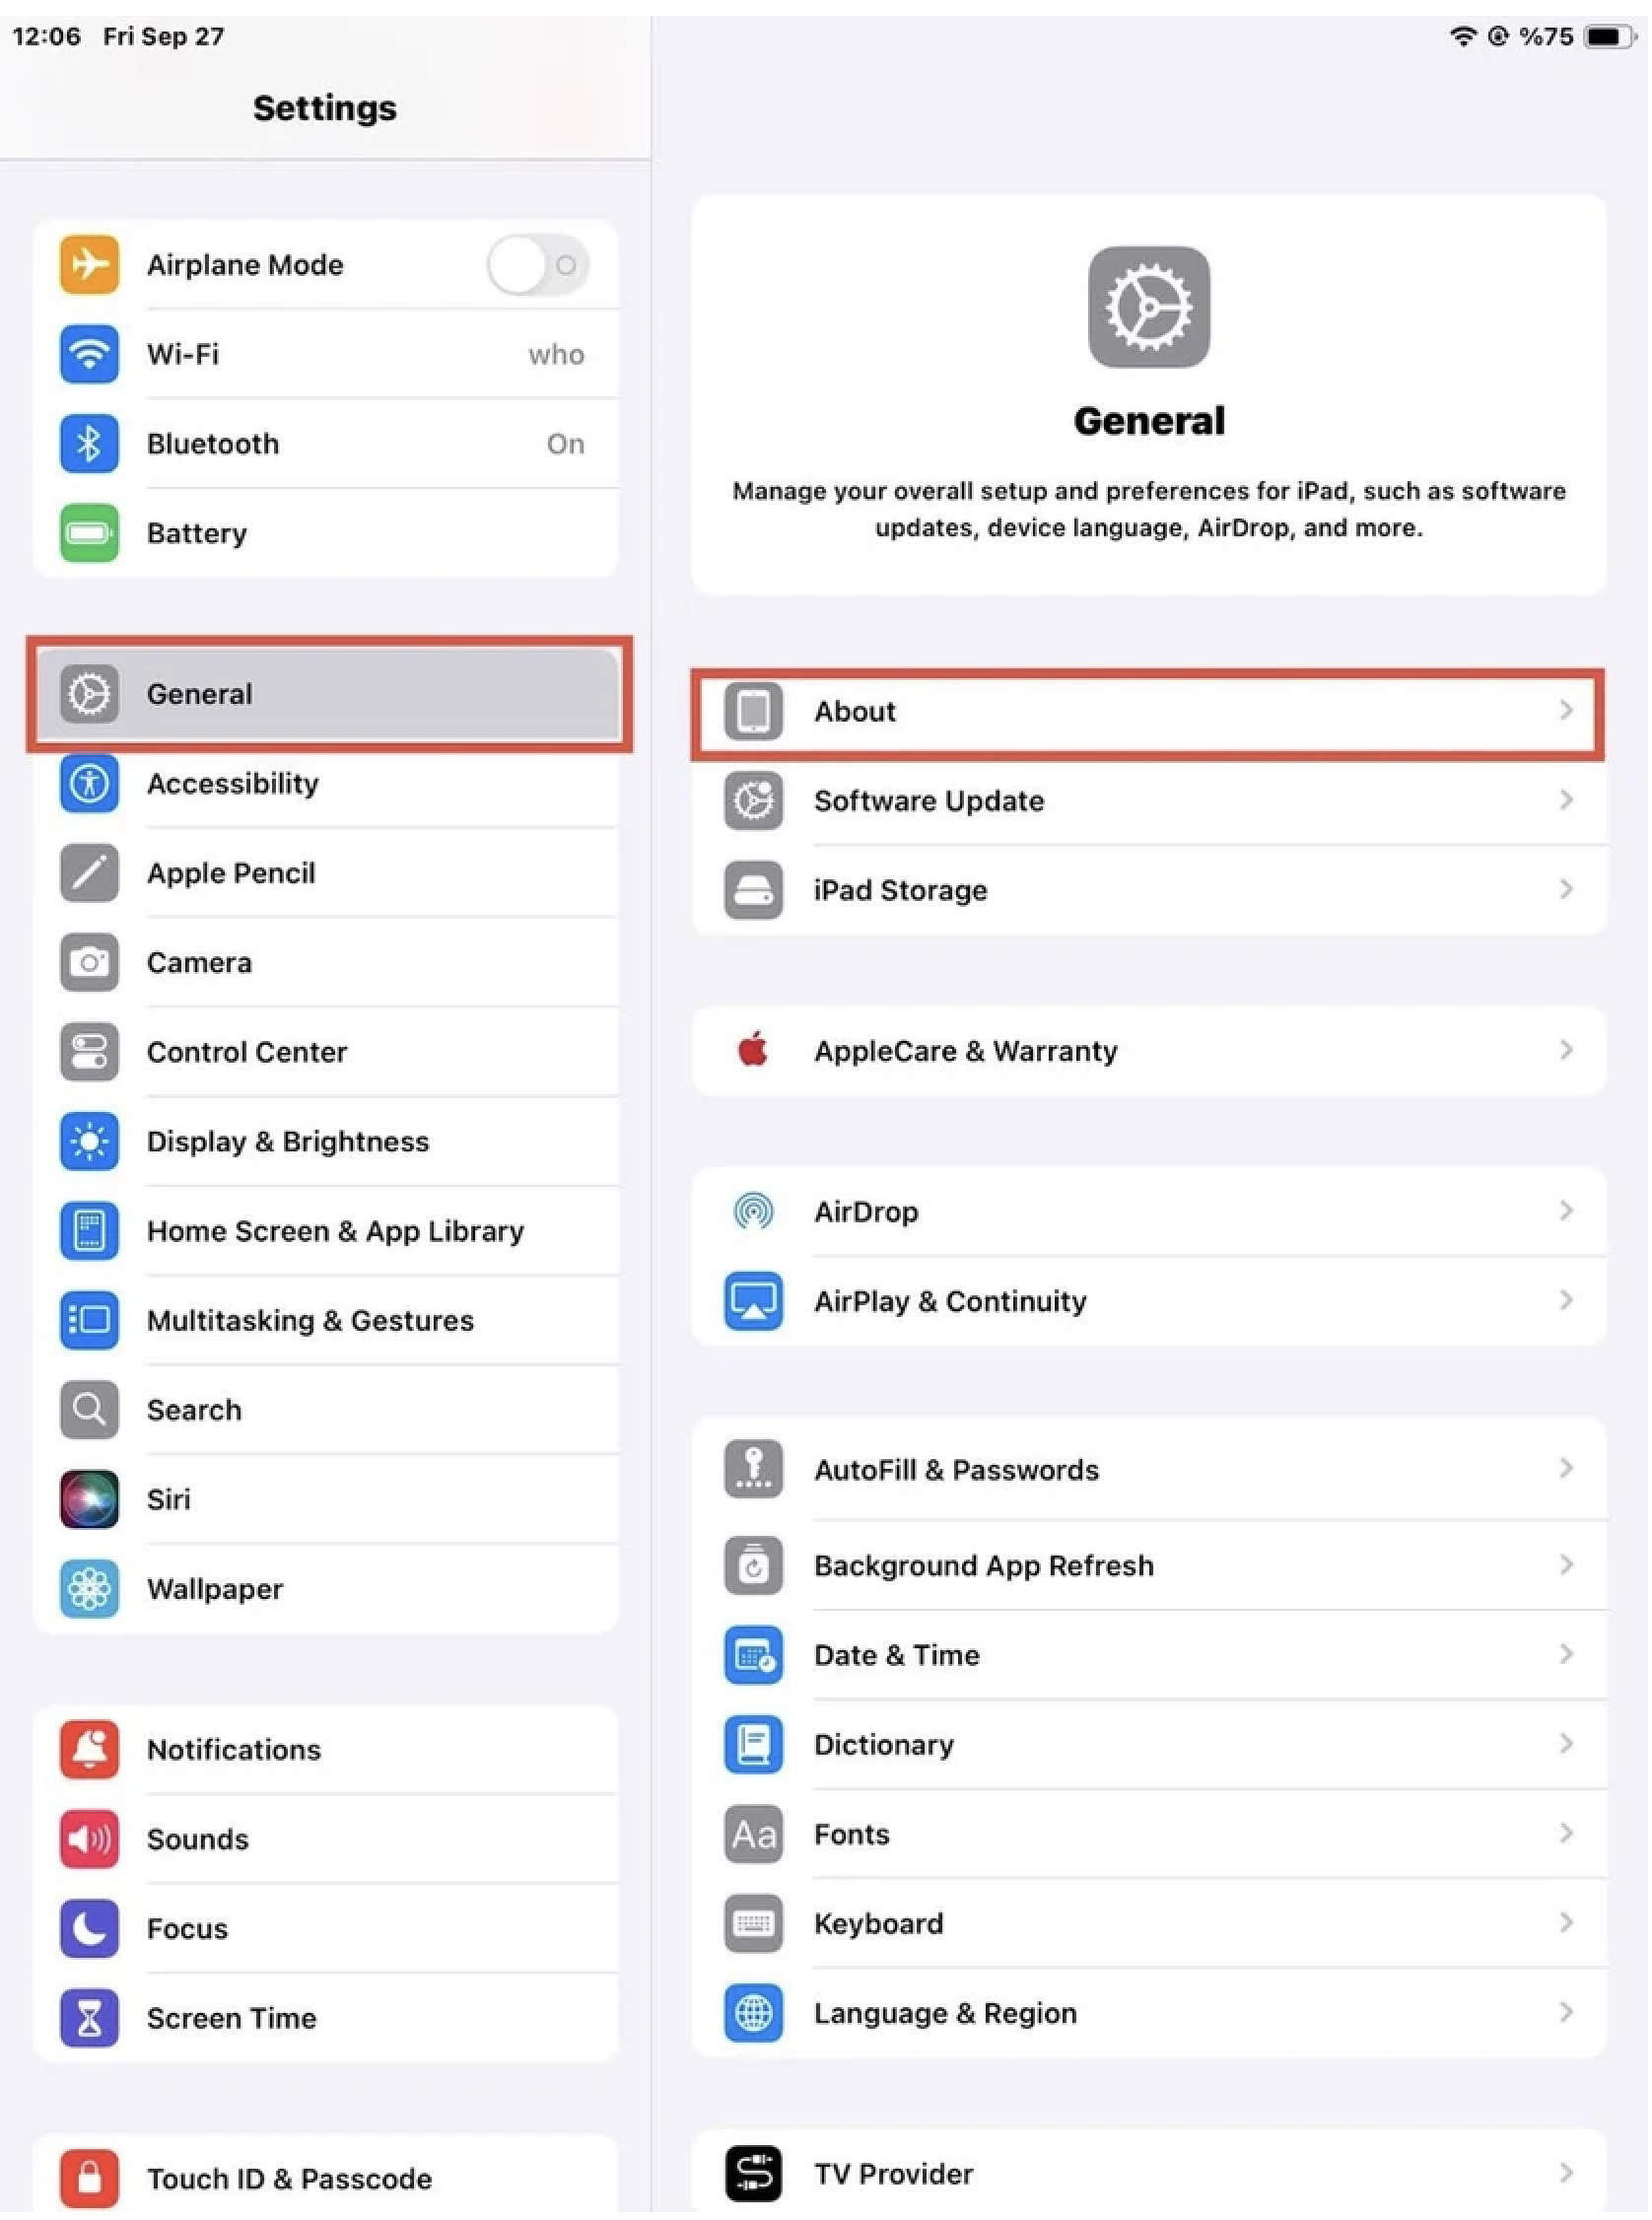
- Open the Settings app, then Tap General
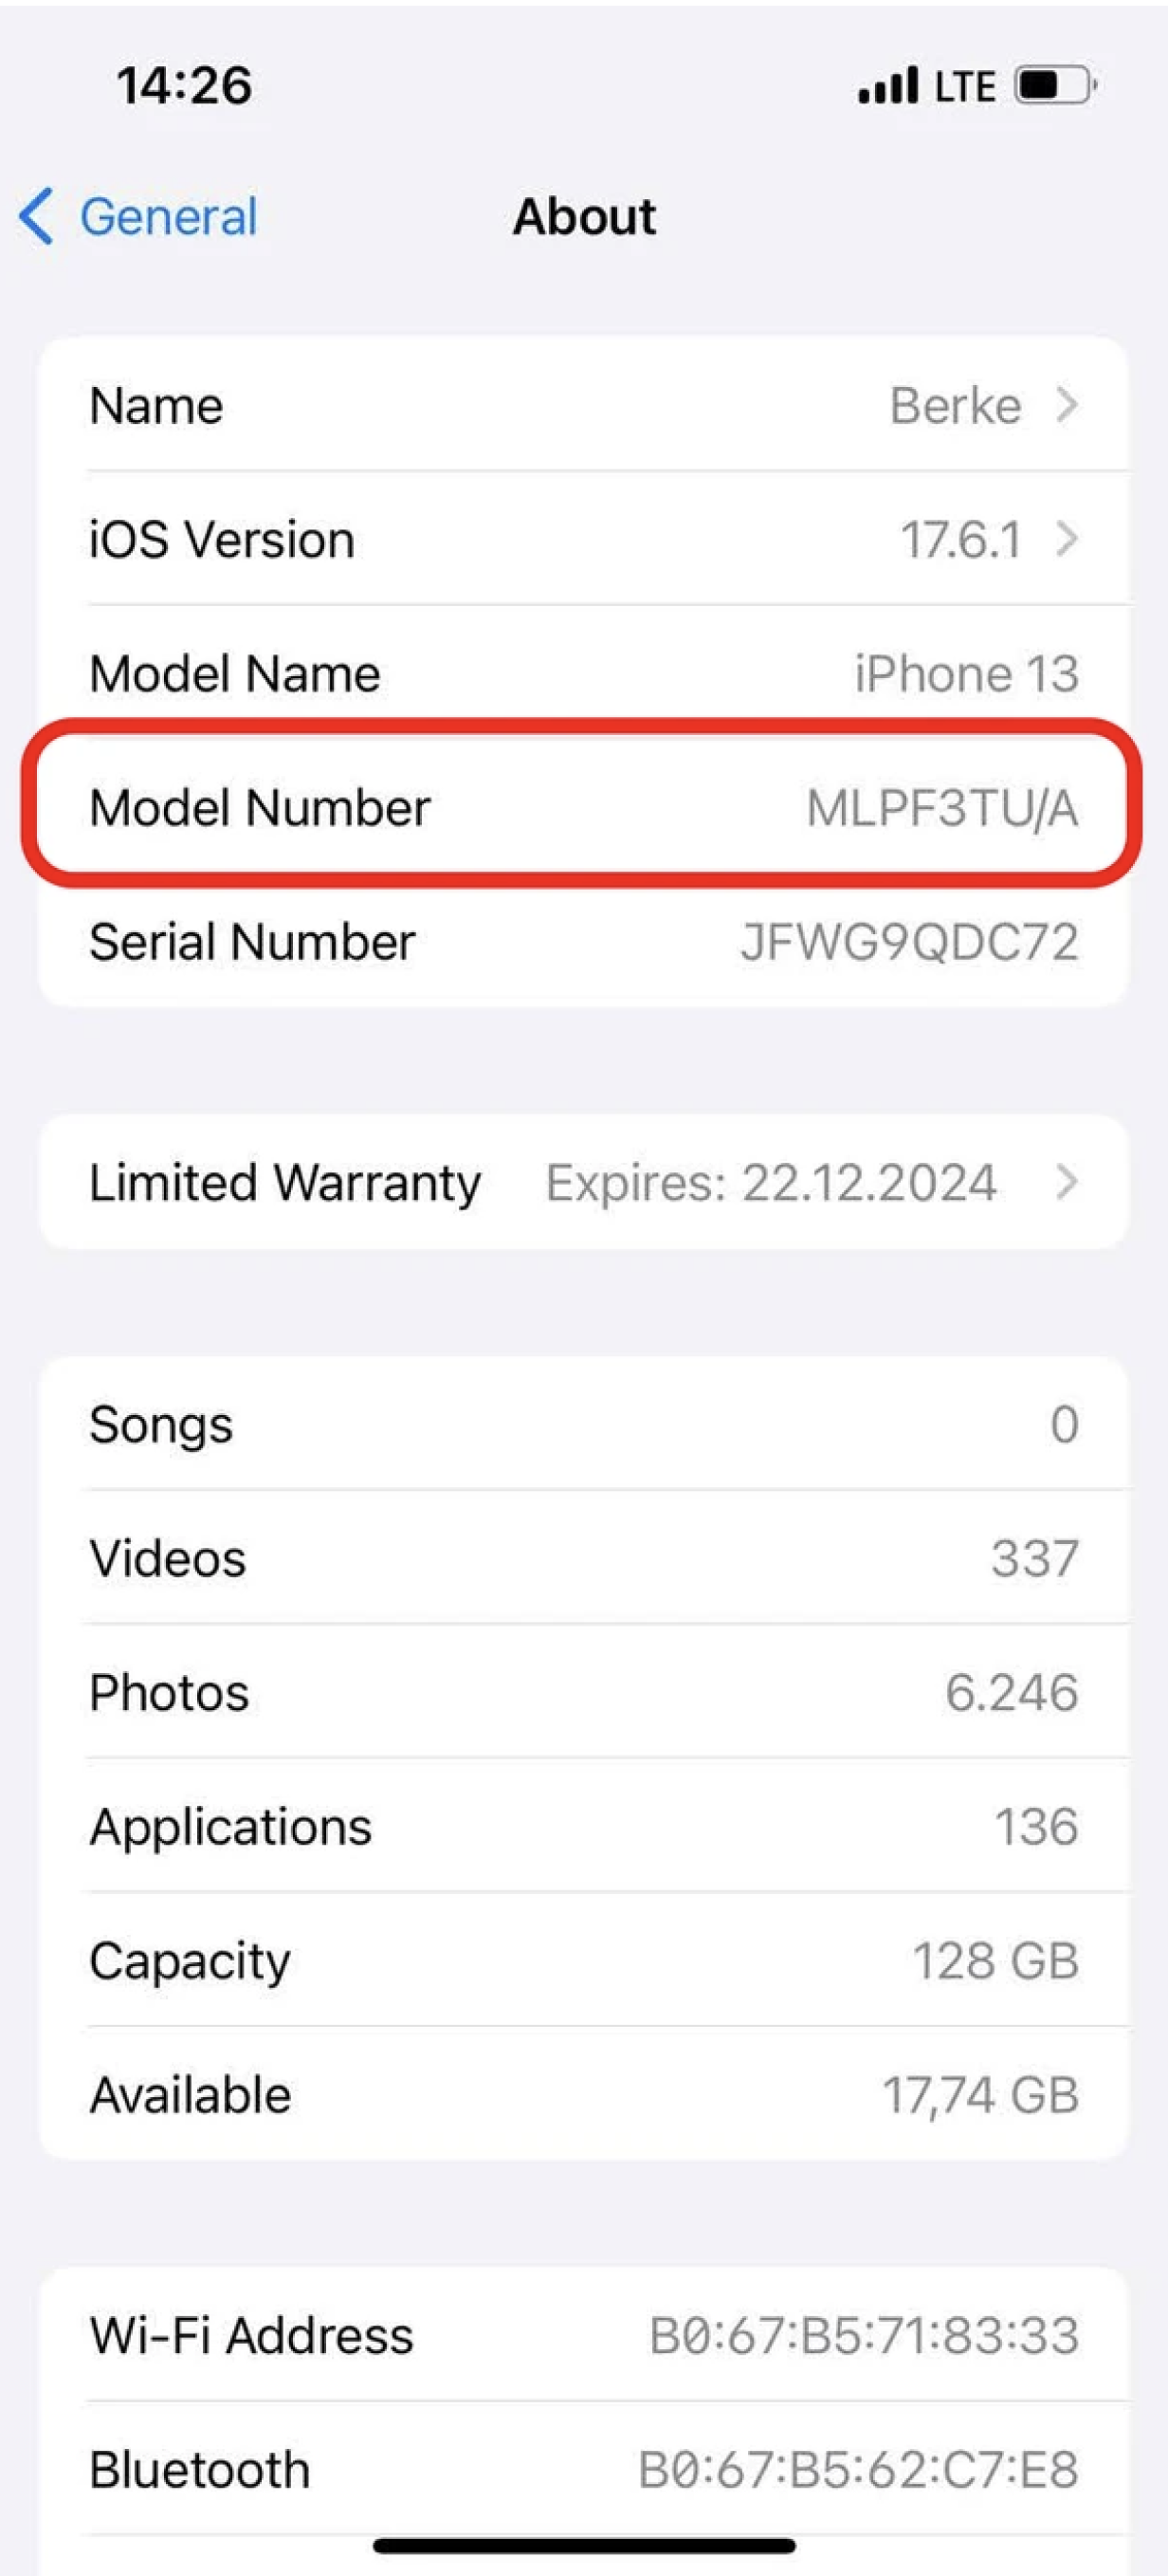
- Tap "About".
- Tap the "Model Number" until it changes to an AXXXX combination.
- Verify that the Model Number of your iPhone is not from a Chinese region. You can find more information through this link.
Whether an eSIM is included by the manufacturer determines if a device is compatible with eSIMs. For convenience, we have compiled a list of eSIM-compatible devices. To see if your device supports eSIM we have a list for you. See Here
Certain models might be released in specific countries and regions without eSIM support. It's also possible that the carrier from whom you bought your device hasn't enabled the eSIM capability.
To find out if your iOS smartphone supports eSIM technology, follow the instructions below. Please keep in mind that your device may or may not support the steps. The manufacturer, seller, or primary carrier of your device is still the best place to find out if it supports eSIMs.
For iPhone:

Your device should be eSIM-compatible if the model number does not match any of the devices from Hong Kong, Macao, or the Chinese mainland. Next, use the instructions below to determine whether your iPhone is carrier-locked or unlocked.
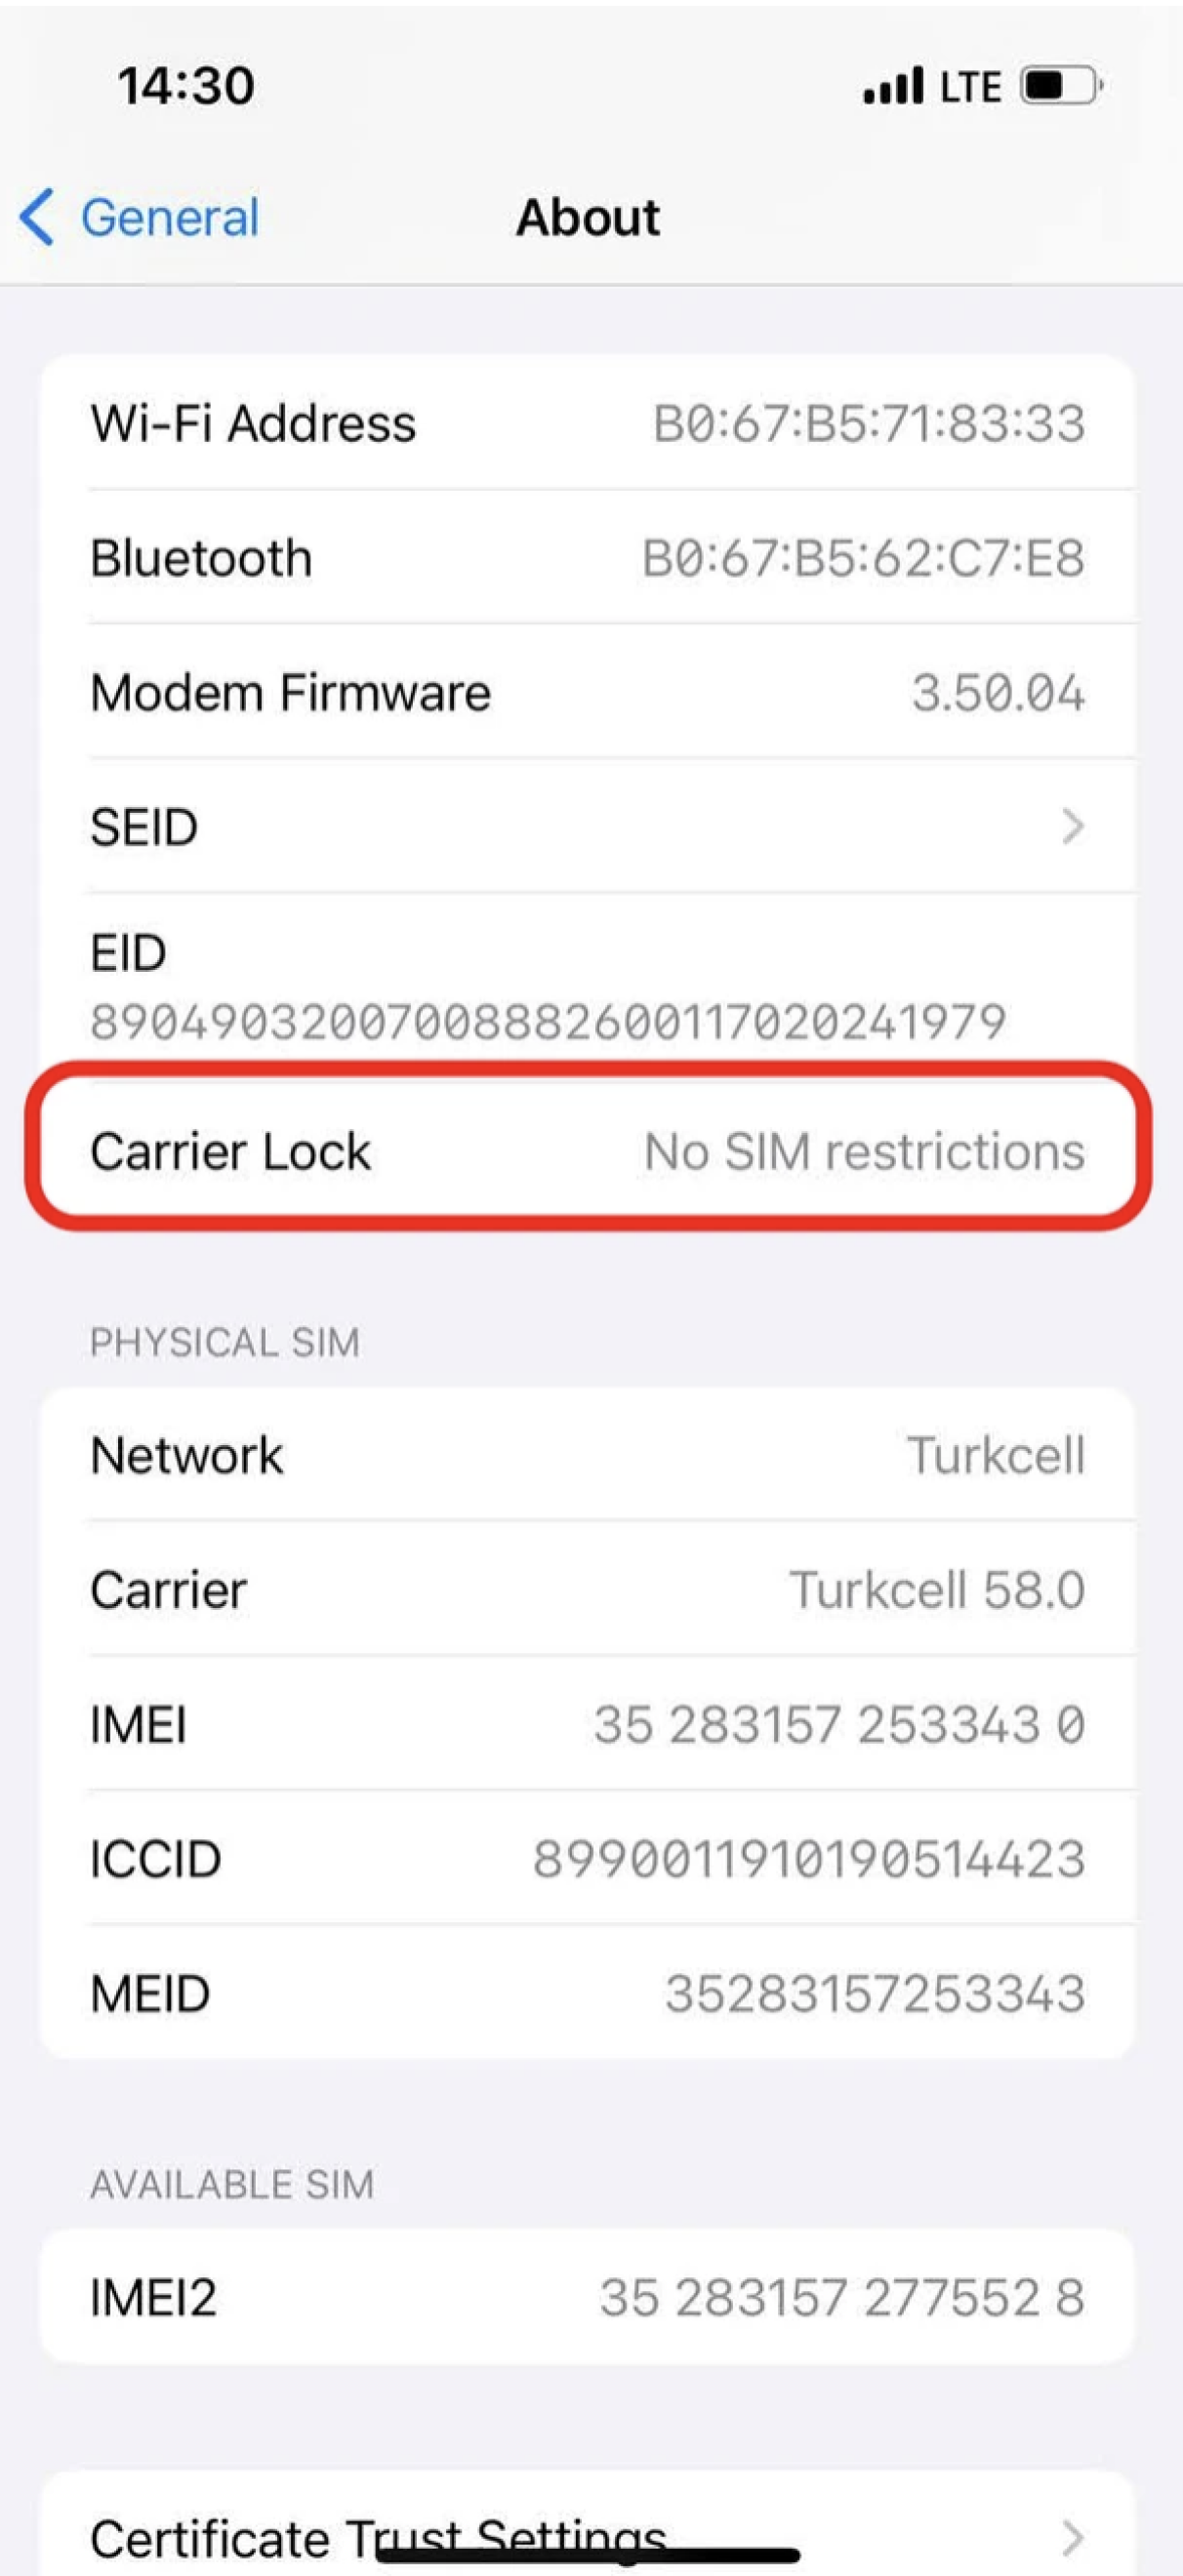
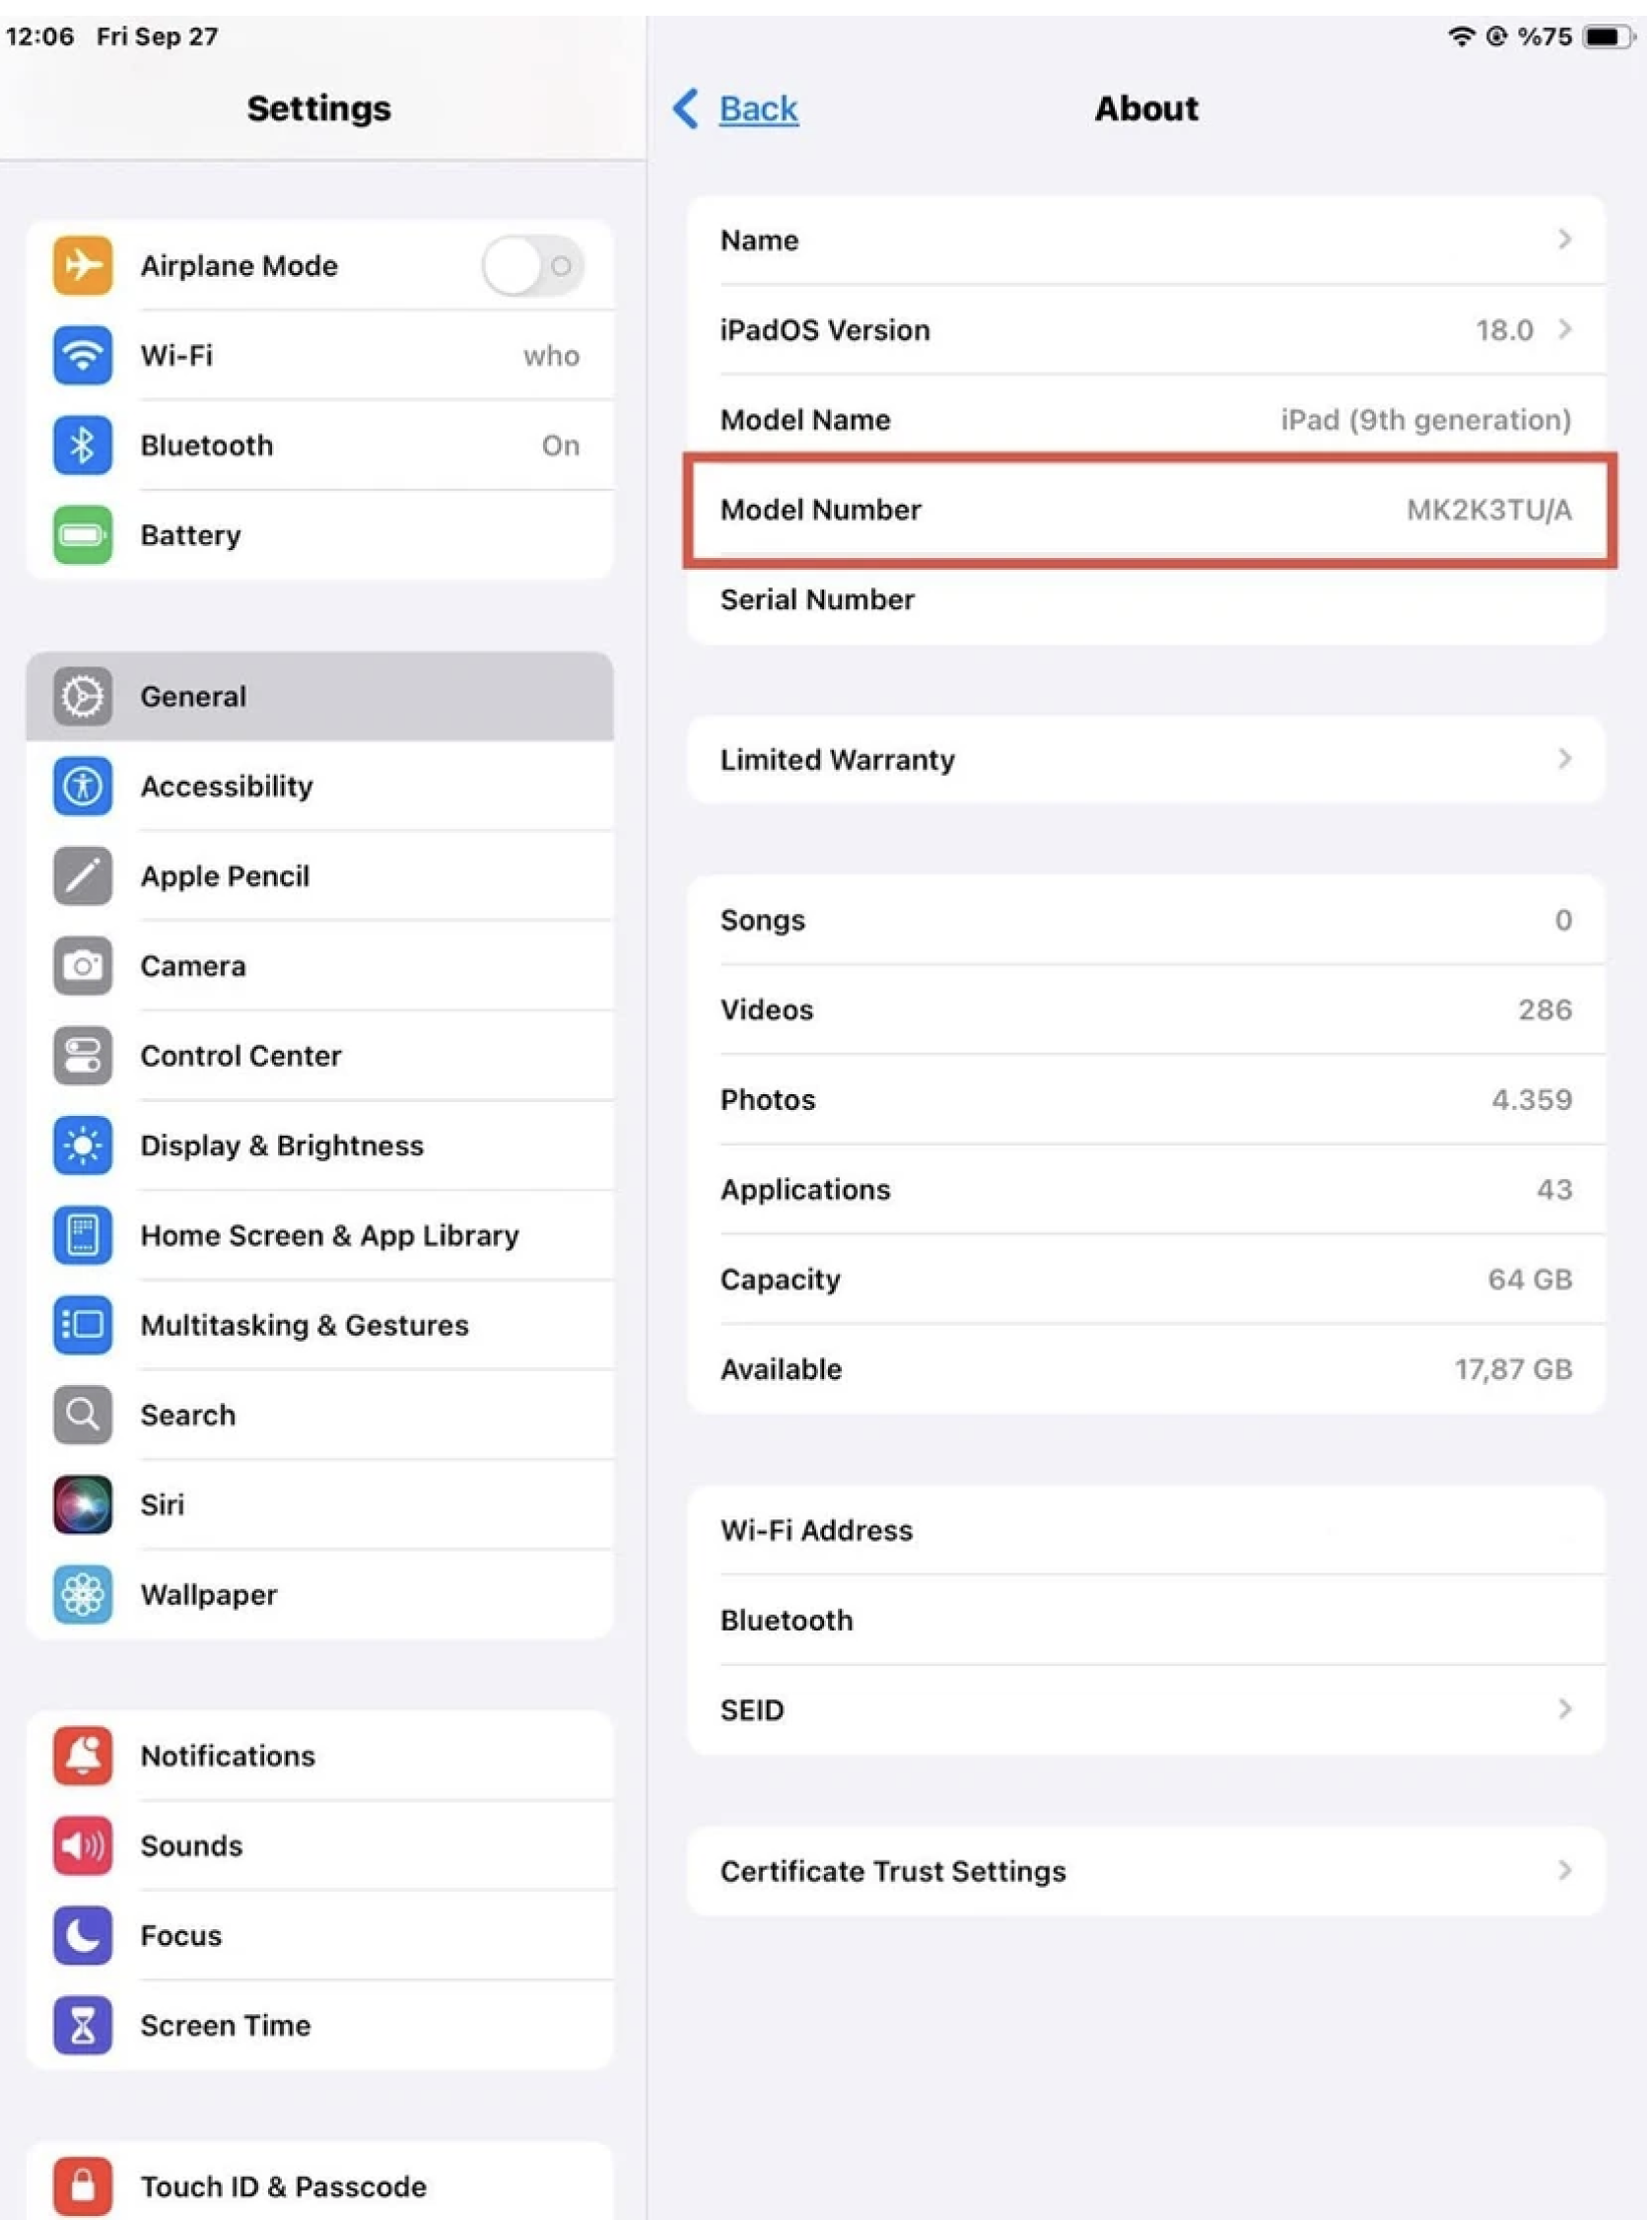
- Open the Settings app, then Tap General
- Tap "About".
- SCROLL and look for the Carrier Lock field. Your iPhone is unlocked if No SIM restrictions appear next to Carrier Lock.

For iPad:
- Open the Settings app, then Tap General
- Tap "About".
- Tap the "Model Number" until it changes to an AXXXX combination.
- Verify that the Model Number of your iPad is not from a Chinese region. You can find more information through this link.
Your device should be eSIM-compatible as long as it provides cellular capabilities, even if the model number does not correspond to any of the China mainland, Hong Kong, or Macao variations. In case you're still uncertain, don't forget to verify eSIM functionality by contacting the primary carrier, vendor, or producer of your device.
If you have any questions, please feel free to contact our support team, and we'll be happy to help!
In Turkey, how can I activate the eSIM on my iPhone or iPad? It has been claimed that the eSIM on some iPhones and iPads bought in Turkey is disabled by default. You won't need to follow these procedures if your device was purchased and activated after June 23, 2020, since your eSIM will activate automatically after setup. Get in contact with your mobile carrier if your eSIM isn't enabled. If you bought your smartphone before June 23, 2020, you can activate your eSIM with the help of the procedures provided below. Before proceeding, make a backup of your device because you will need to reset it to finish the next step.
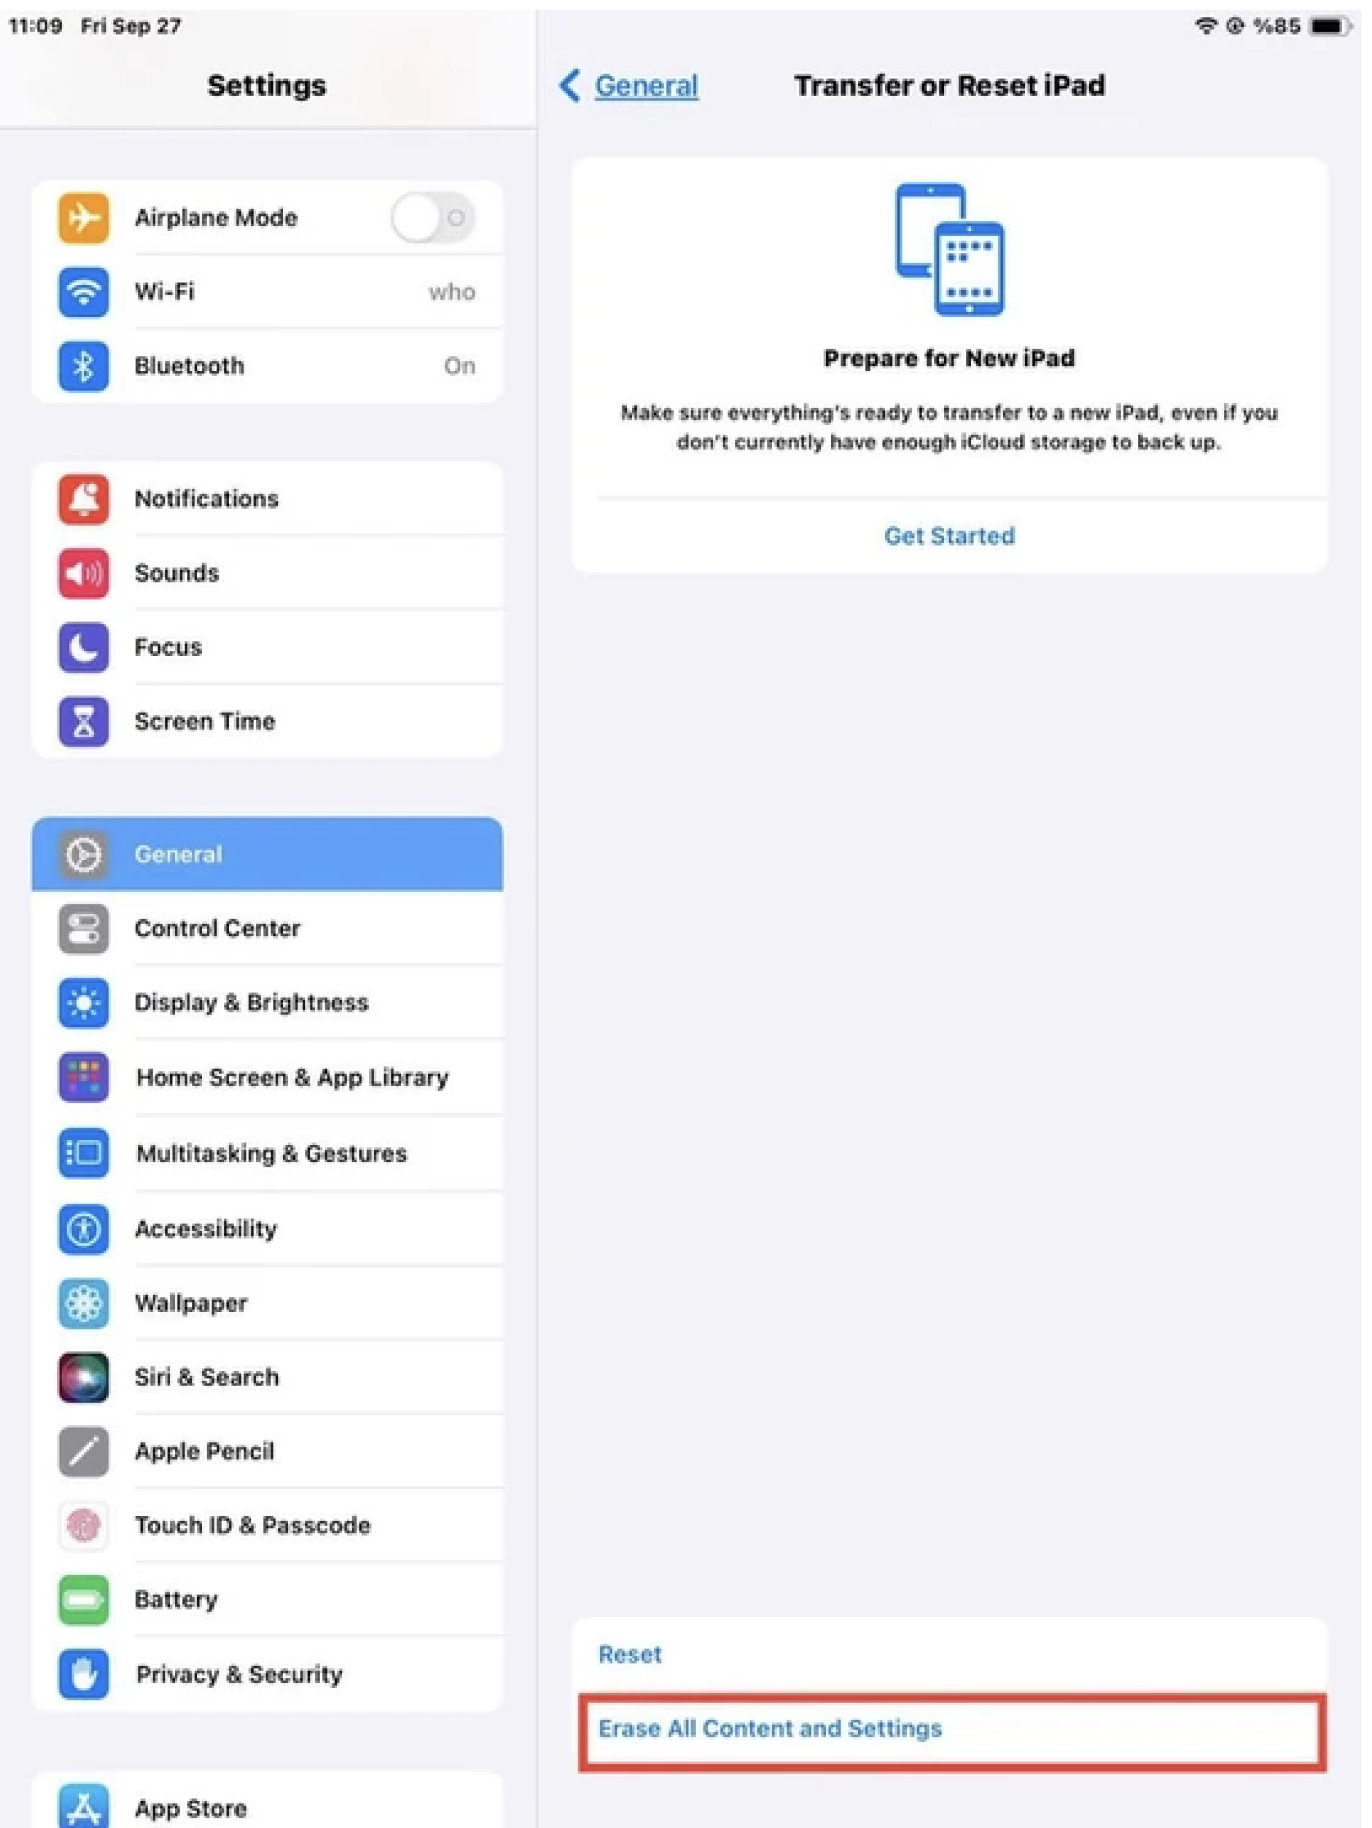
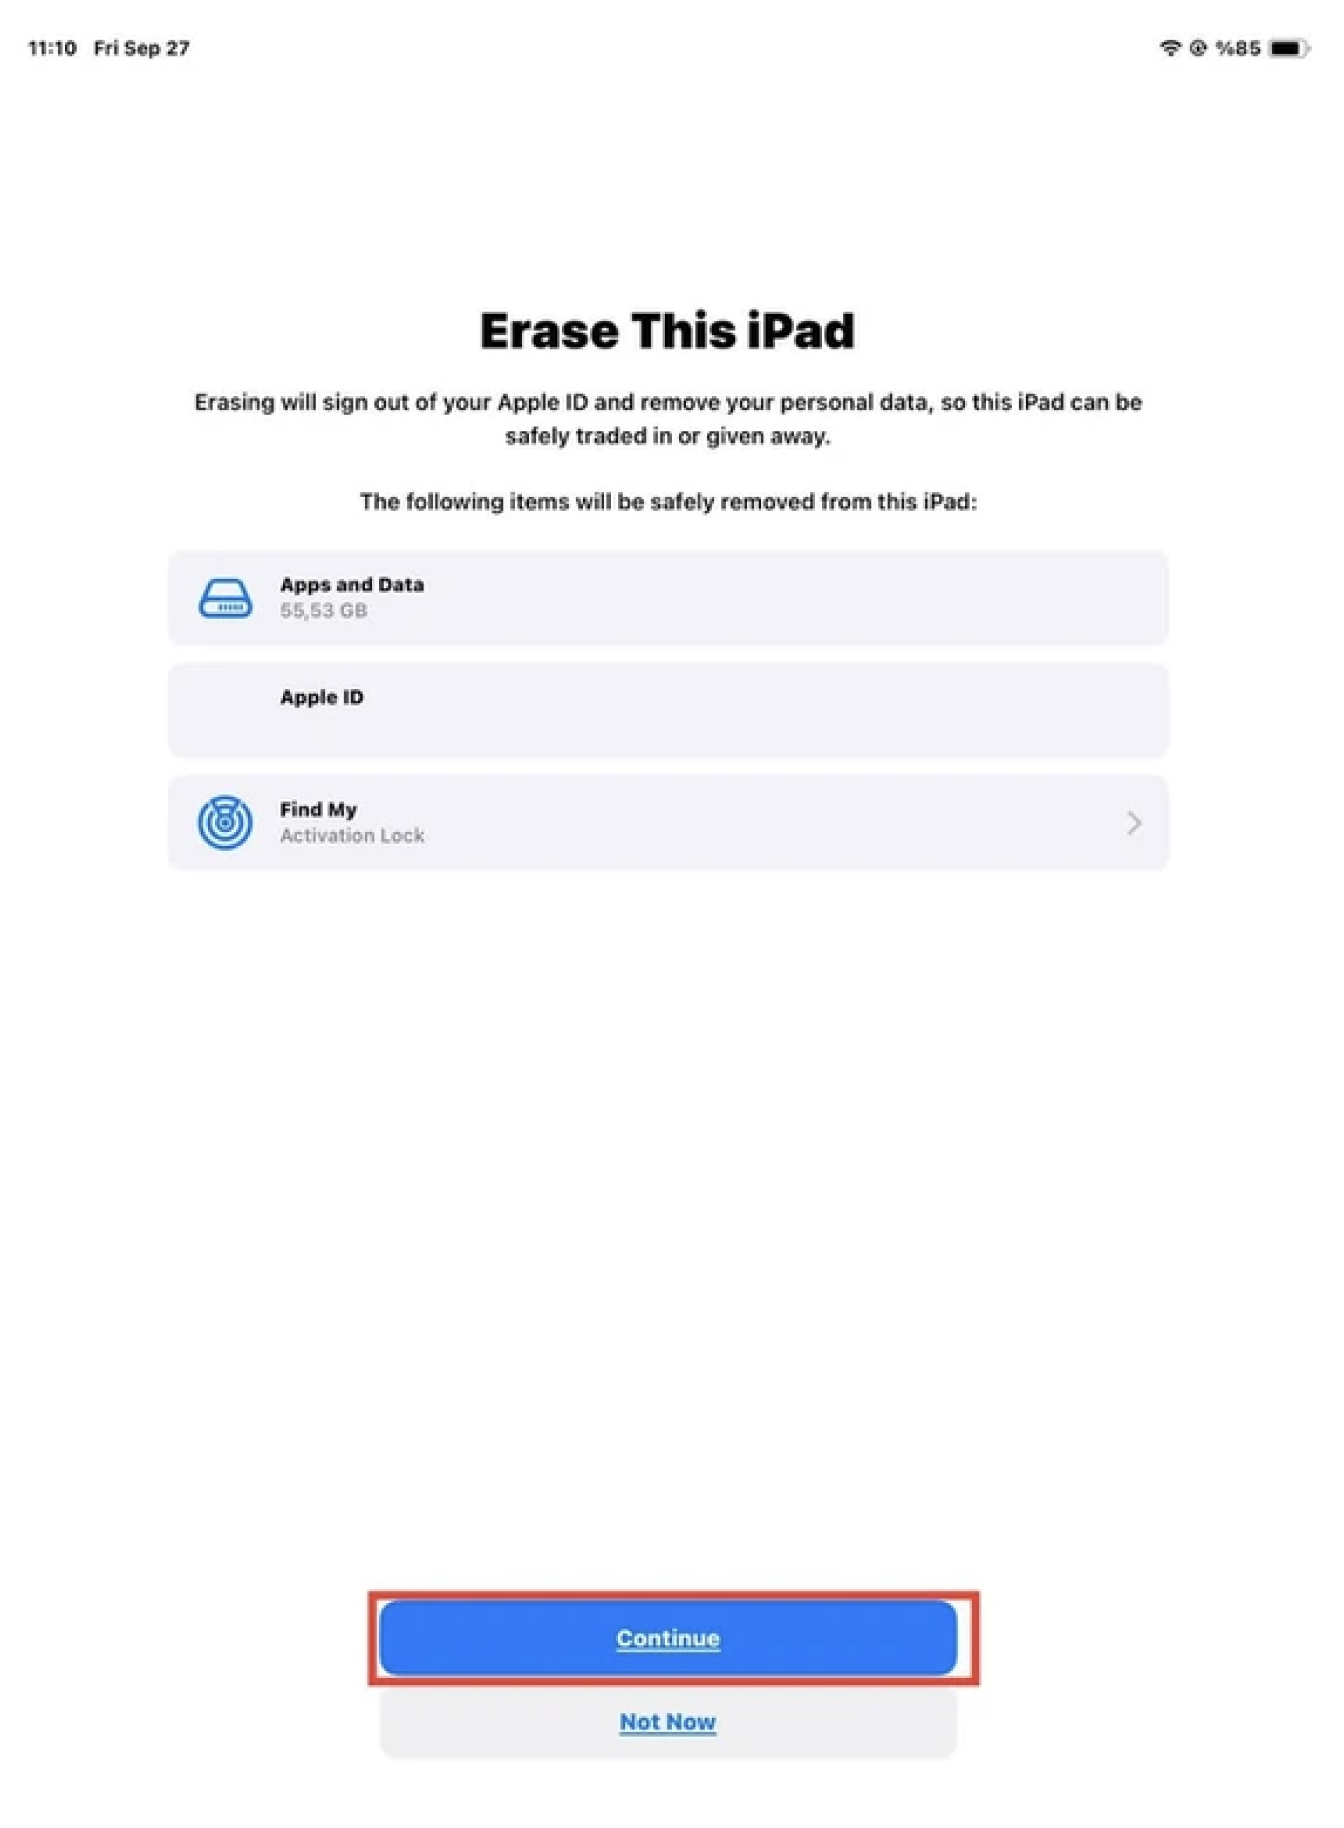
- Back up your device. Then make sure it's updated to the latest iOS or iPadOS.
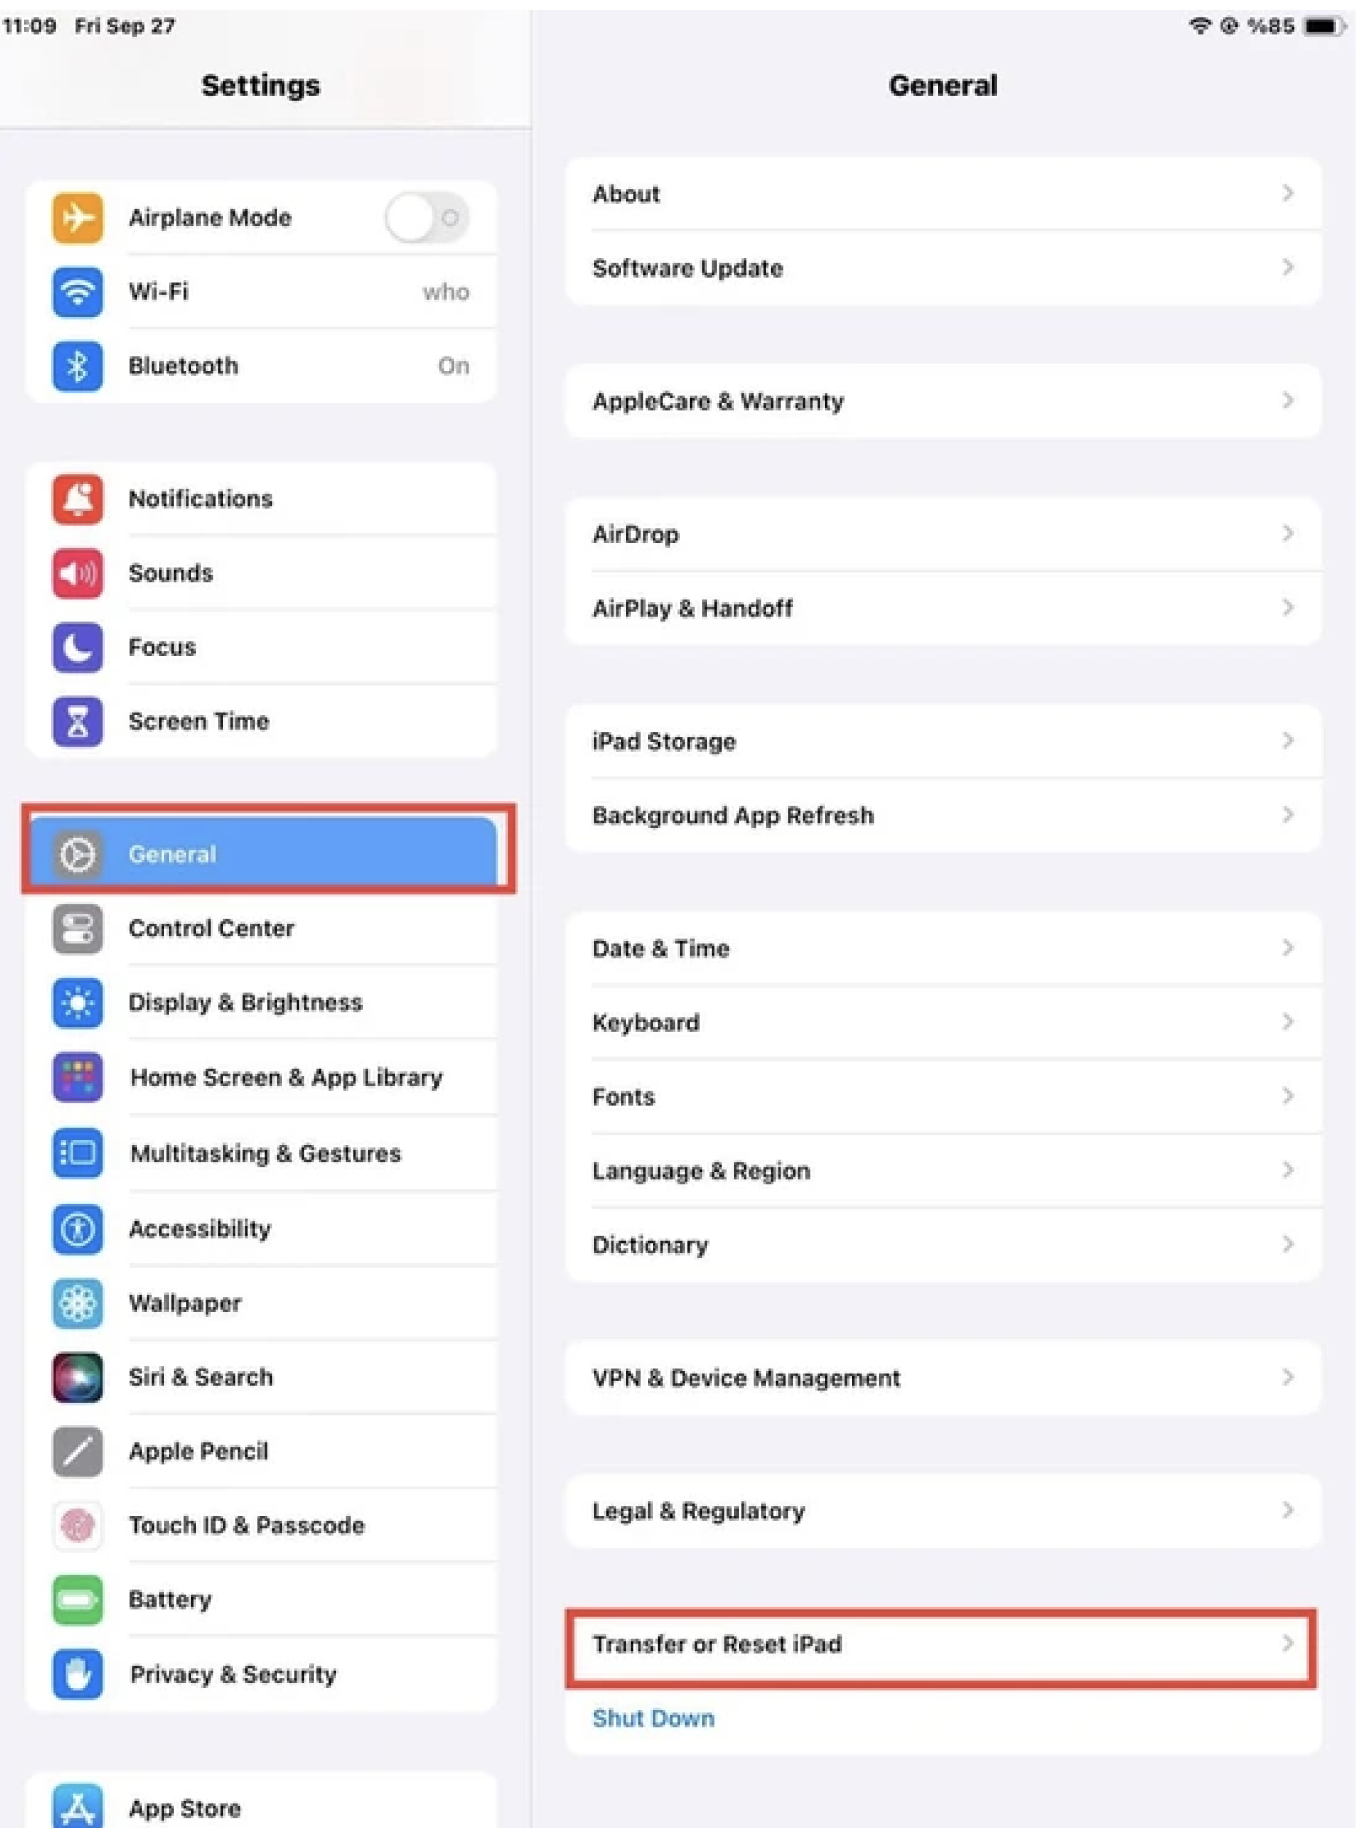
- Tap Settings > General > Transfer or Reset
- Tap Erase All Content and Settings.
- When asked, enter your passcode or Apple ID password. Then confirm that you want to erase your device.
- After erase is complete, restore your iPhone or iPad from your backup.
After that, your iPhone or iPad can now be setup with an eSIM. Please be aware that the device's IMEI needs to be registered with the Central Equipment Identity Register of Turkey in order to use roaming data services for 91 days (accumulated) or more during a 120-day period, per local regulations in Turkey. We respectfully suggest that you get in touch with the CEIR to learn more. Please feel free to get in touch with us through our help channels with any questions.
Source:https://support.apple.com/en-us/HT211023
If you have any questions, please feel free to contact our support team, and we'll be happy to help!
Make sure your iOS device supports eSIMs before proceeding, as not all of them are. Please check if your iOS device is carrier-unlocked and supports eSIMs by following the instructions in this article. To see if your device supports eSIM we have a list for you. See Here
You can set up an eSIM by following these instructions after you have verified that your iOS device supports eSIMs and is linked to a reliable internet connection.
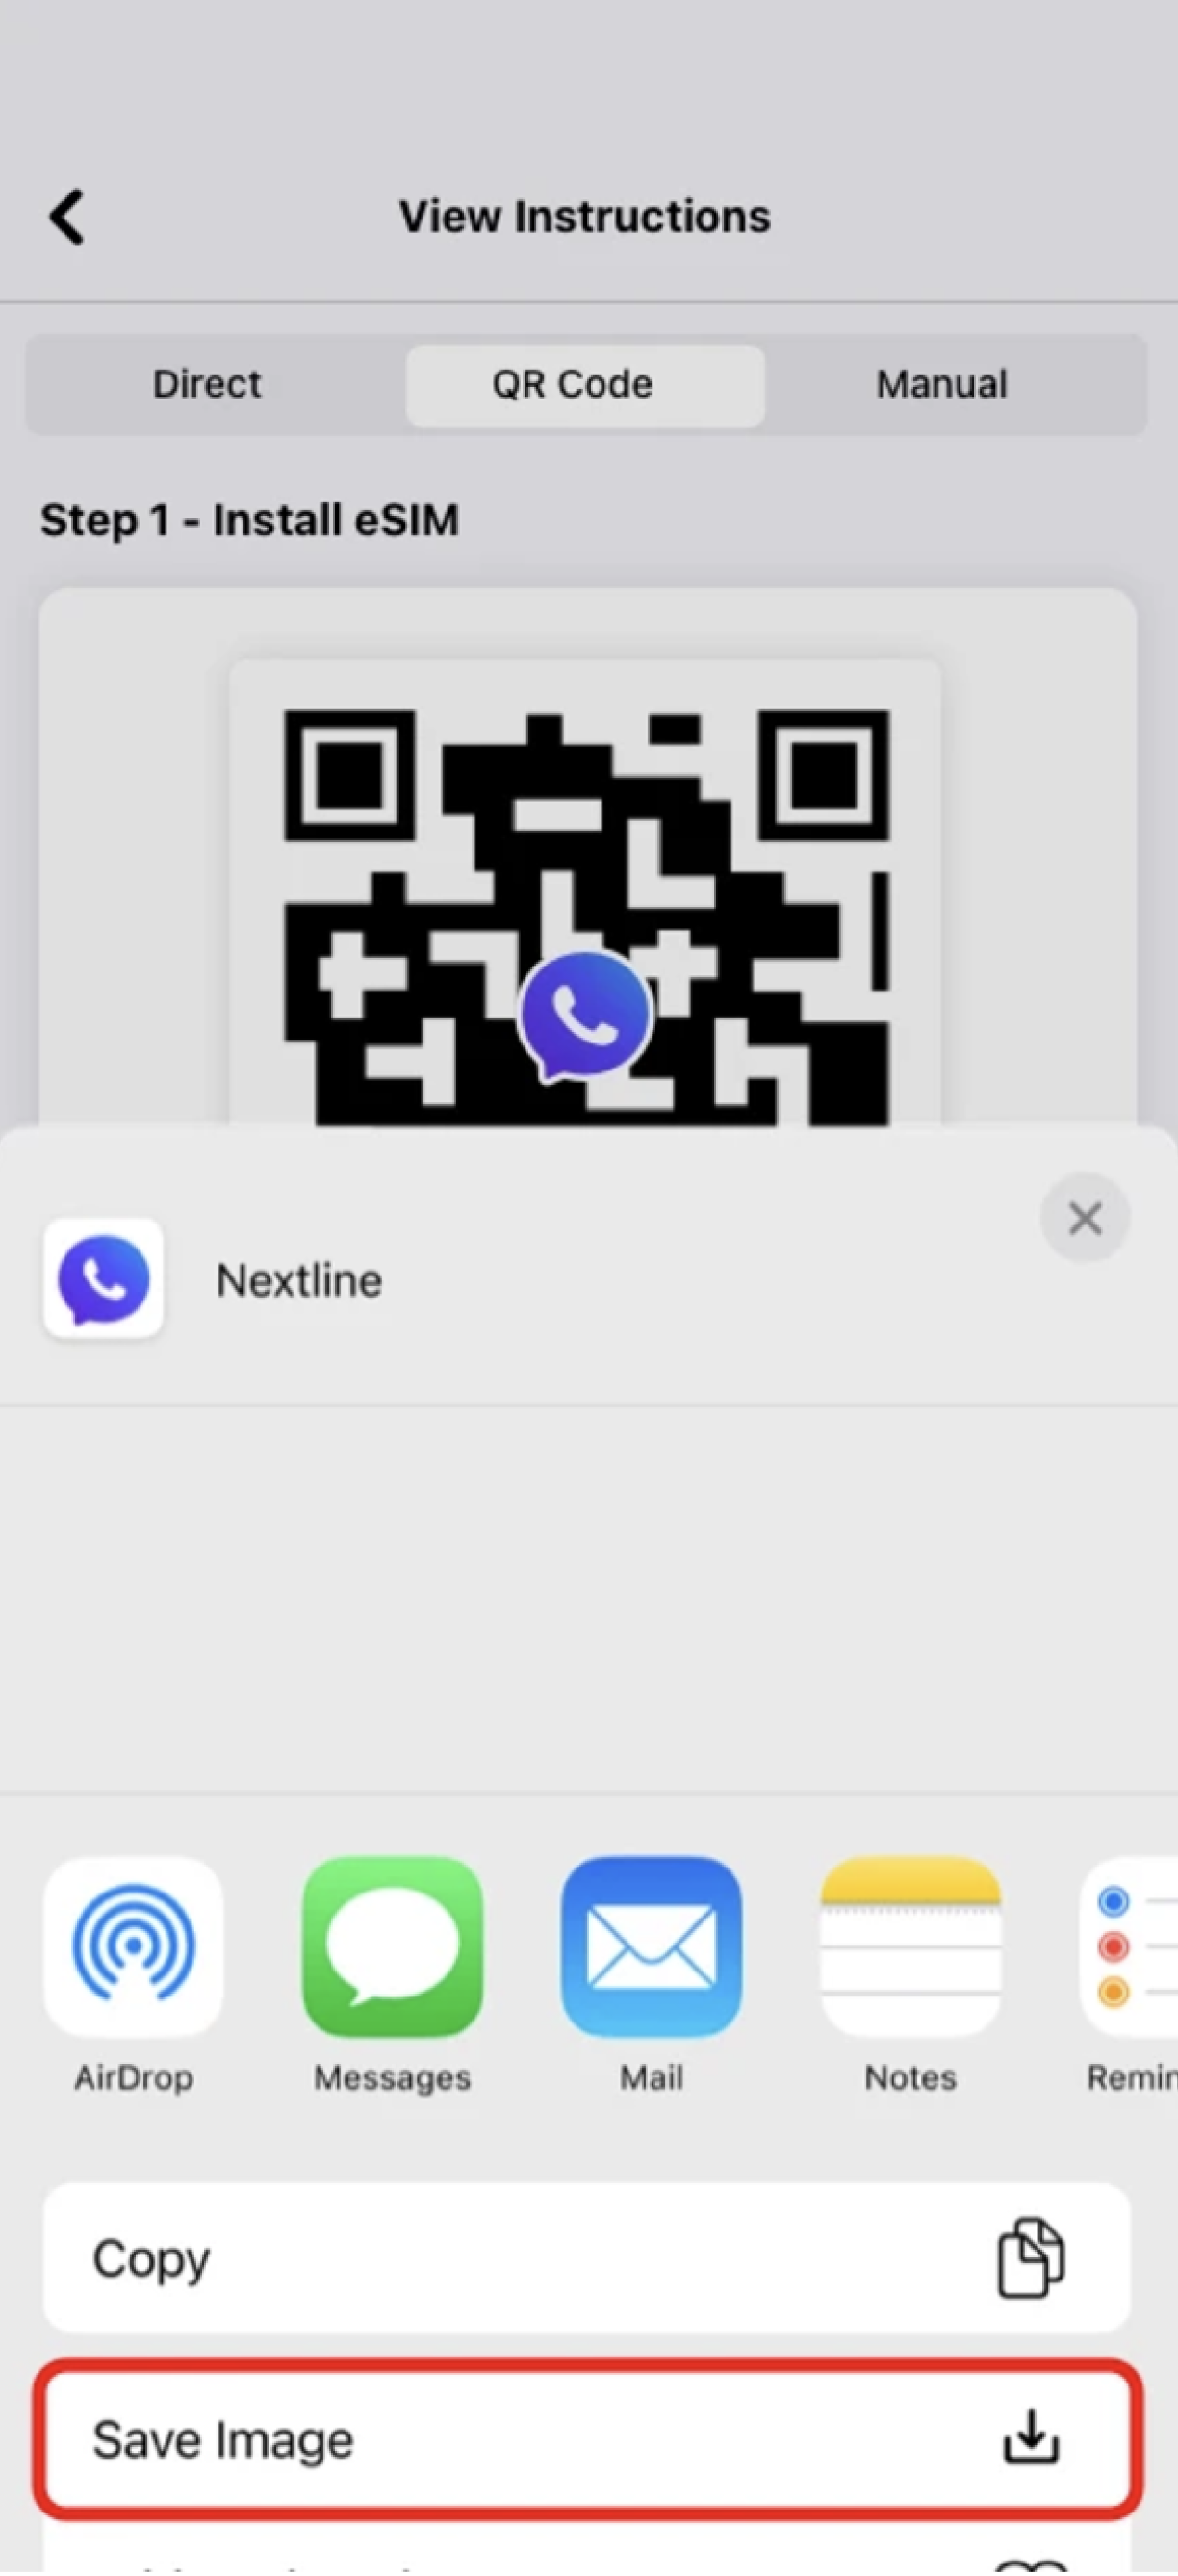
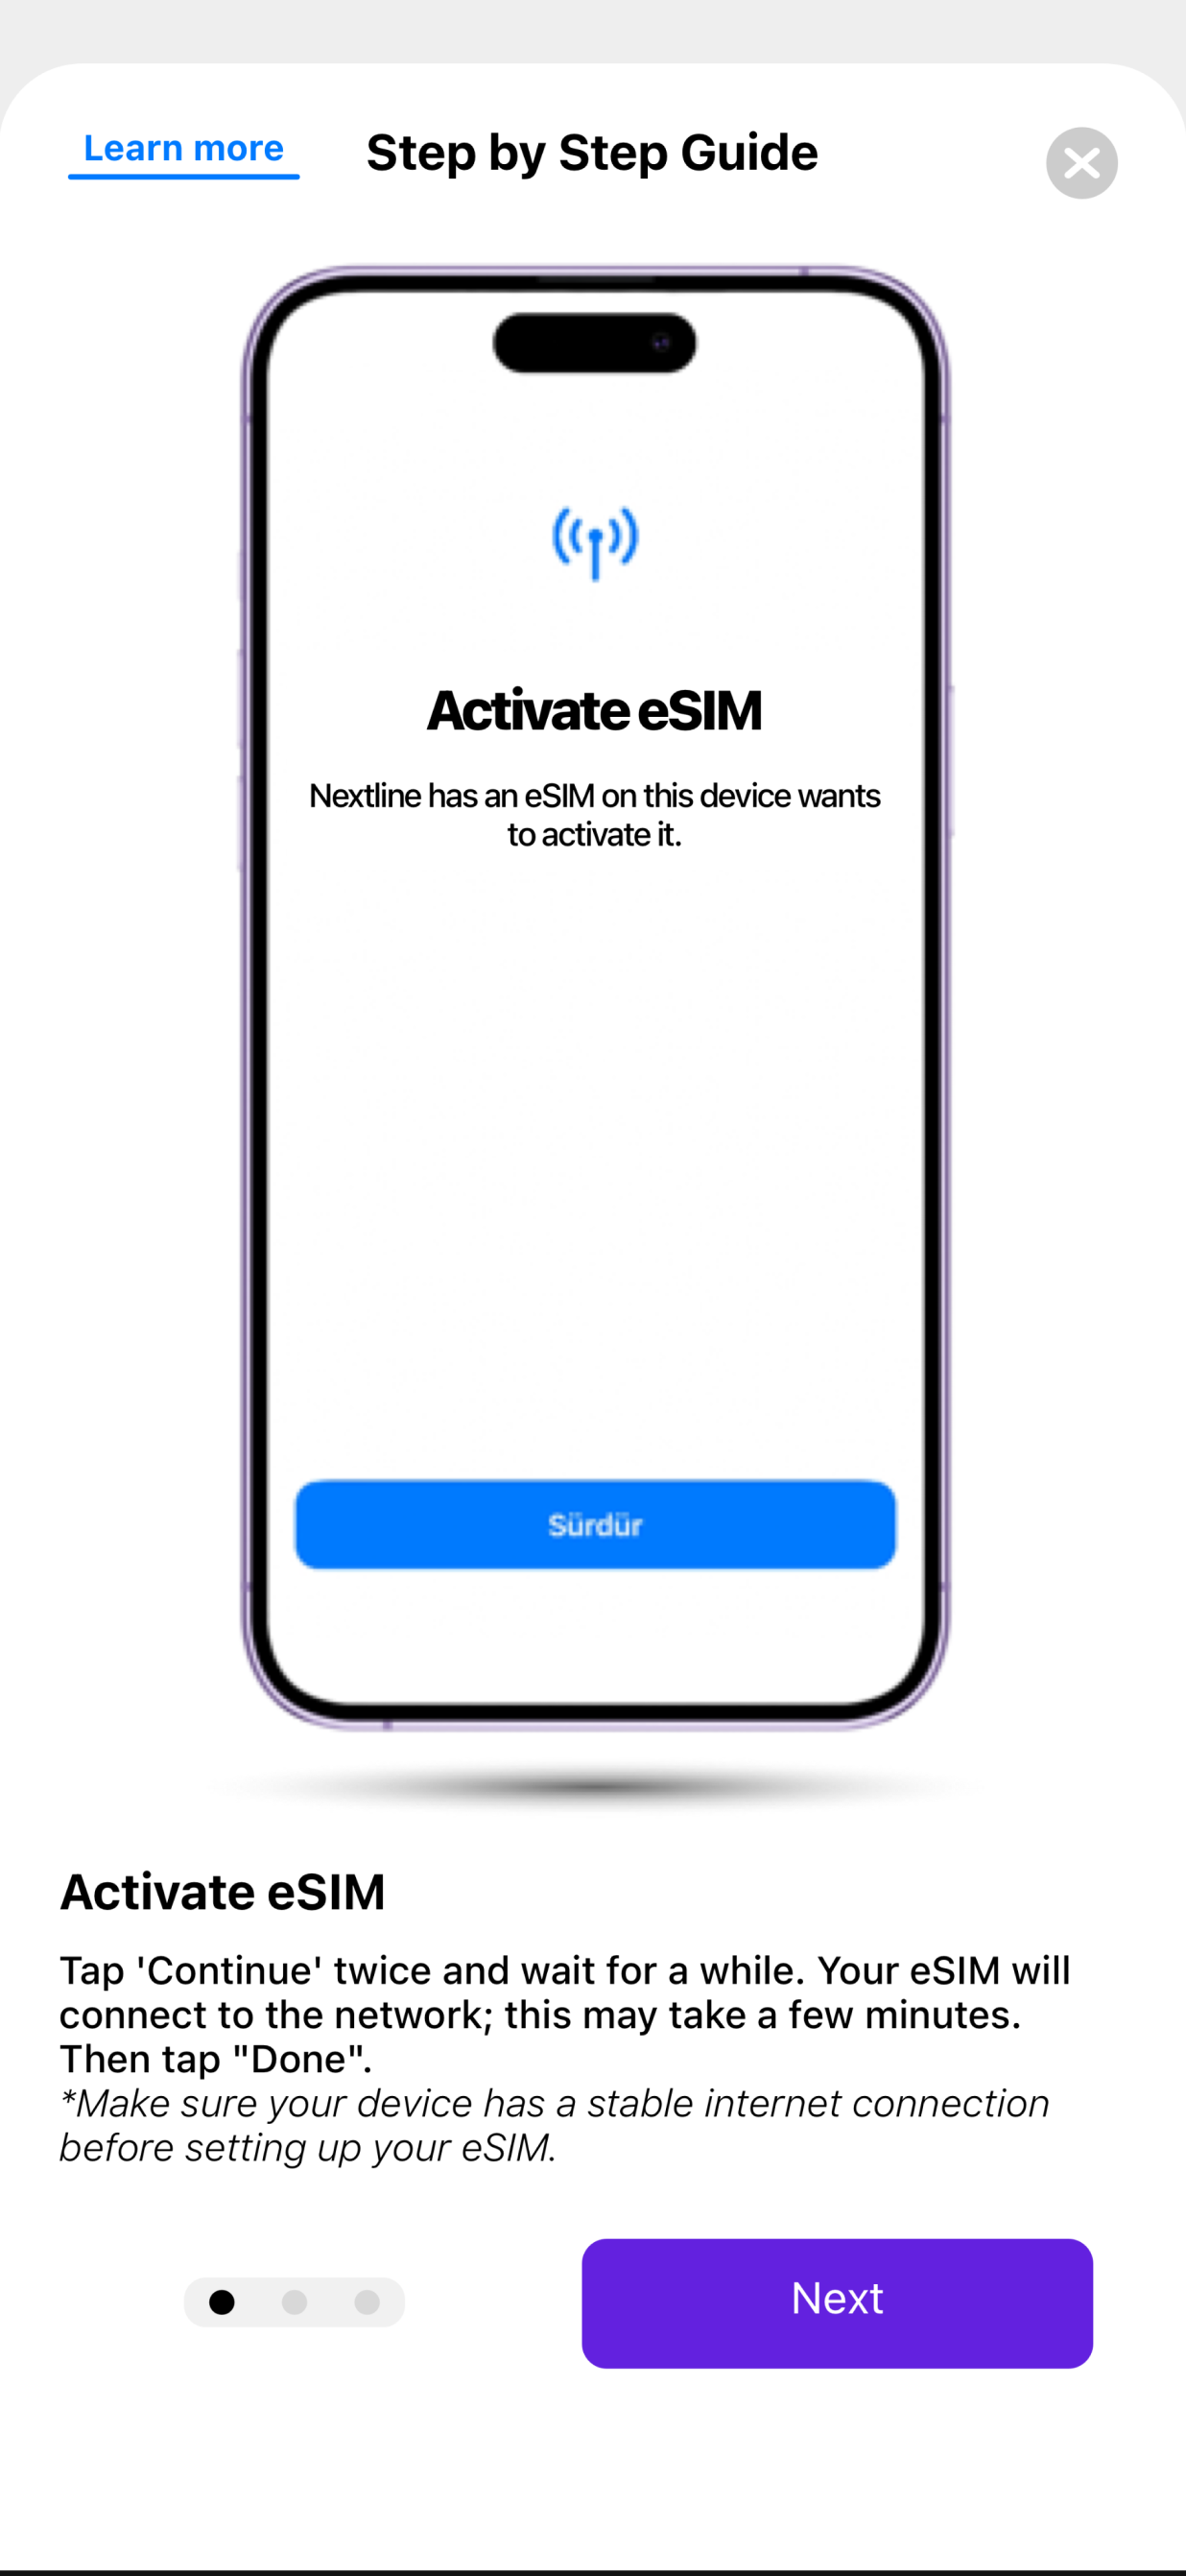
I. INSTALLATION- OPEN the Nextline app.
- TAP My eSIMs.
- TAP the eSIM you want to install.
- TAP View Instructions.
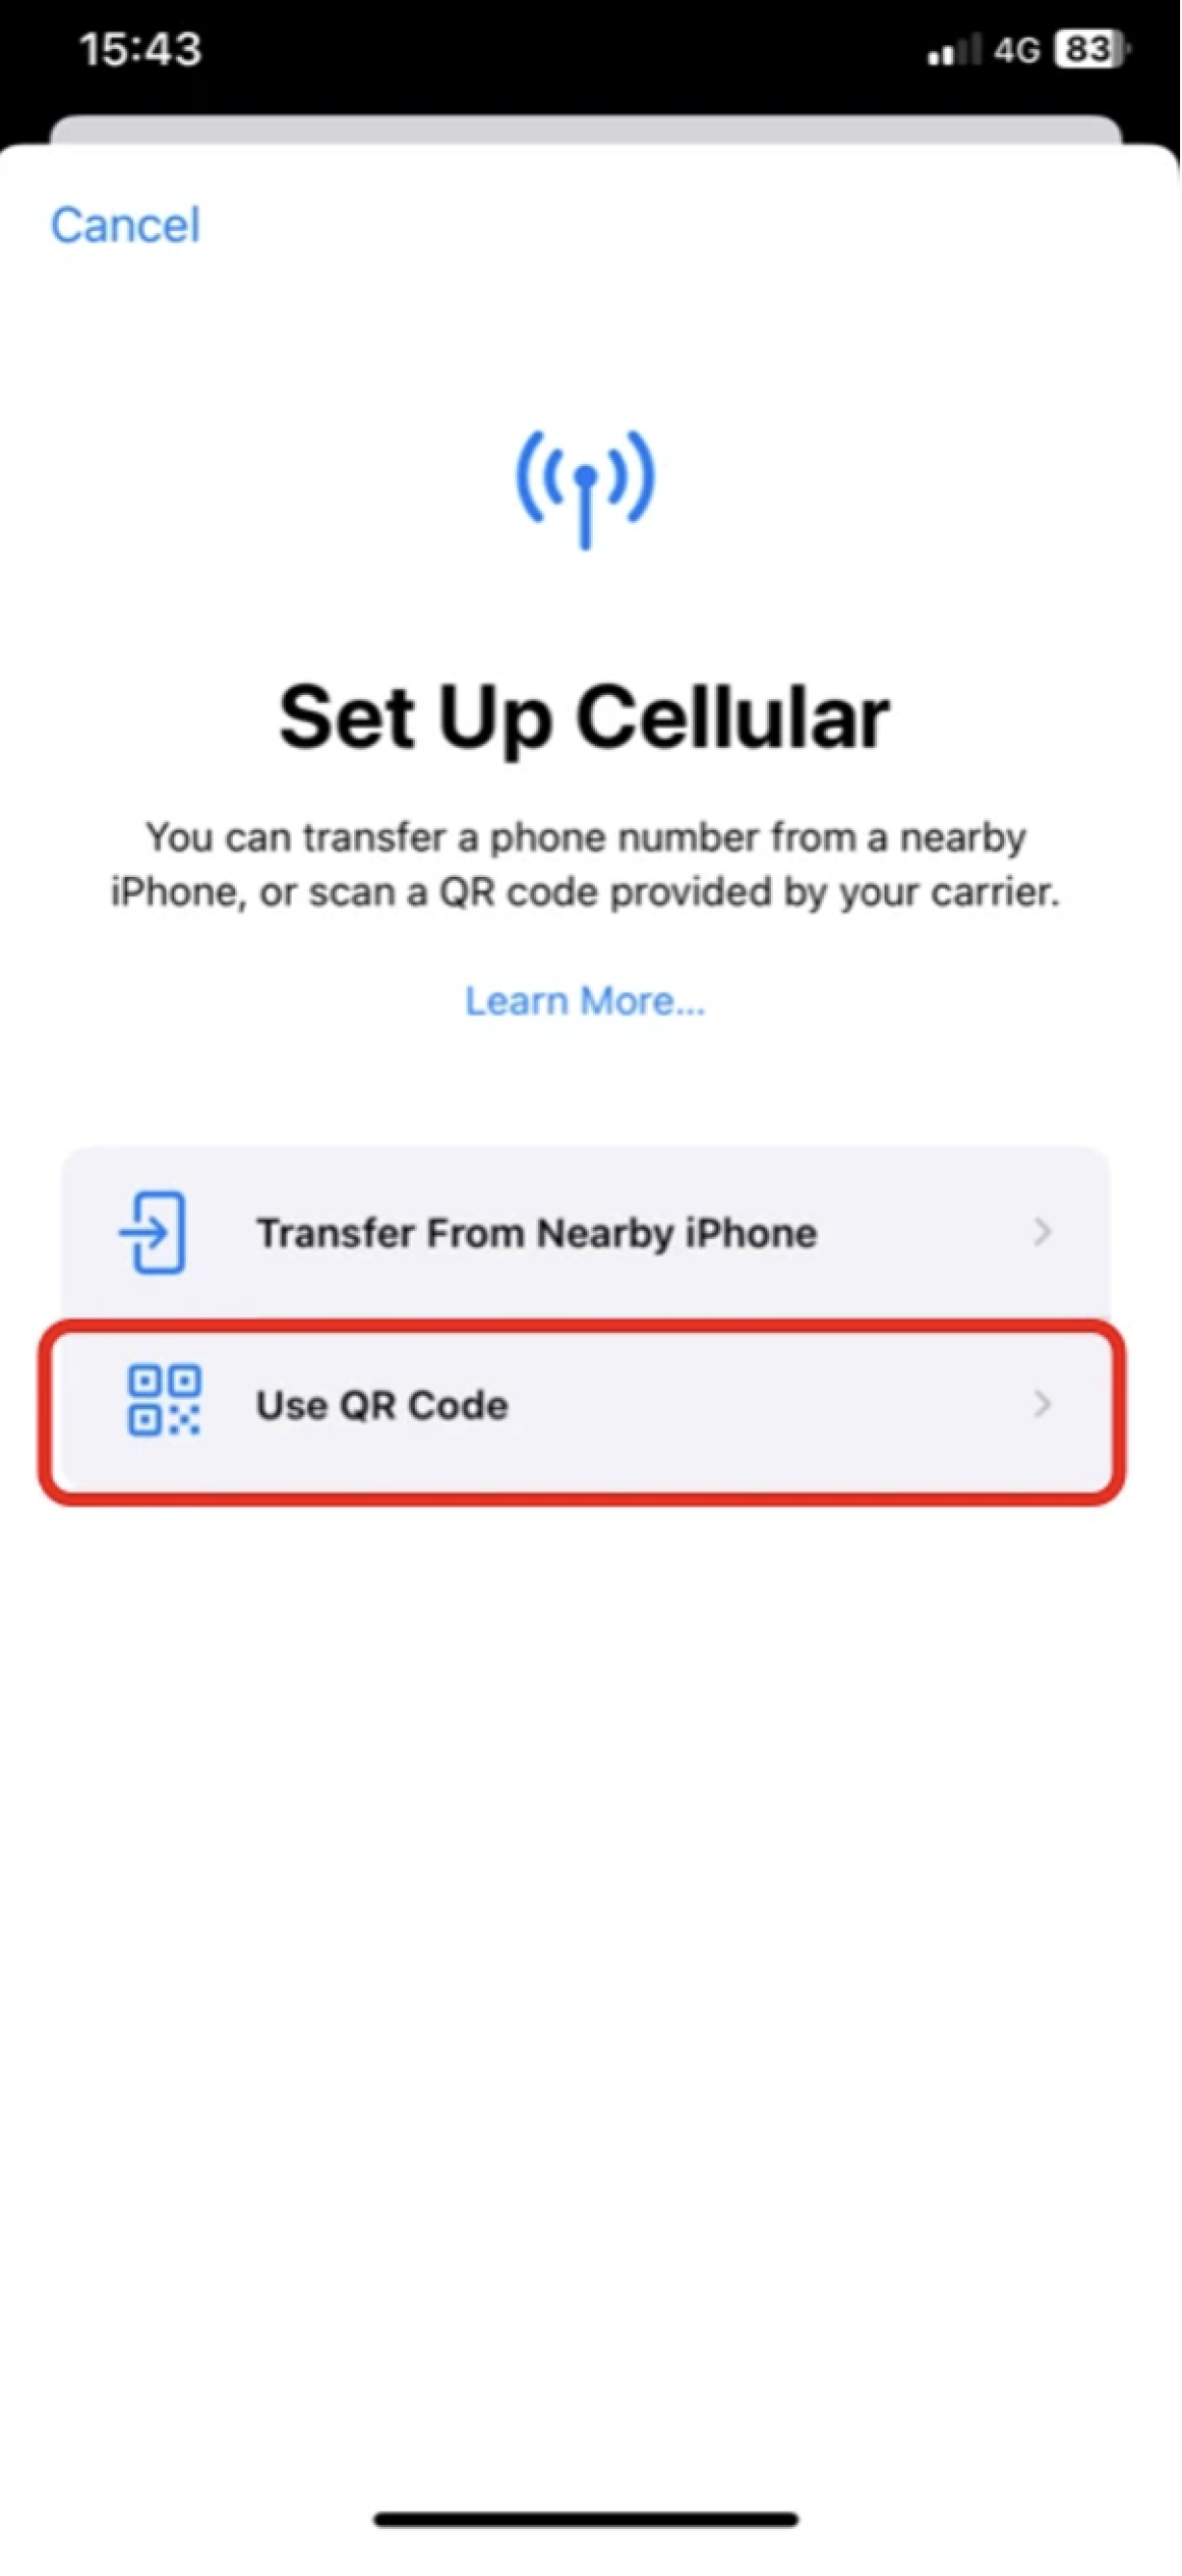
- TAP QR Code.
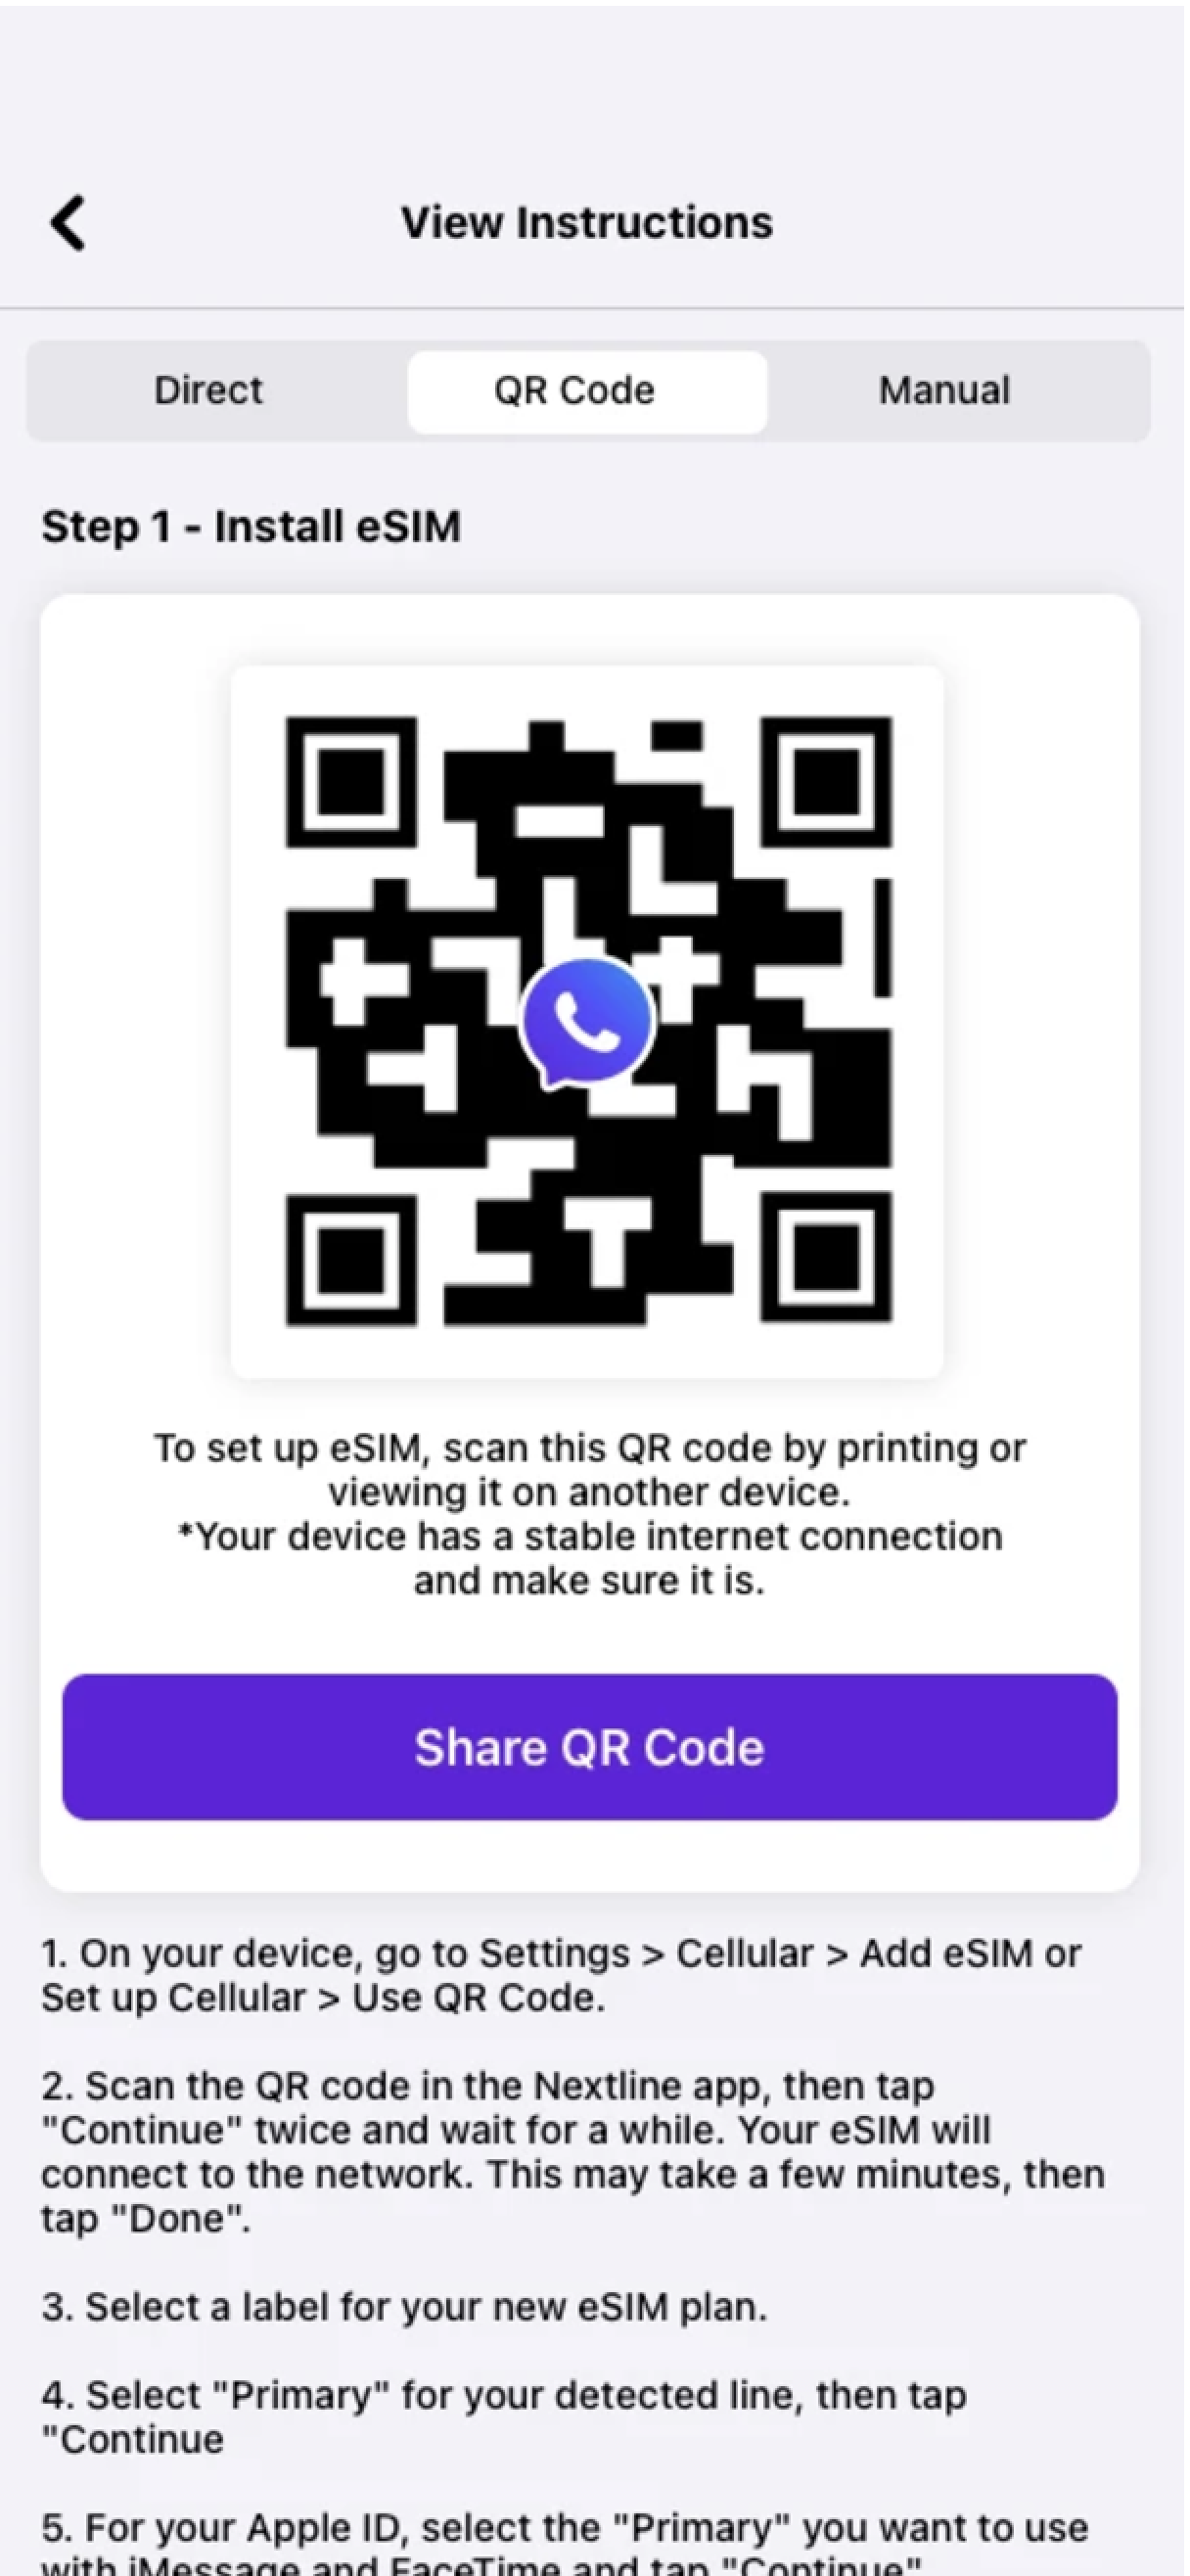
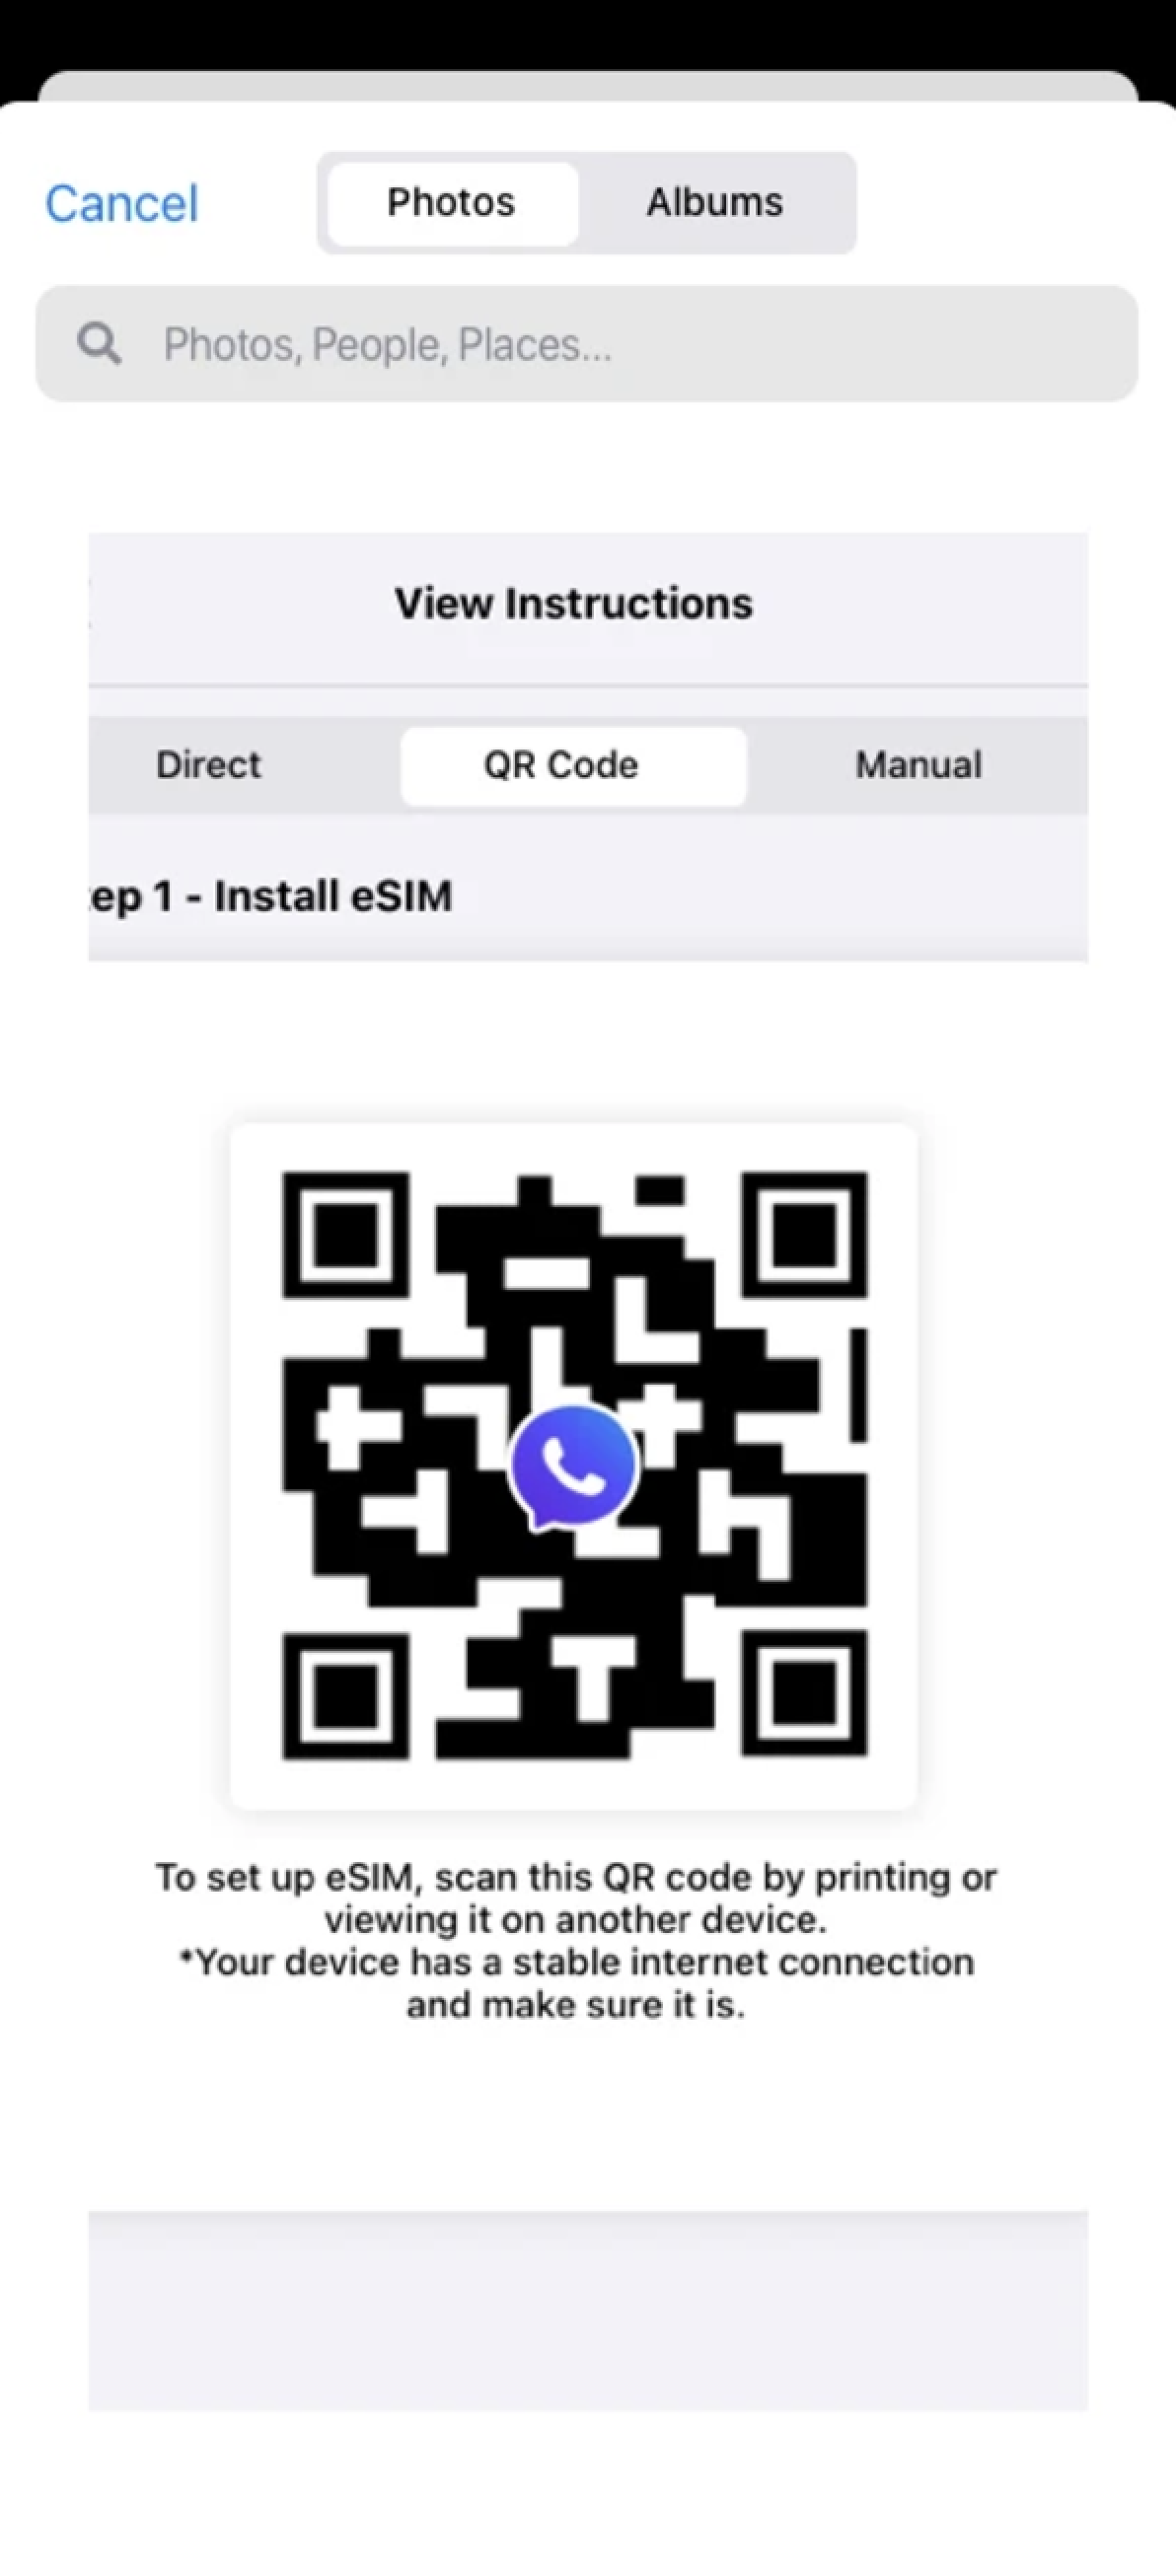
- TAP Share QR Code, then TAP Save Image.
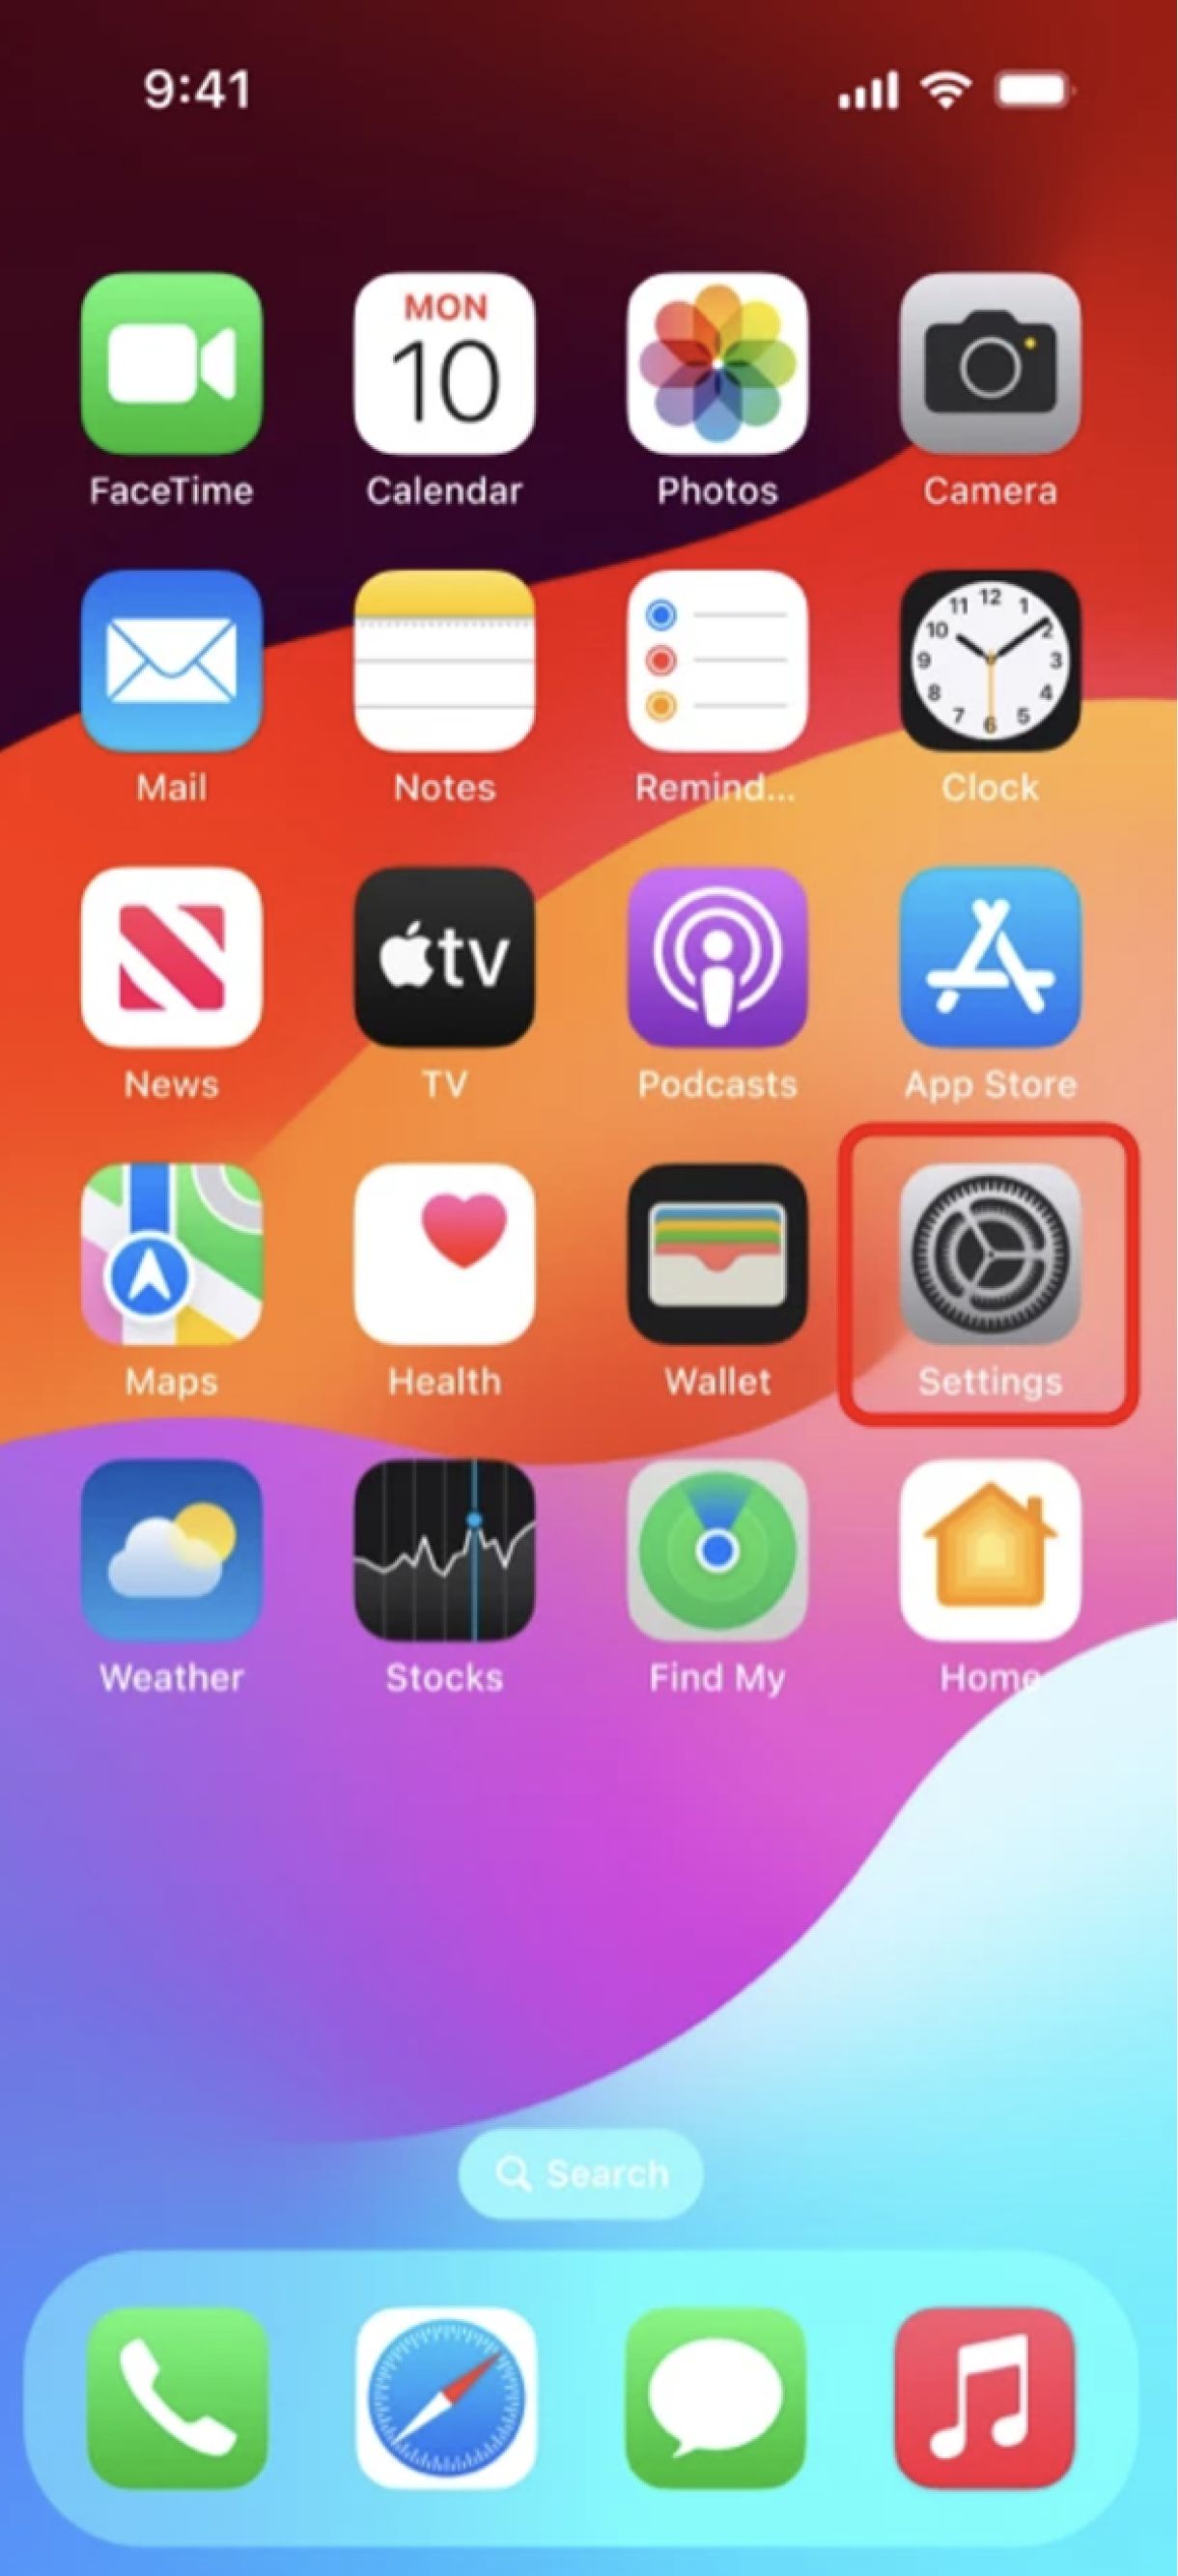
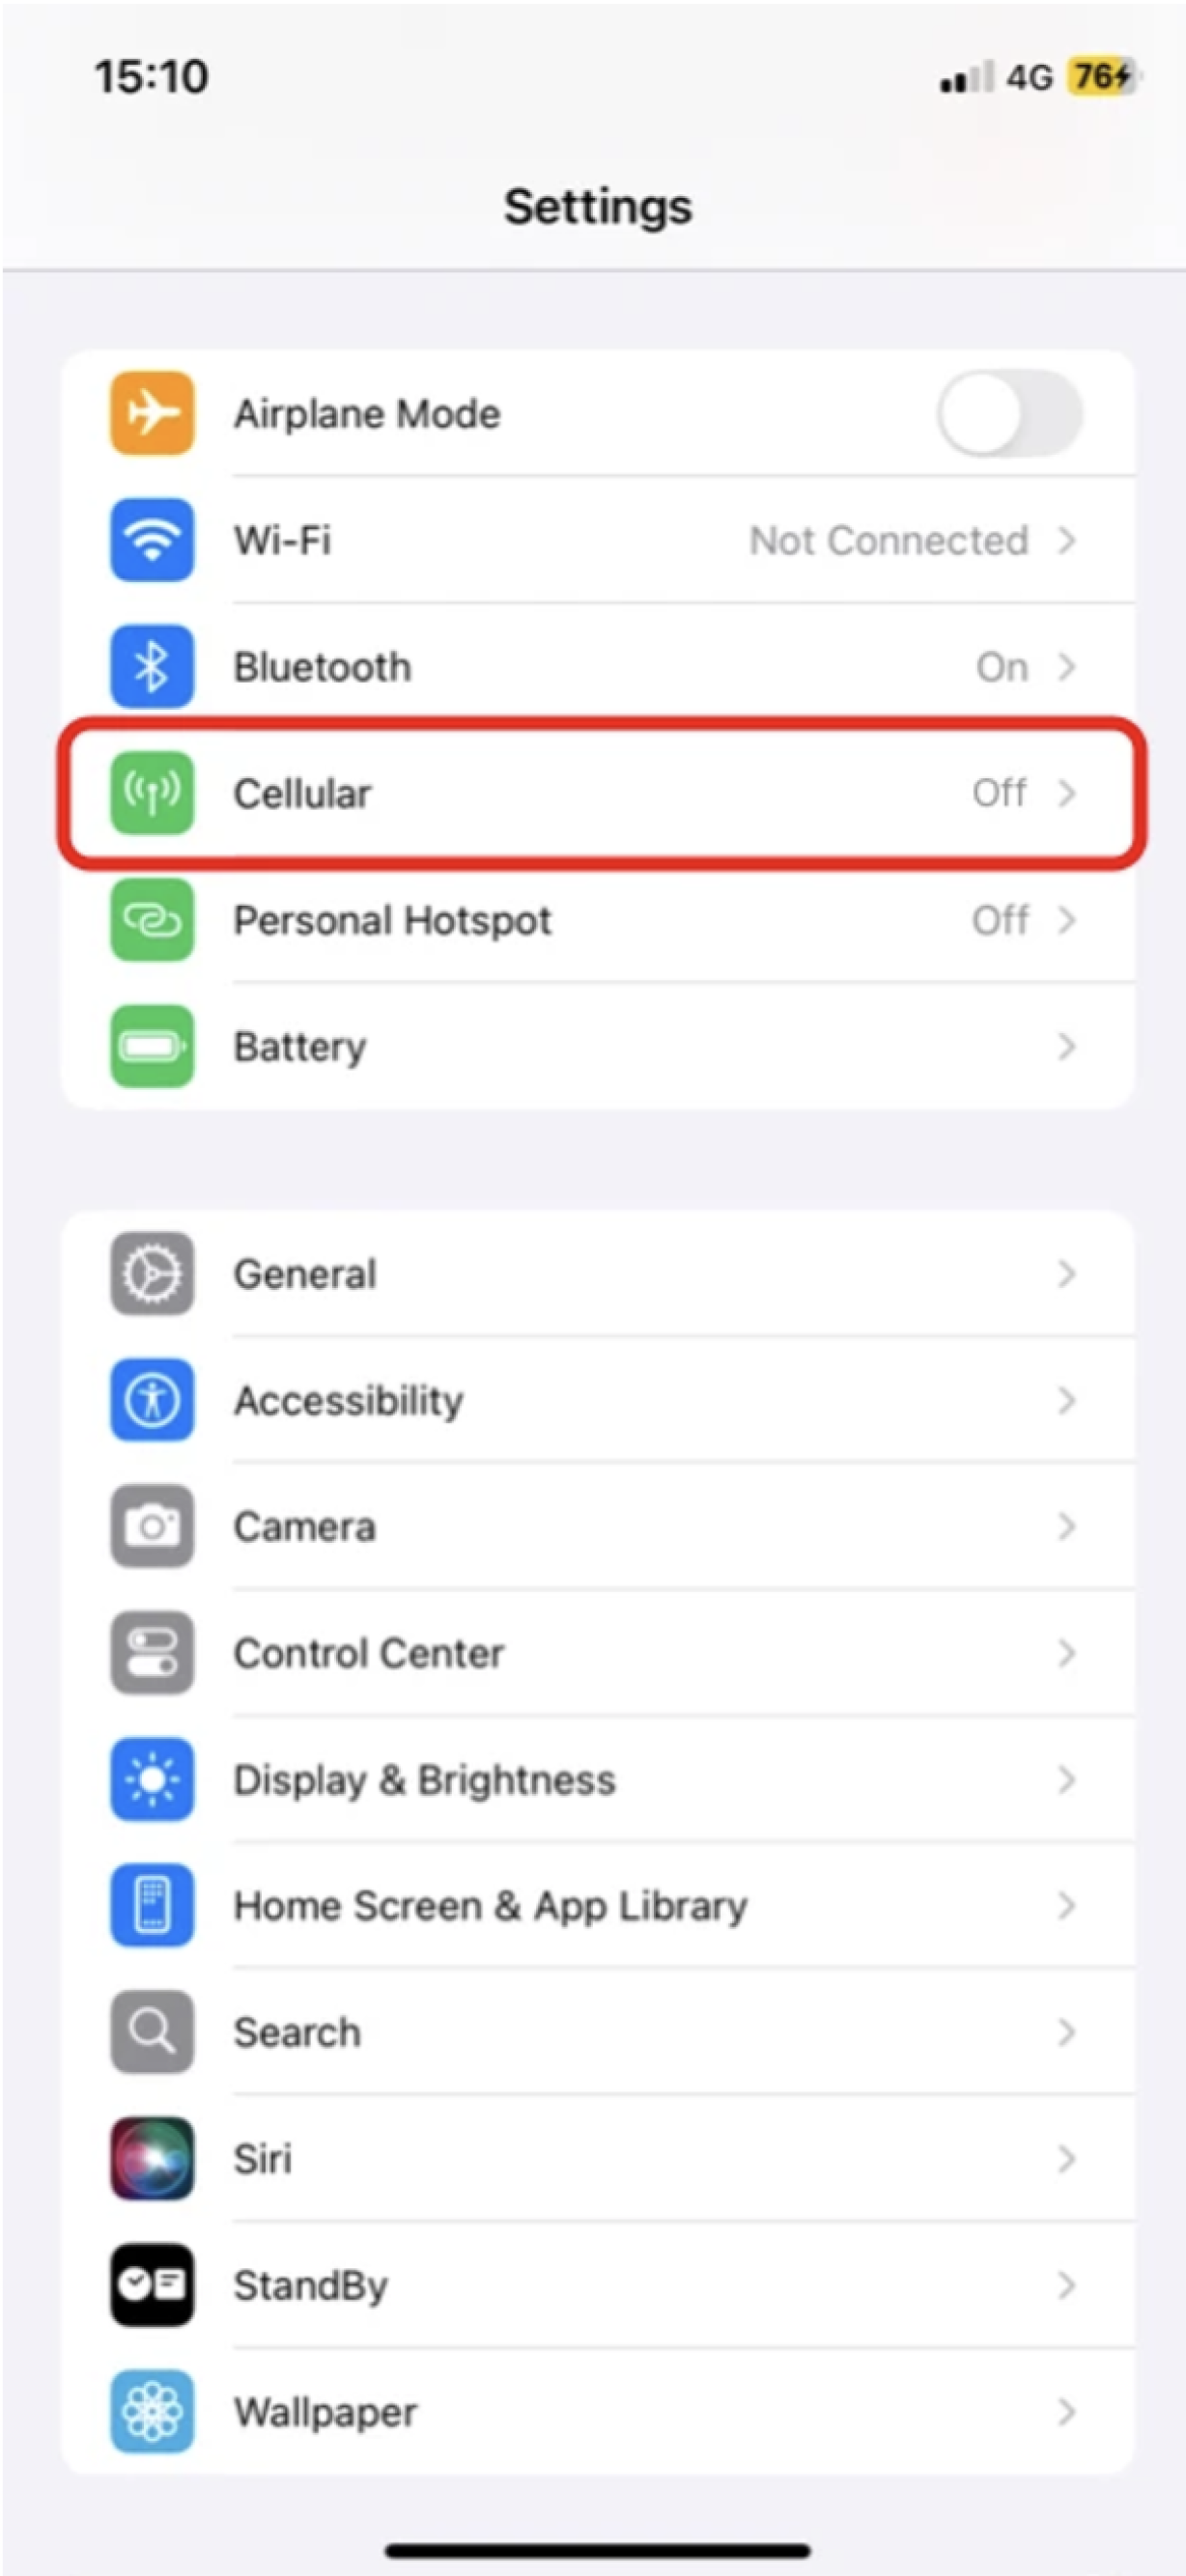
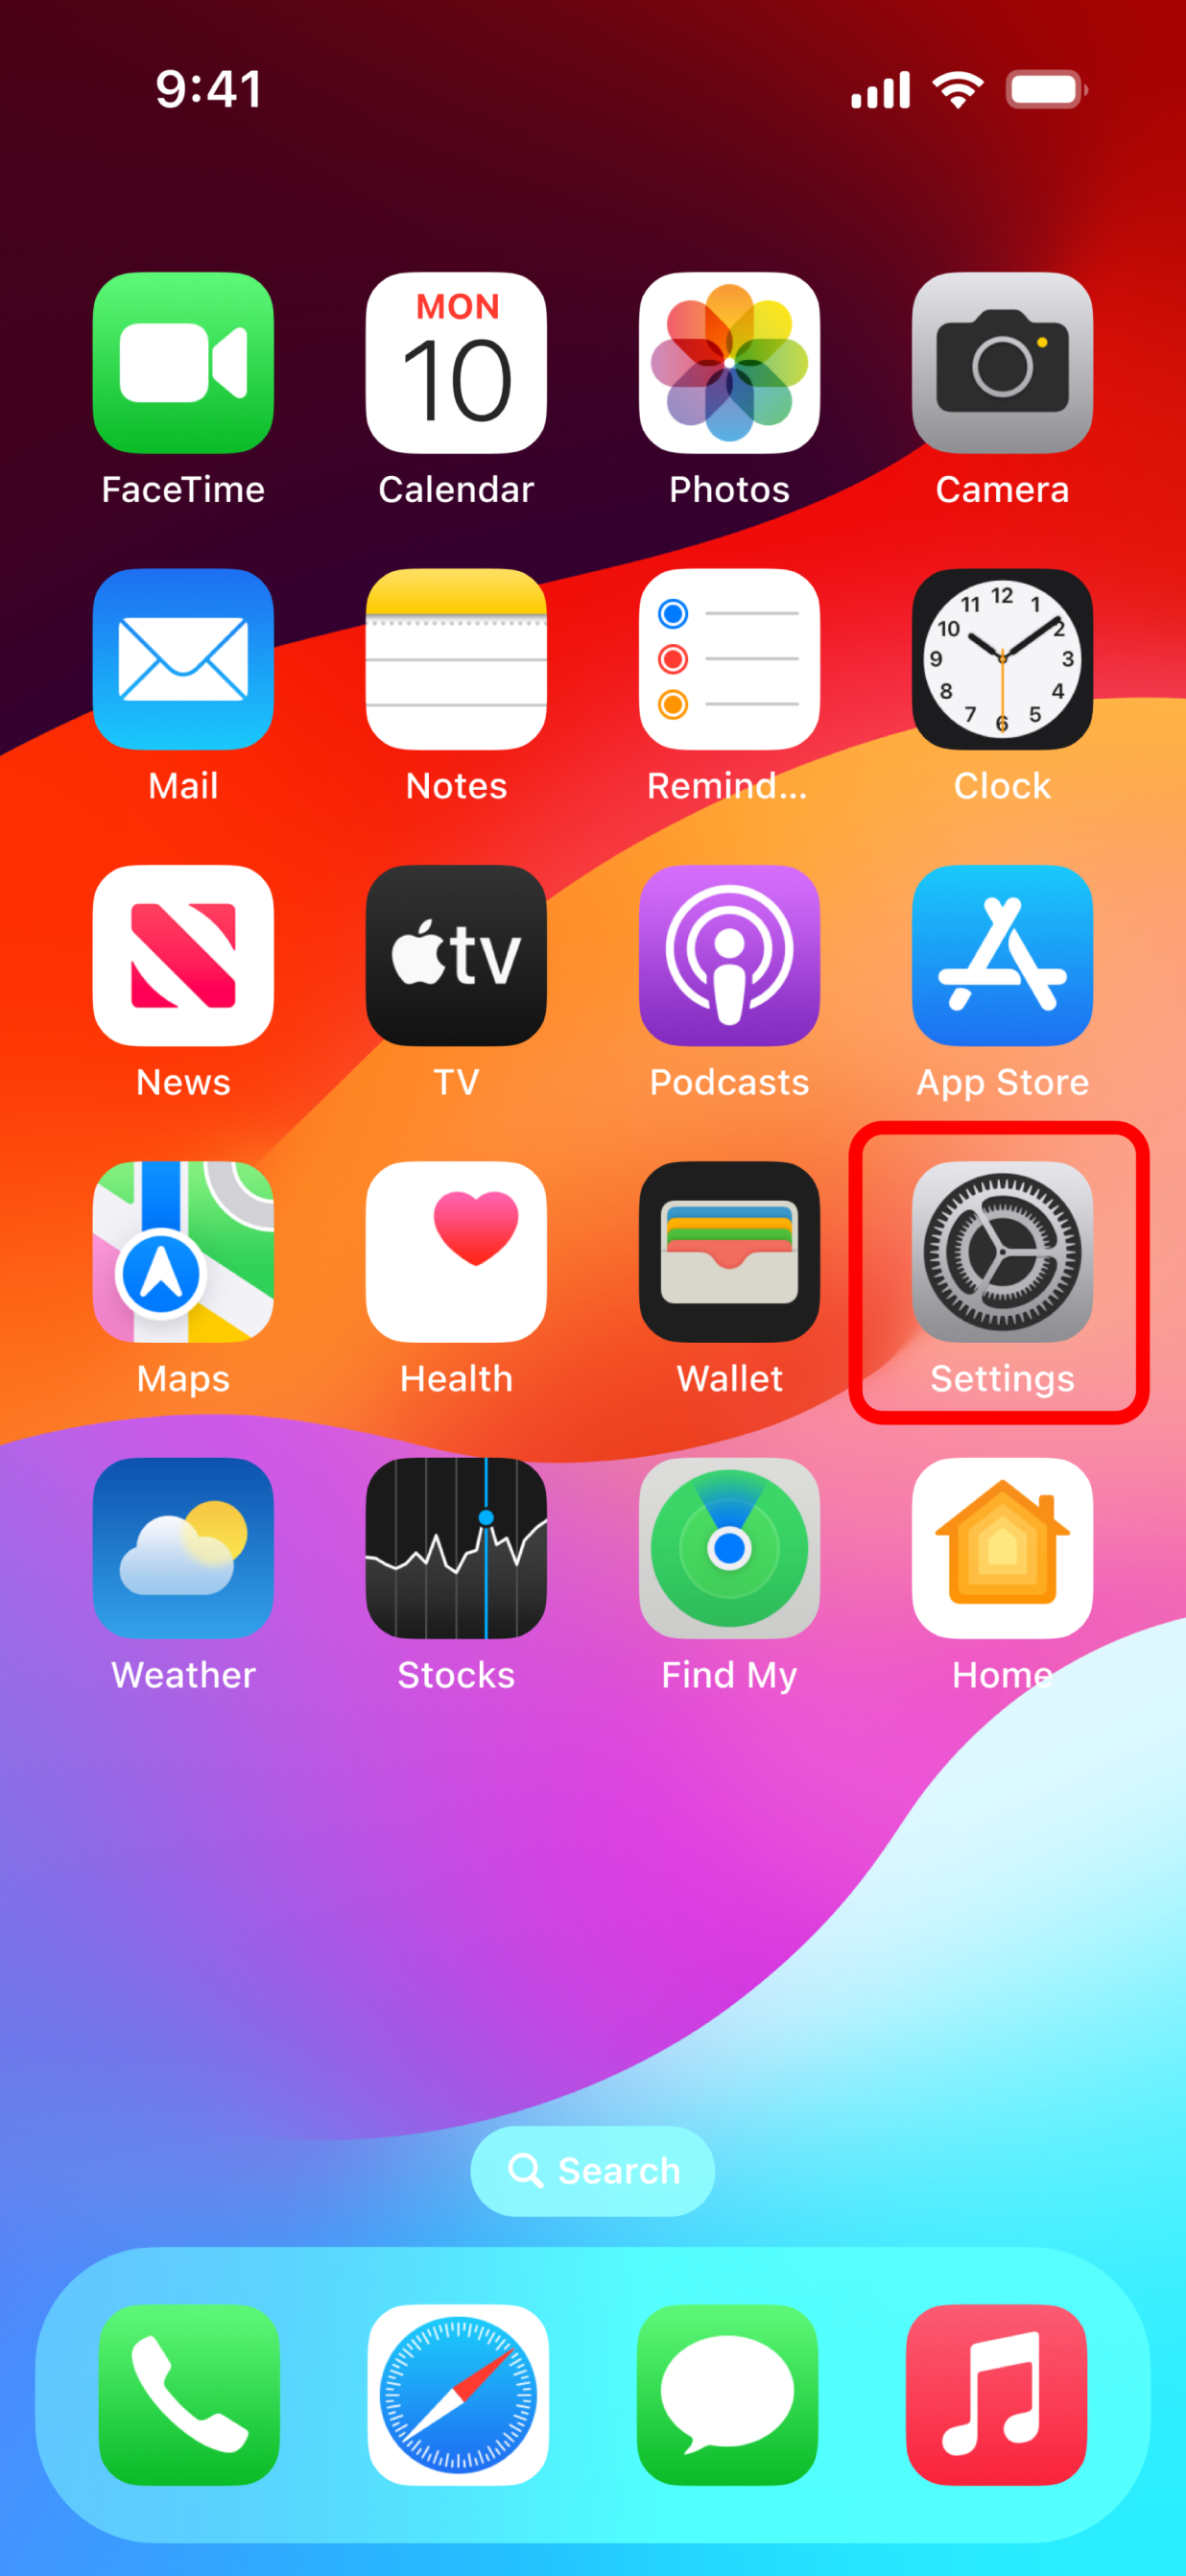
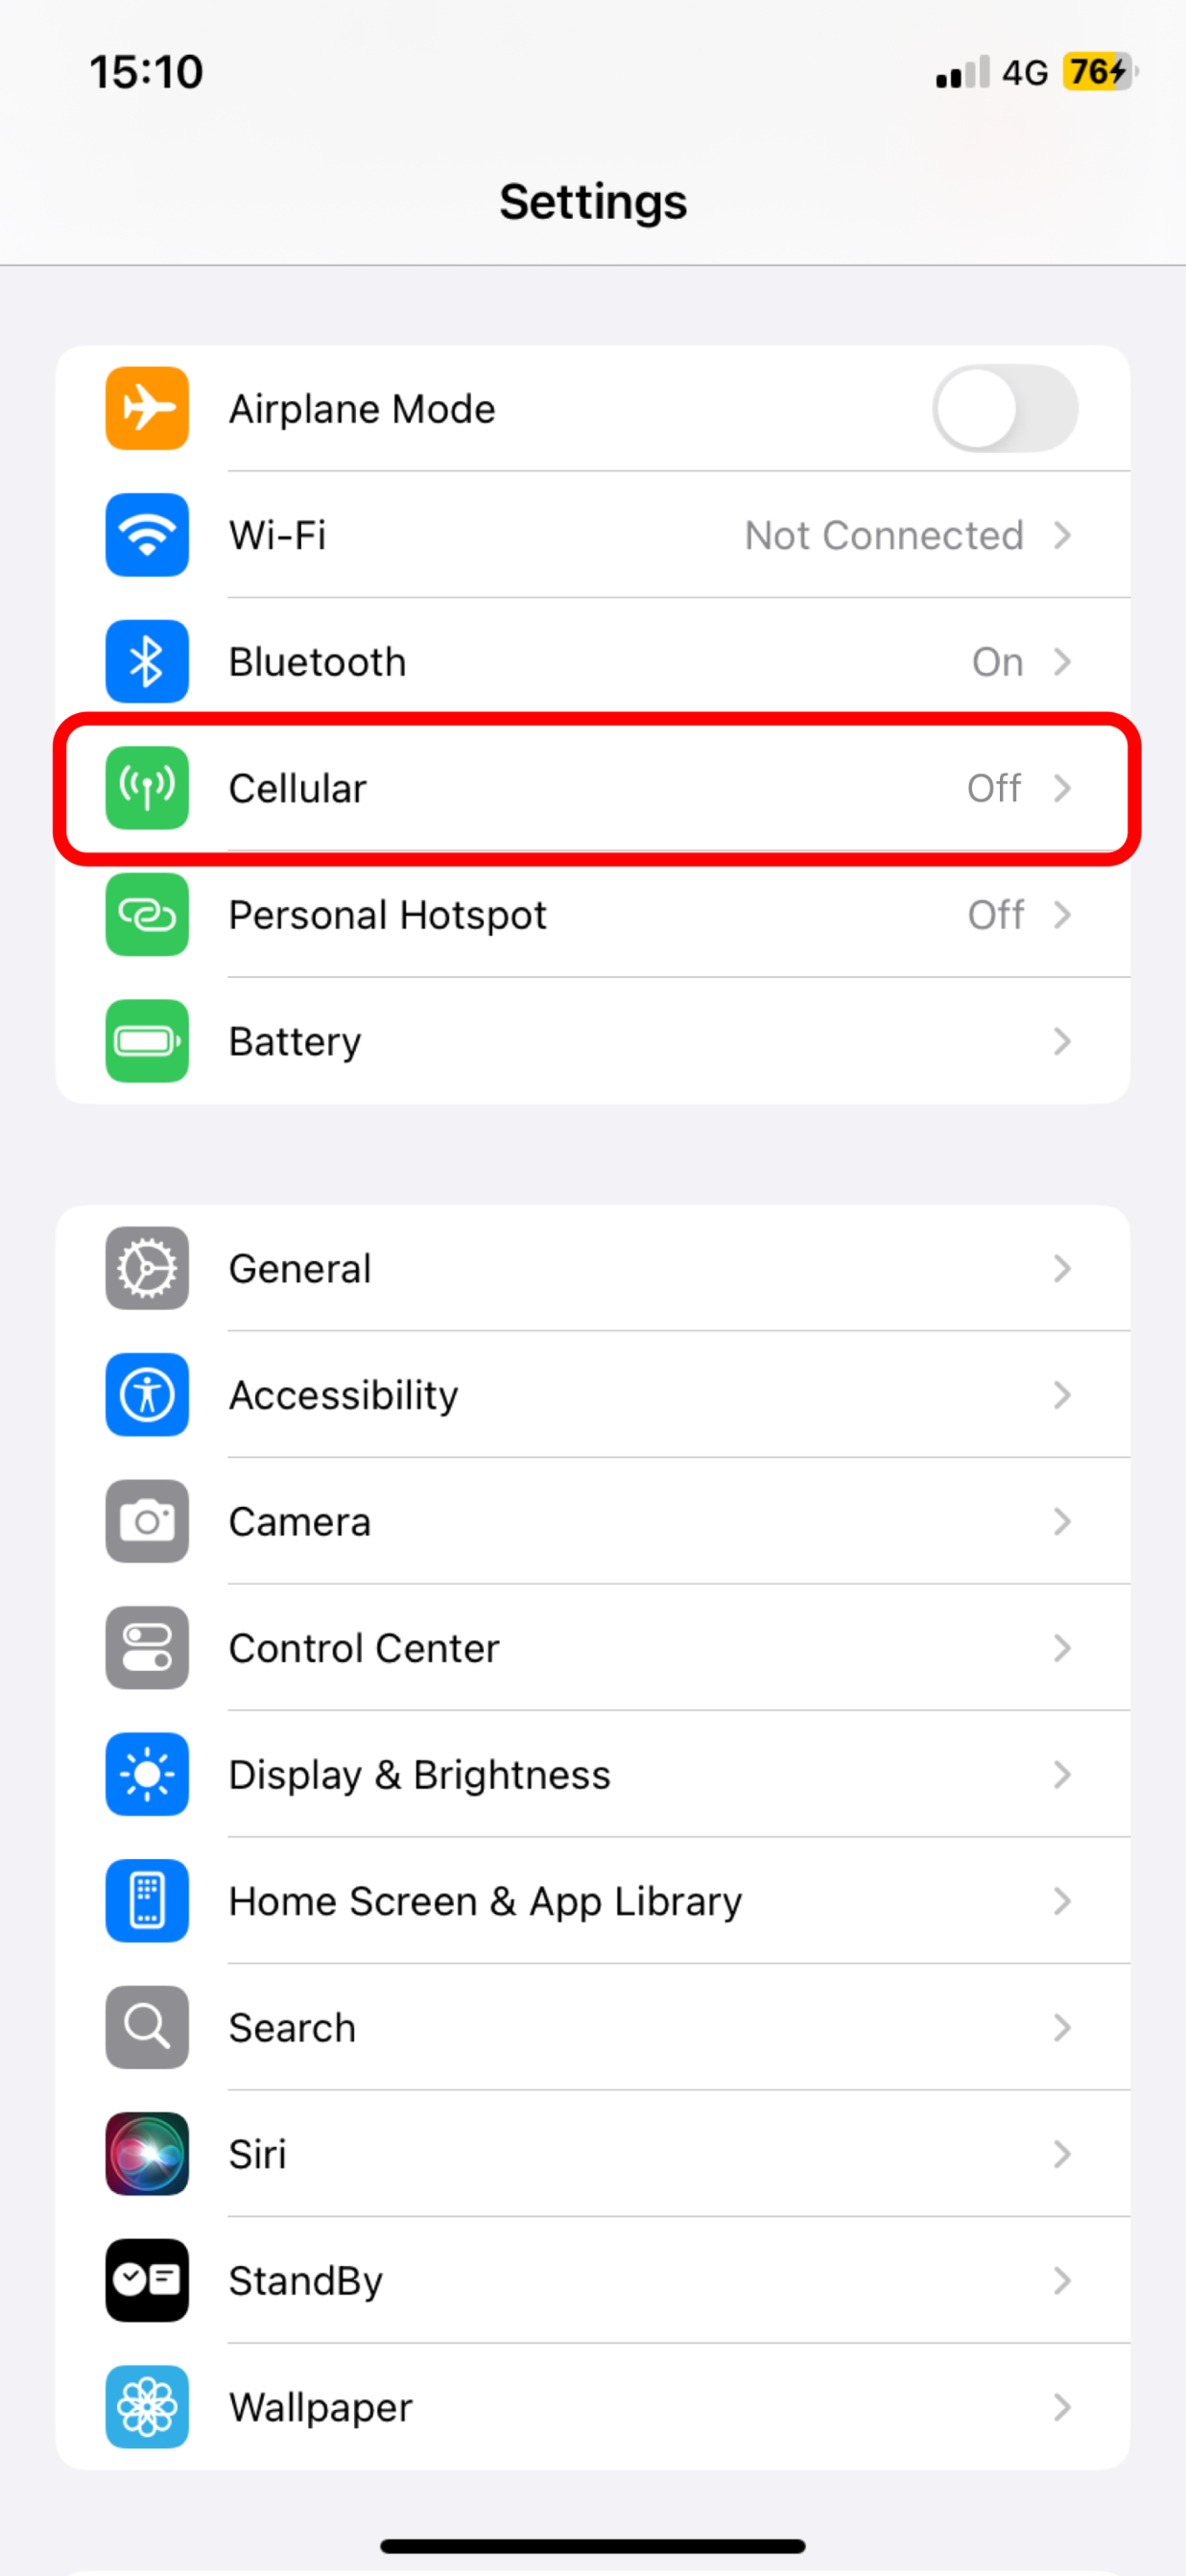
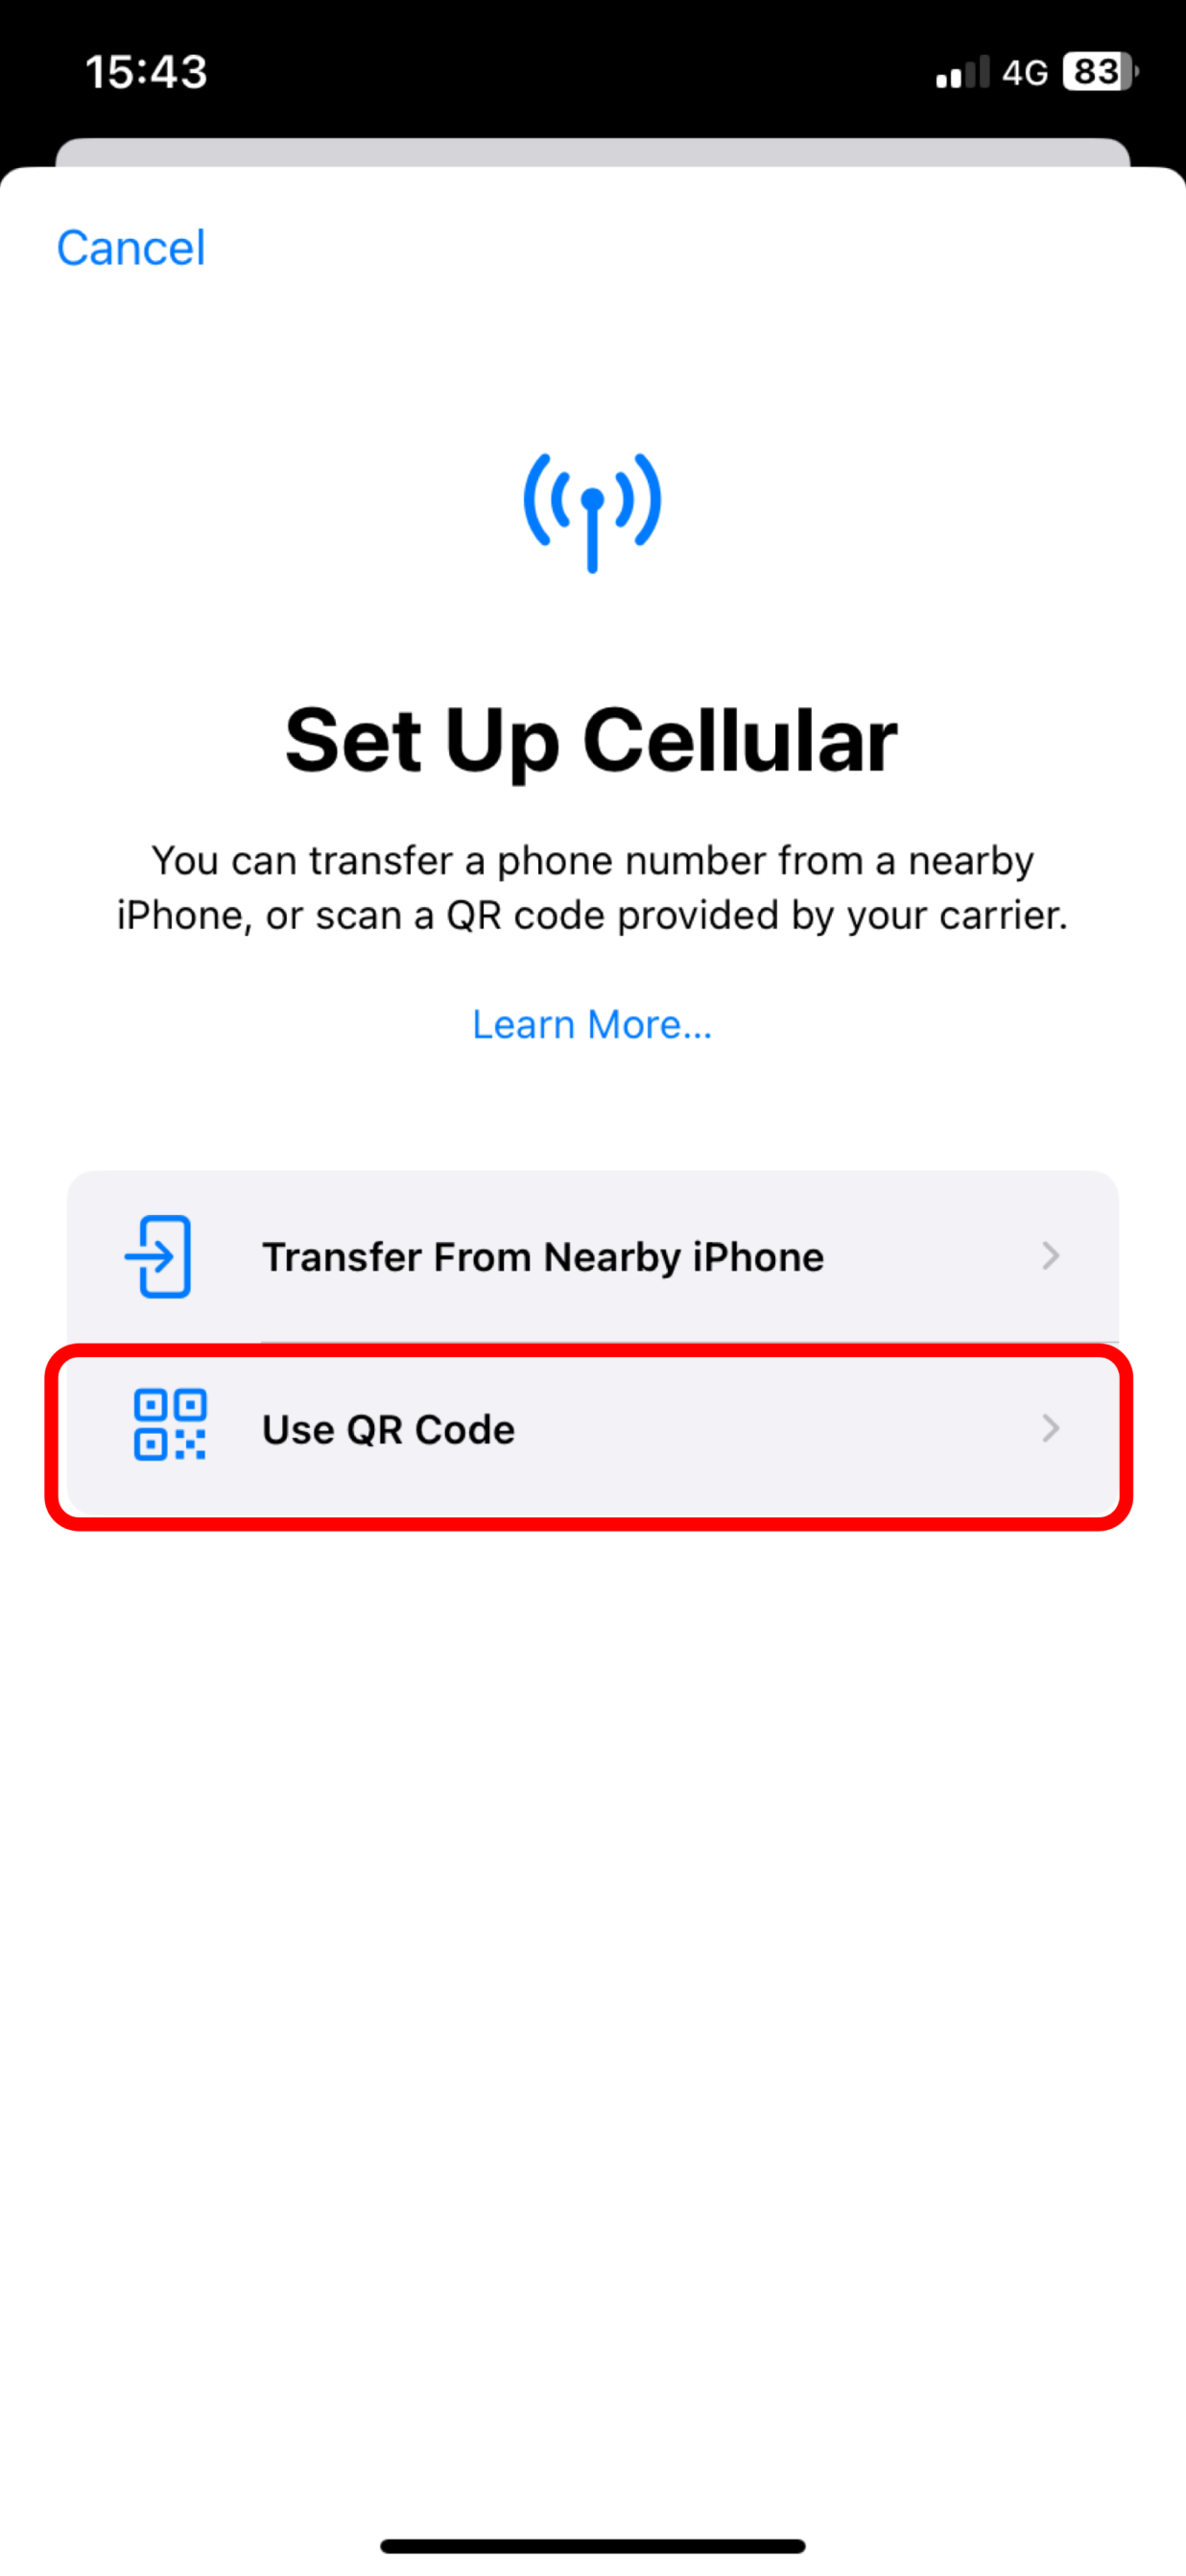
- EXIT the Nextline app, then GO to Settings.
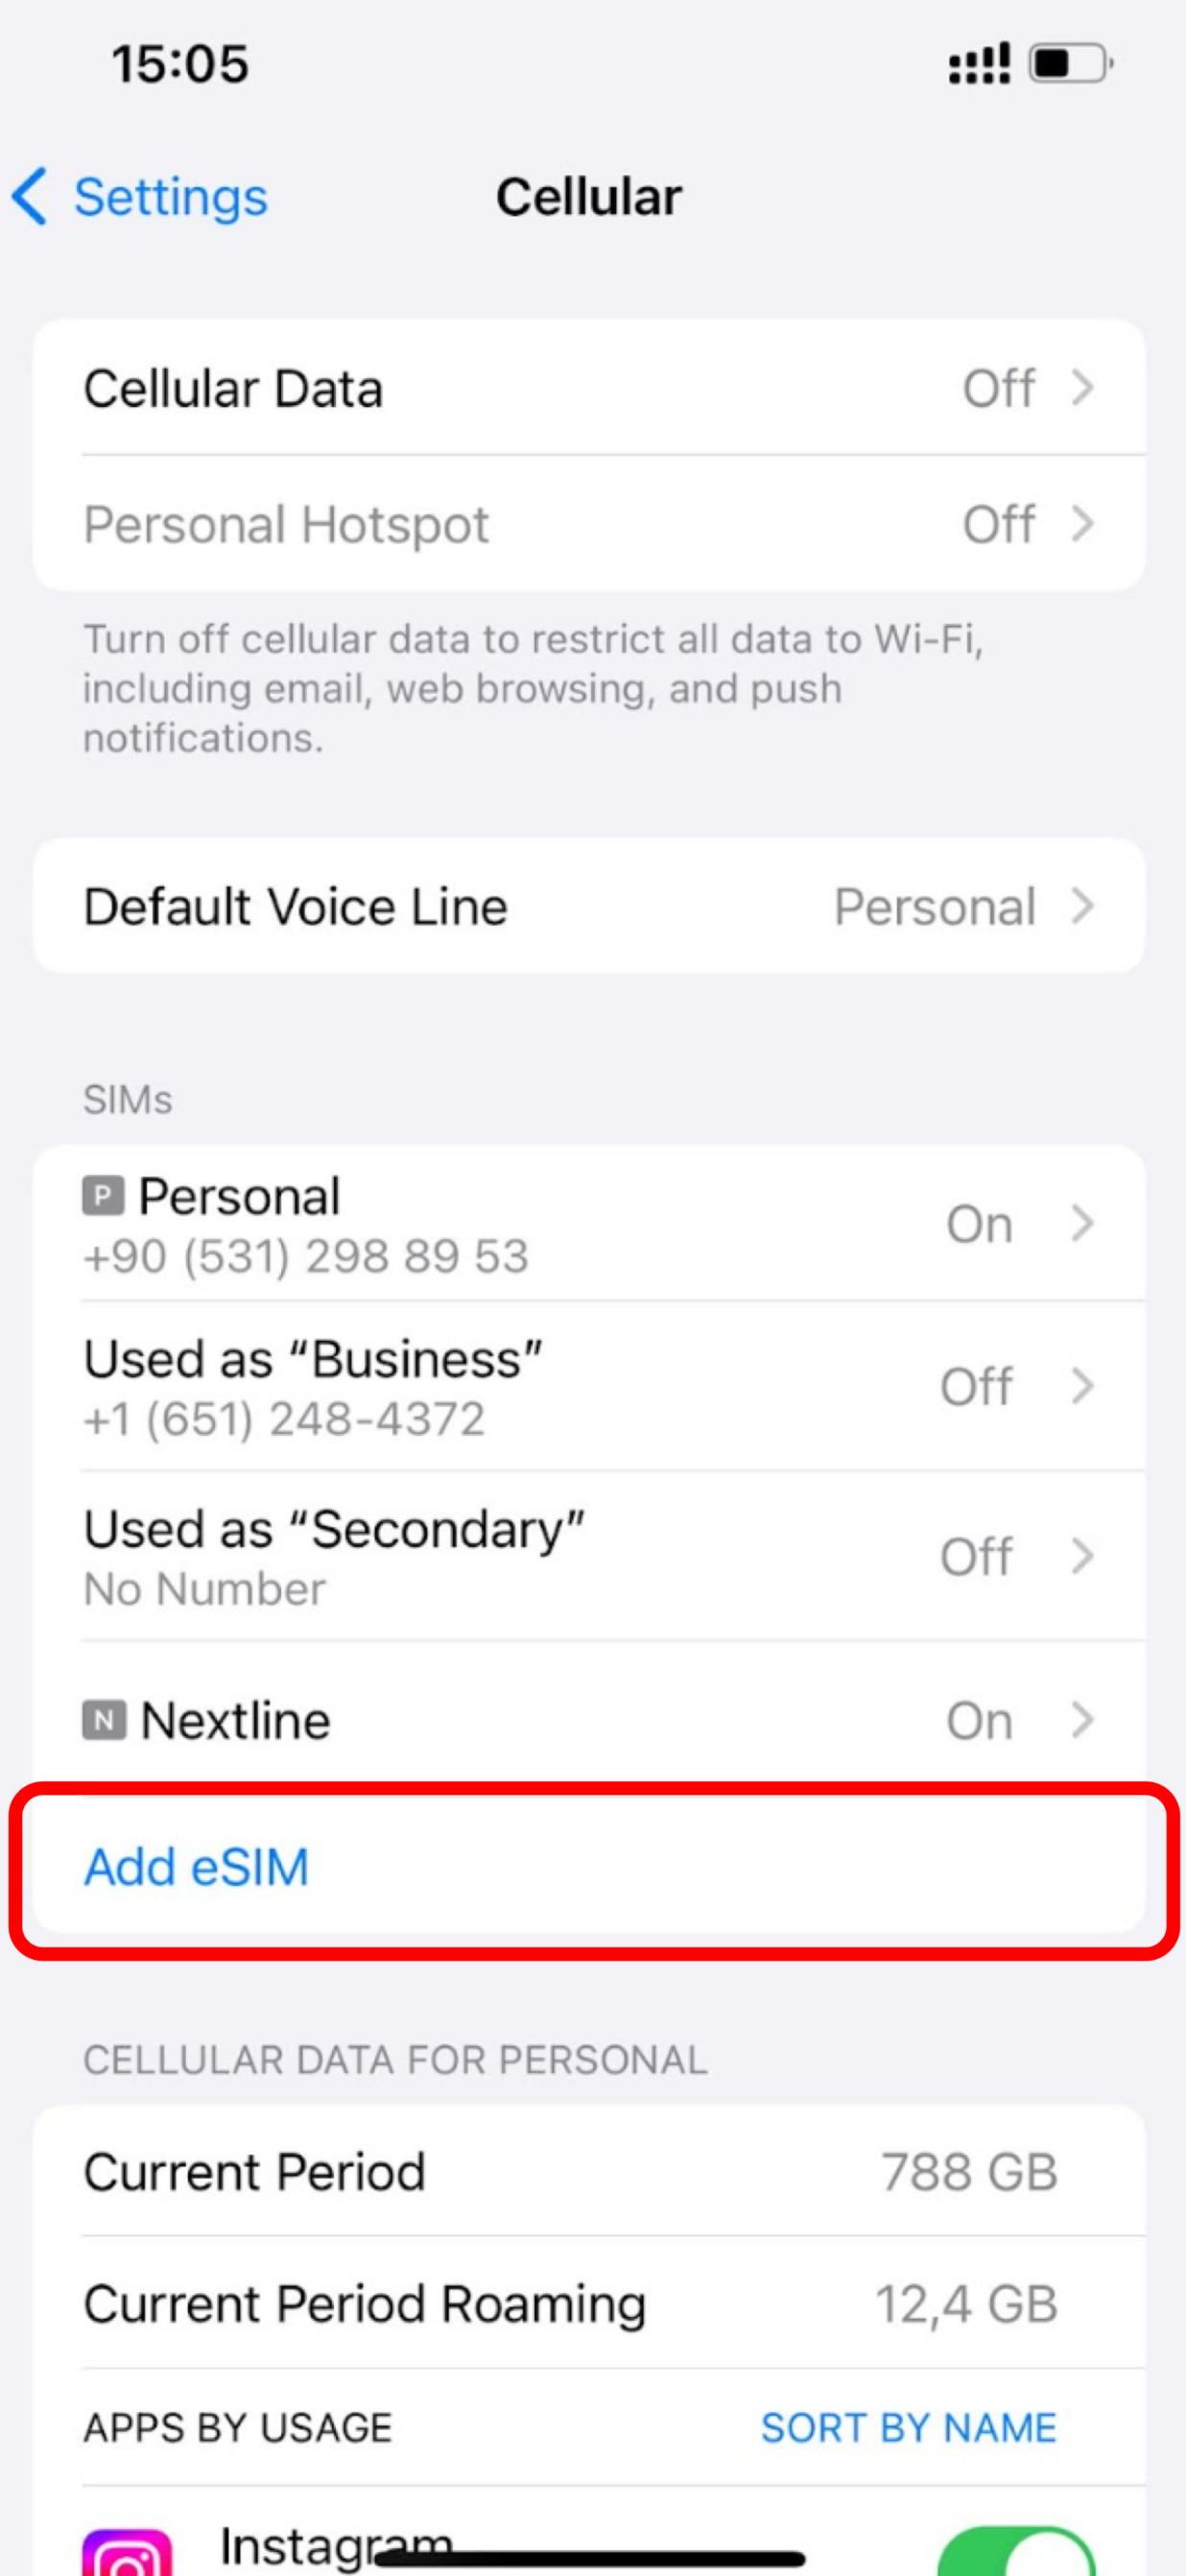
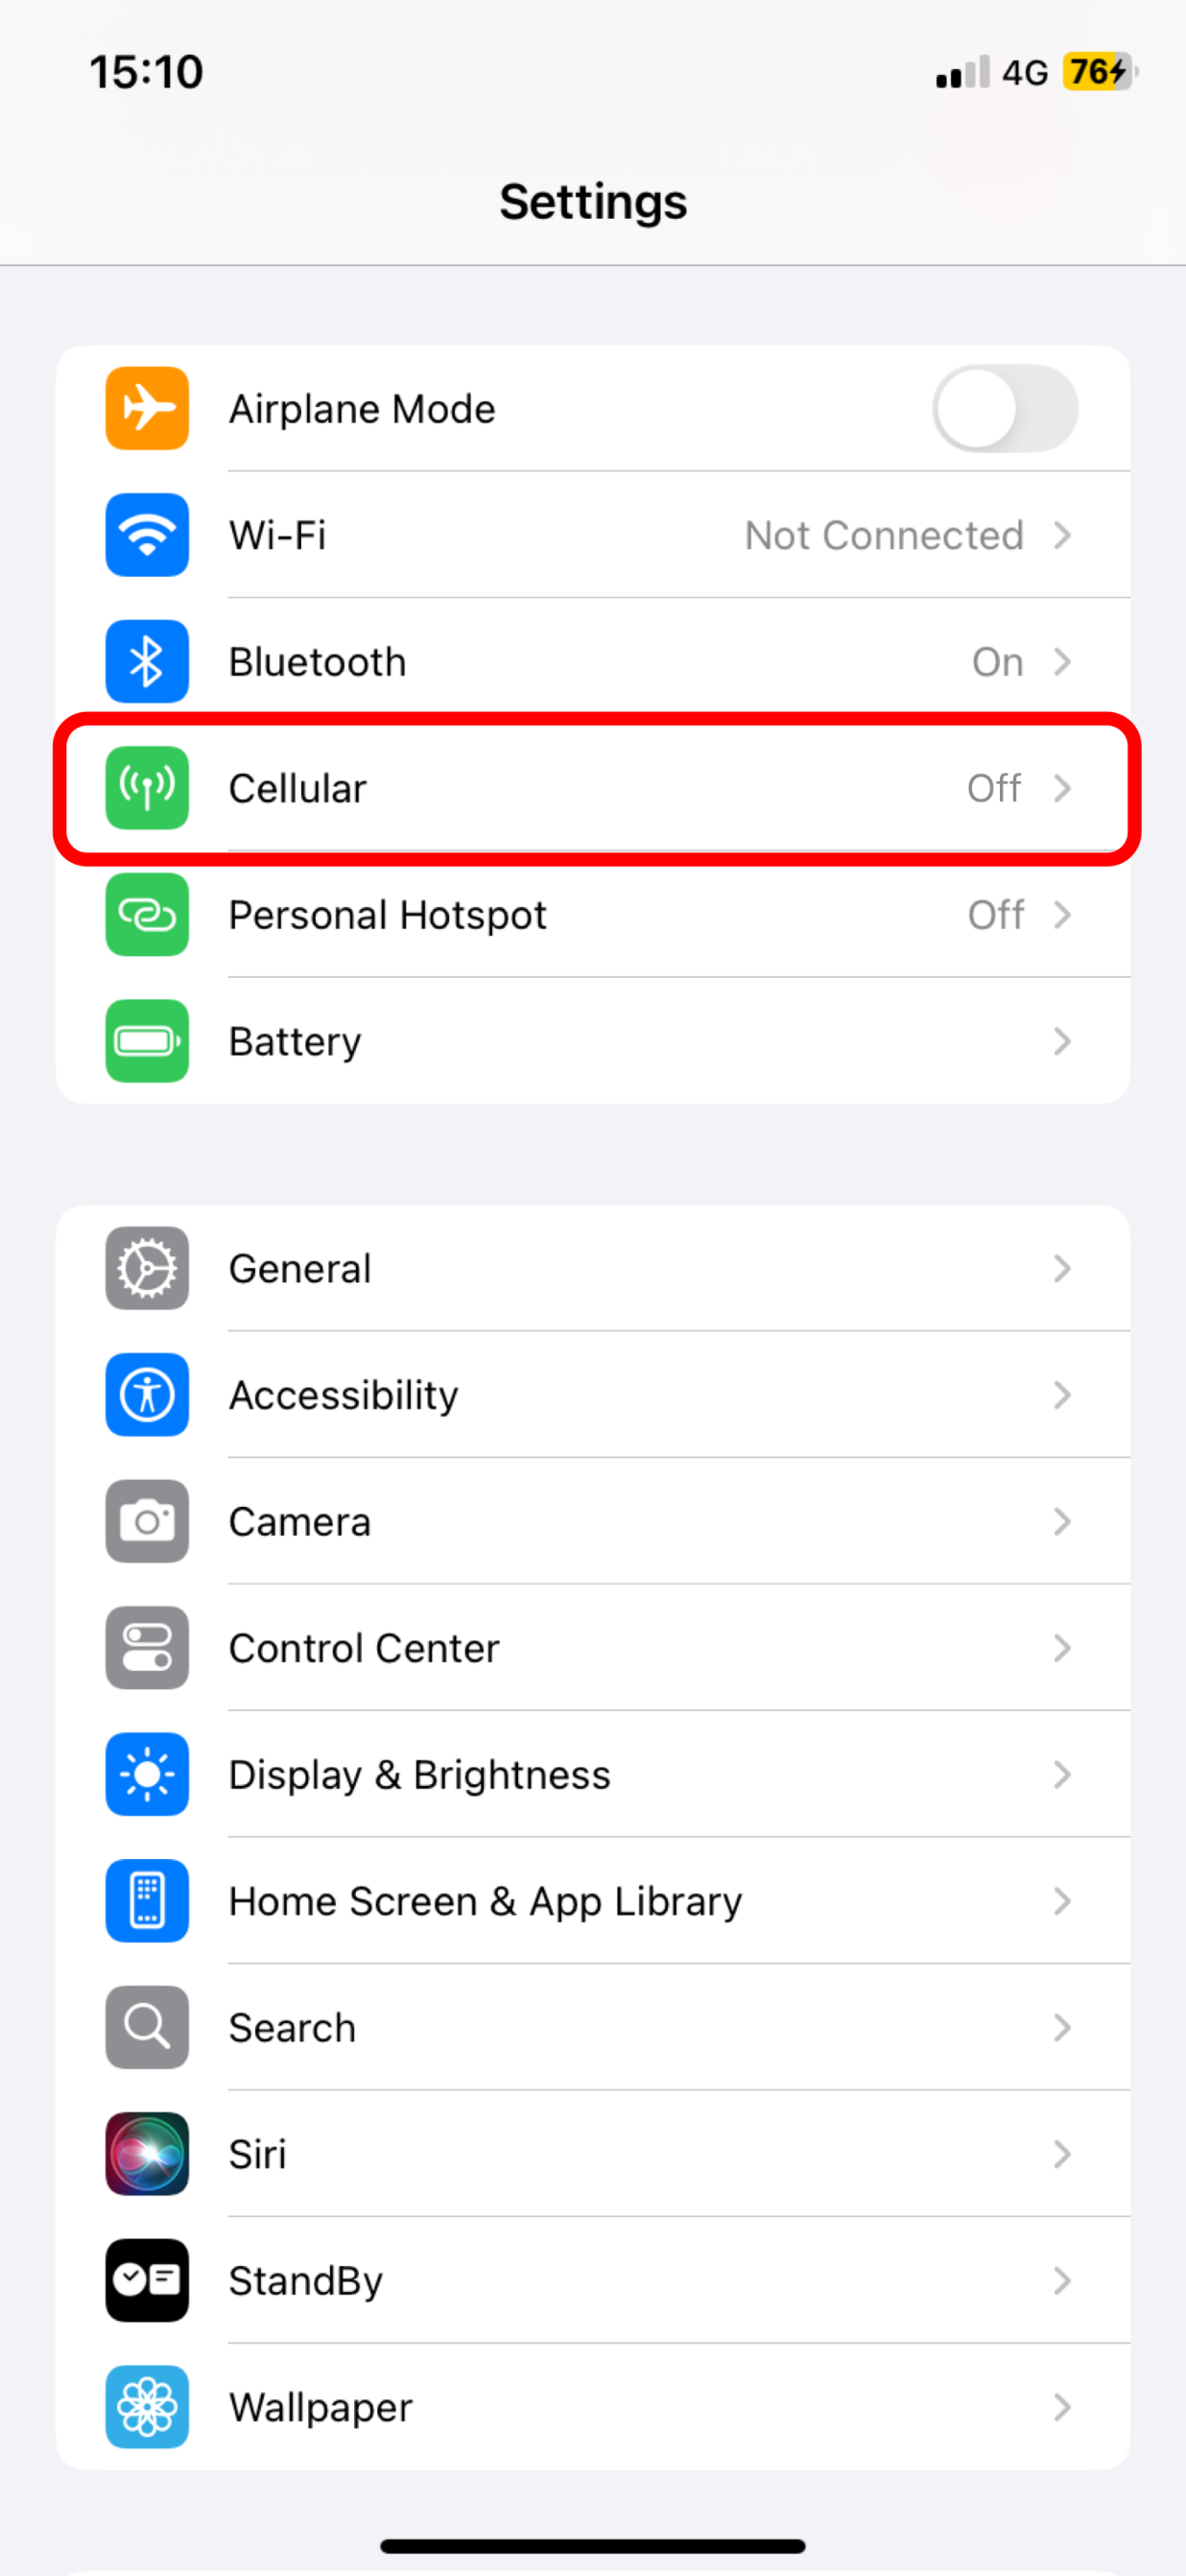
- TAP Cellular or Mobile.
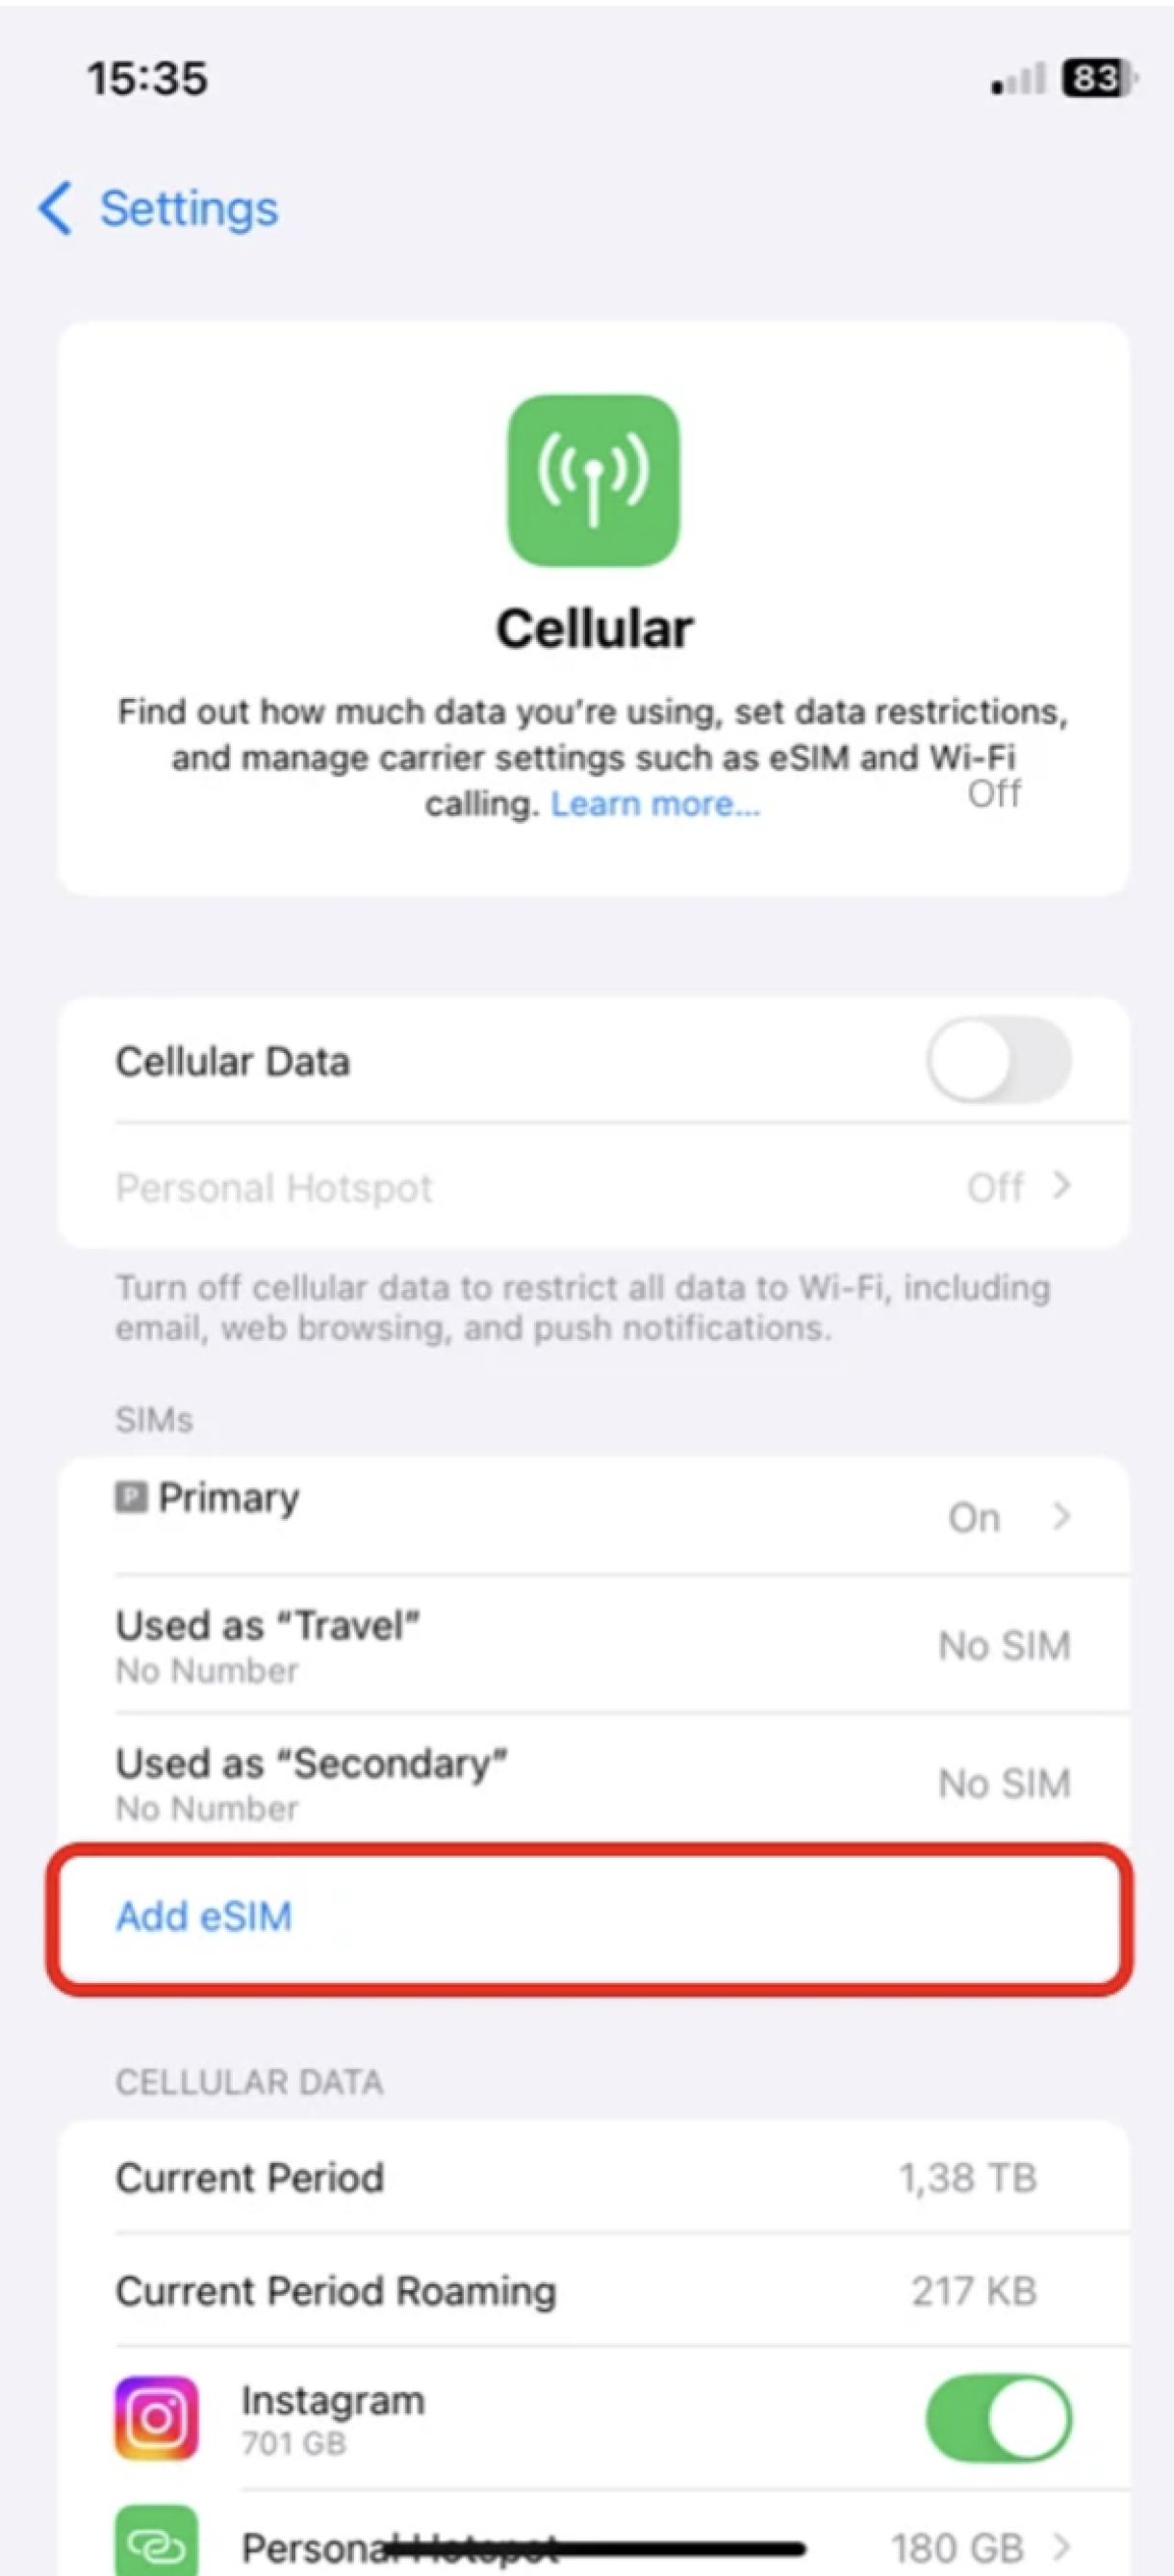
- TAP Add eSIM.
- TAP Use QR Code.
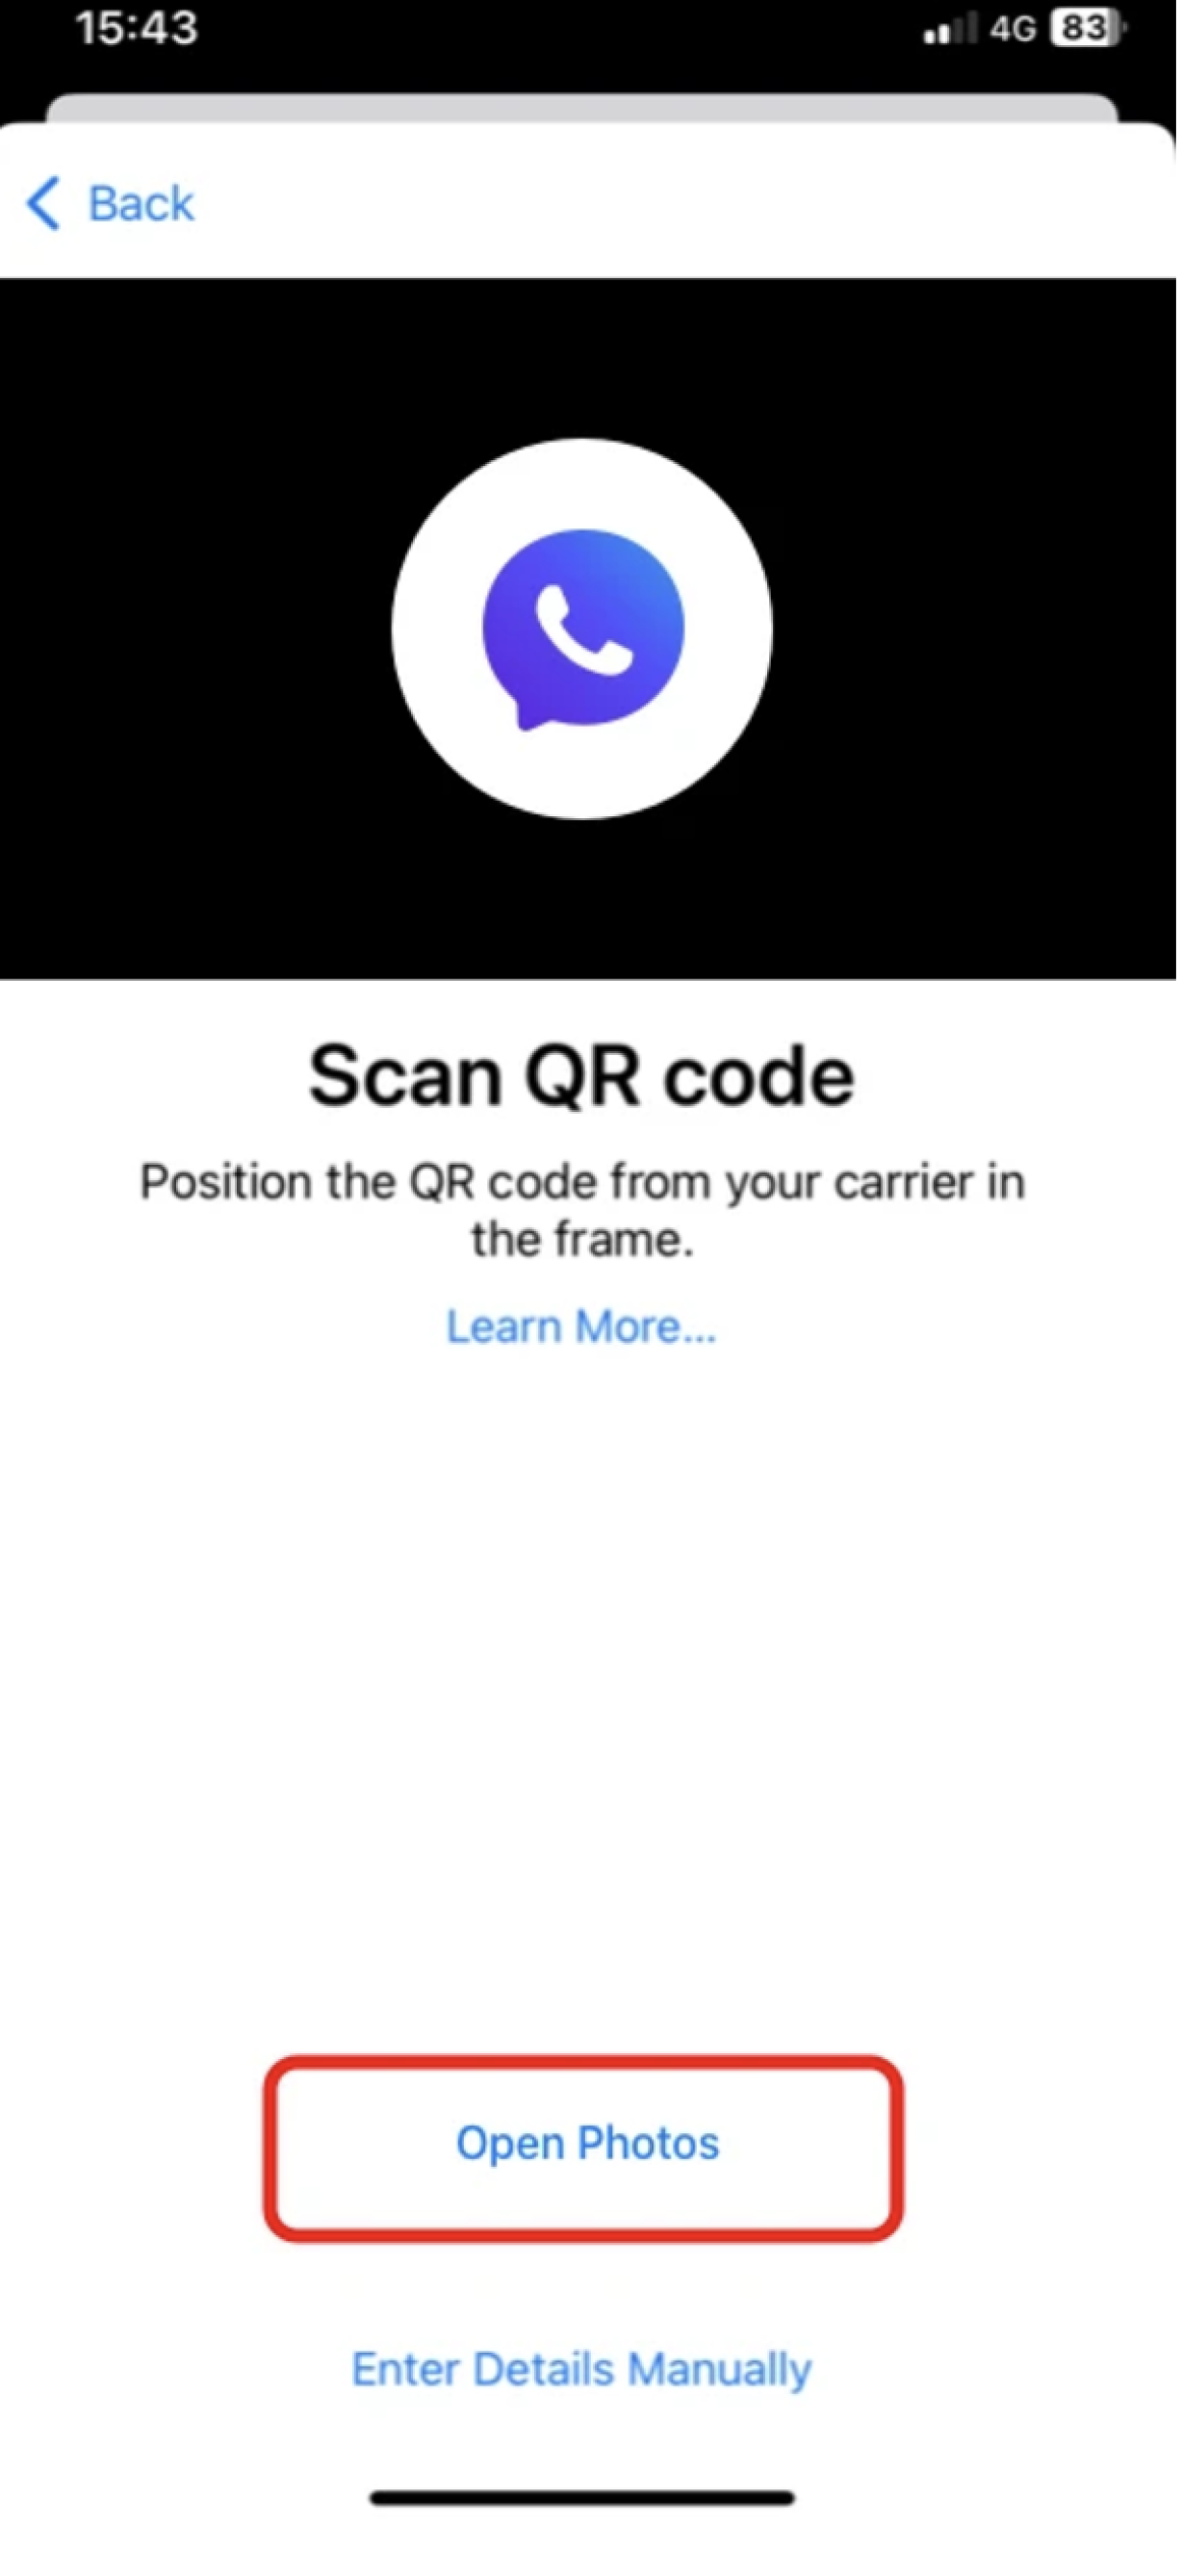
- TAP Open Photos.
- SELECT the saved QR code.
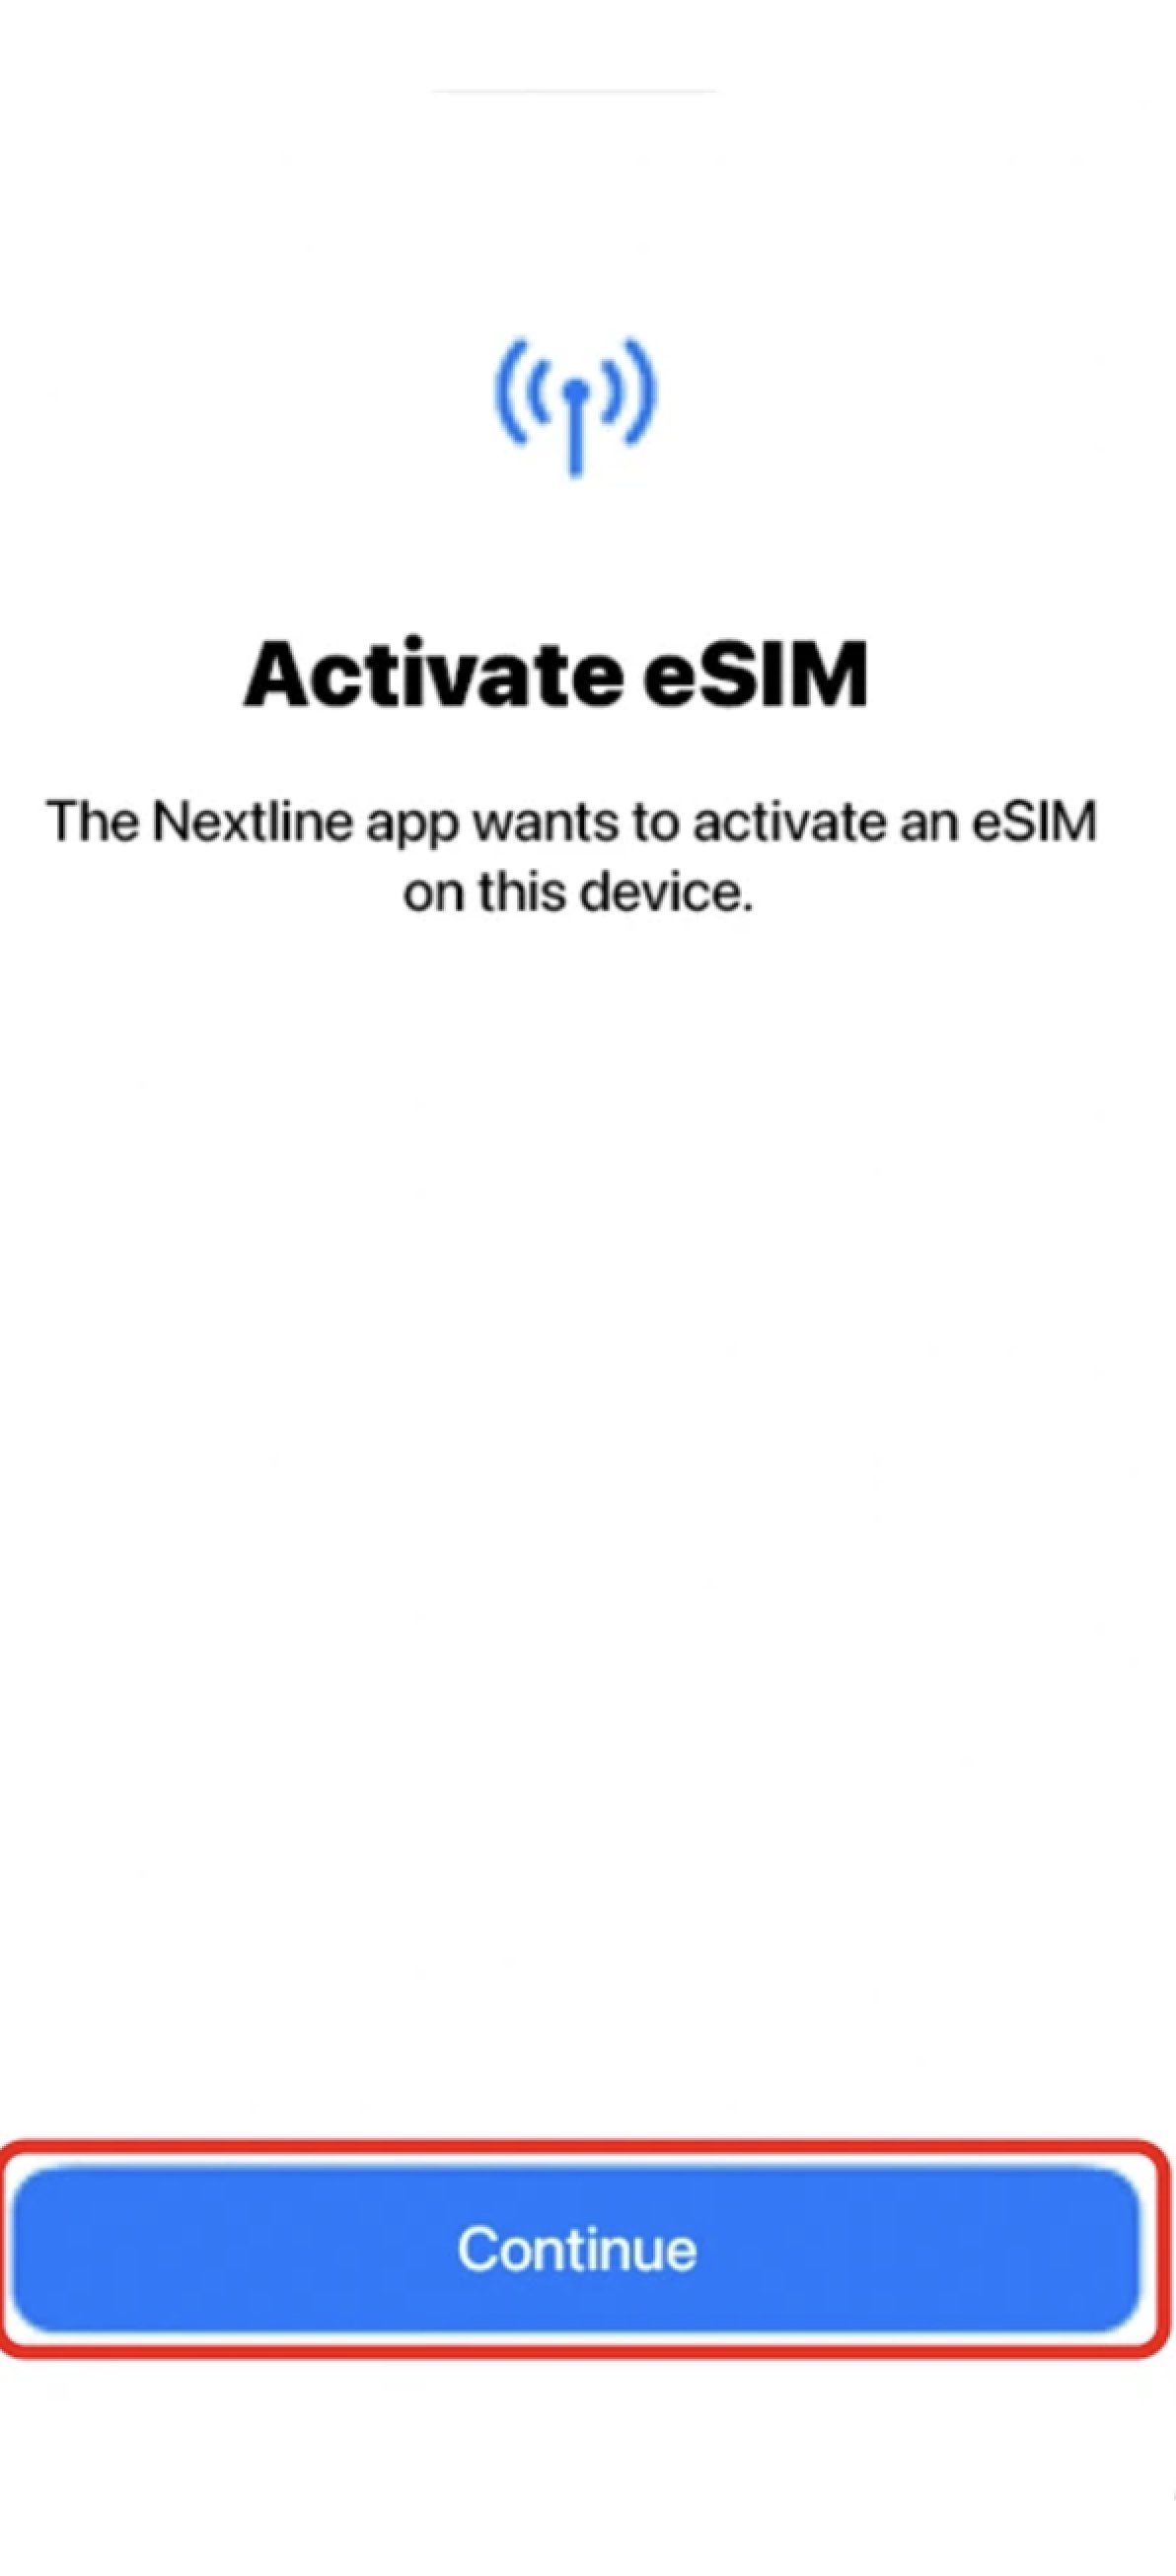
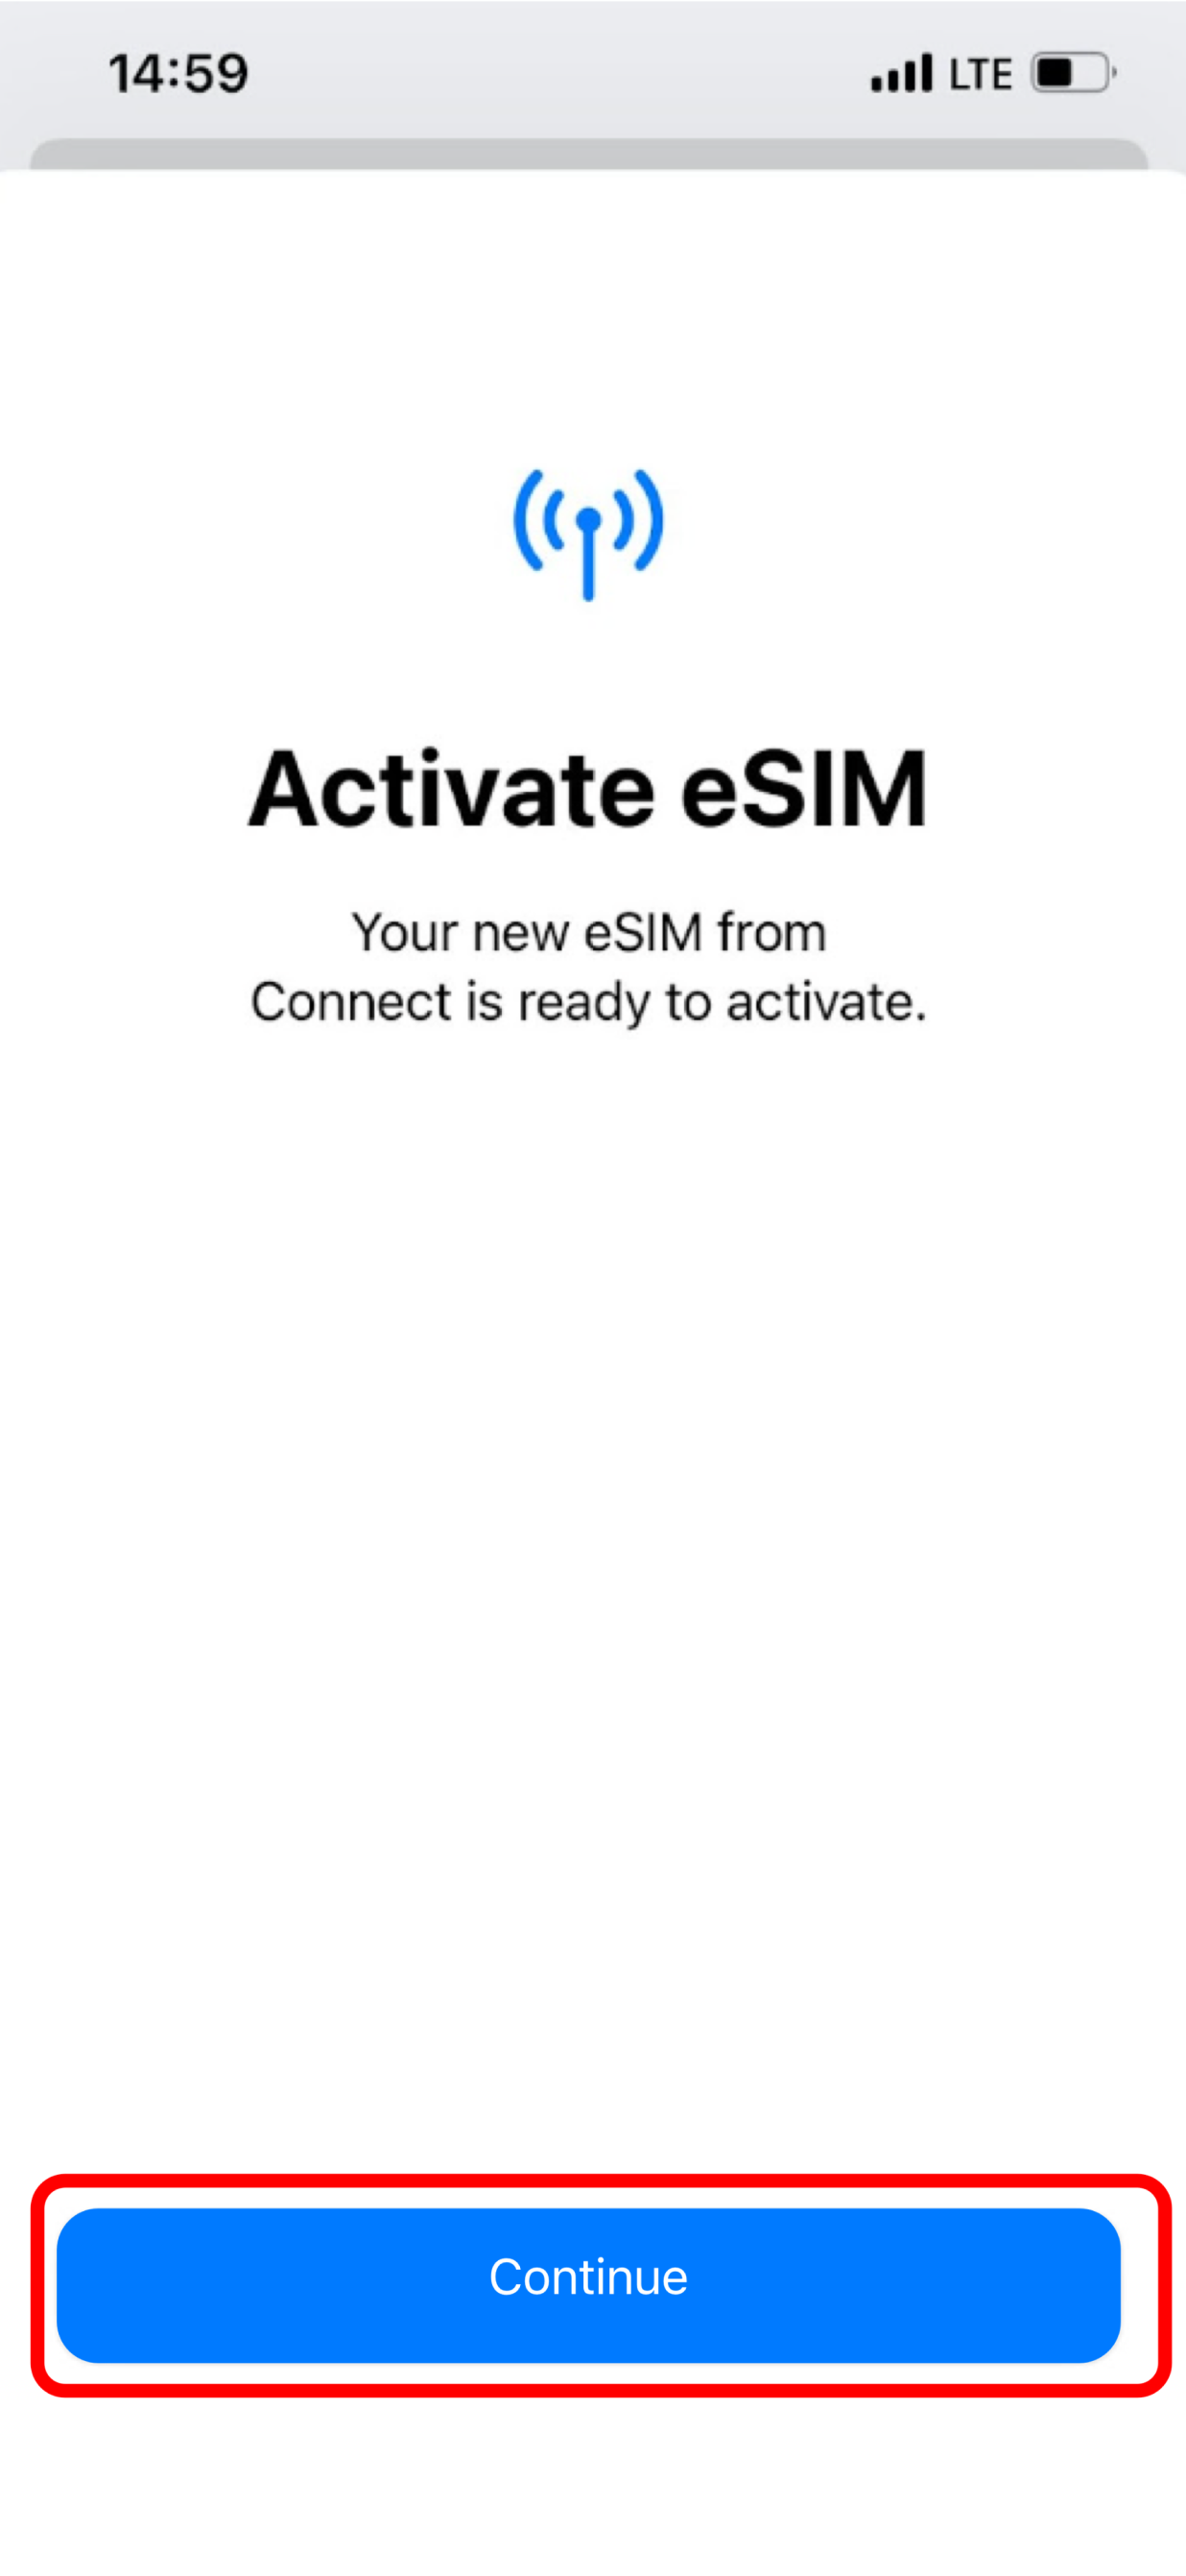
- TAP Continue twice.
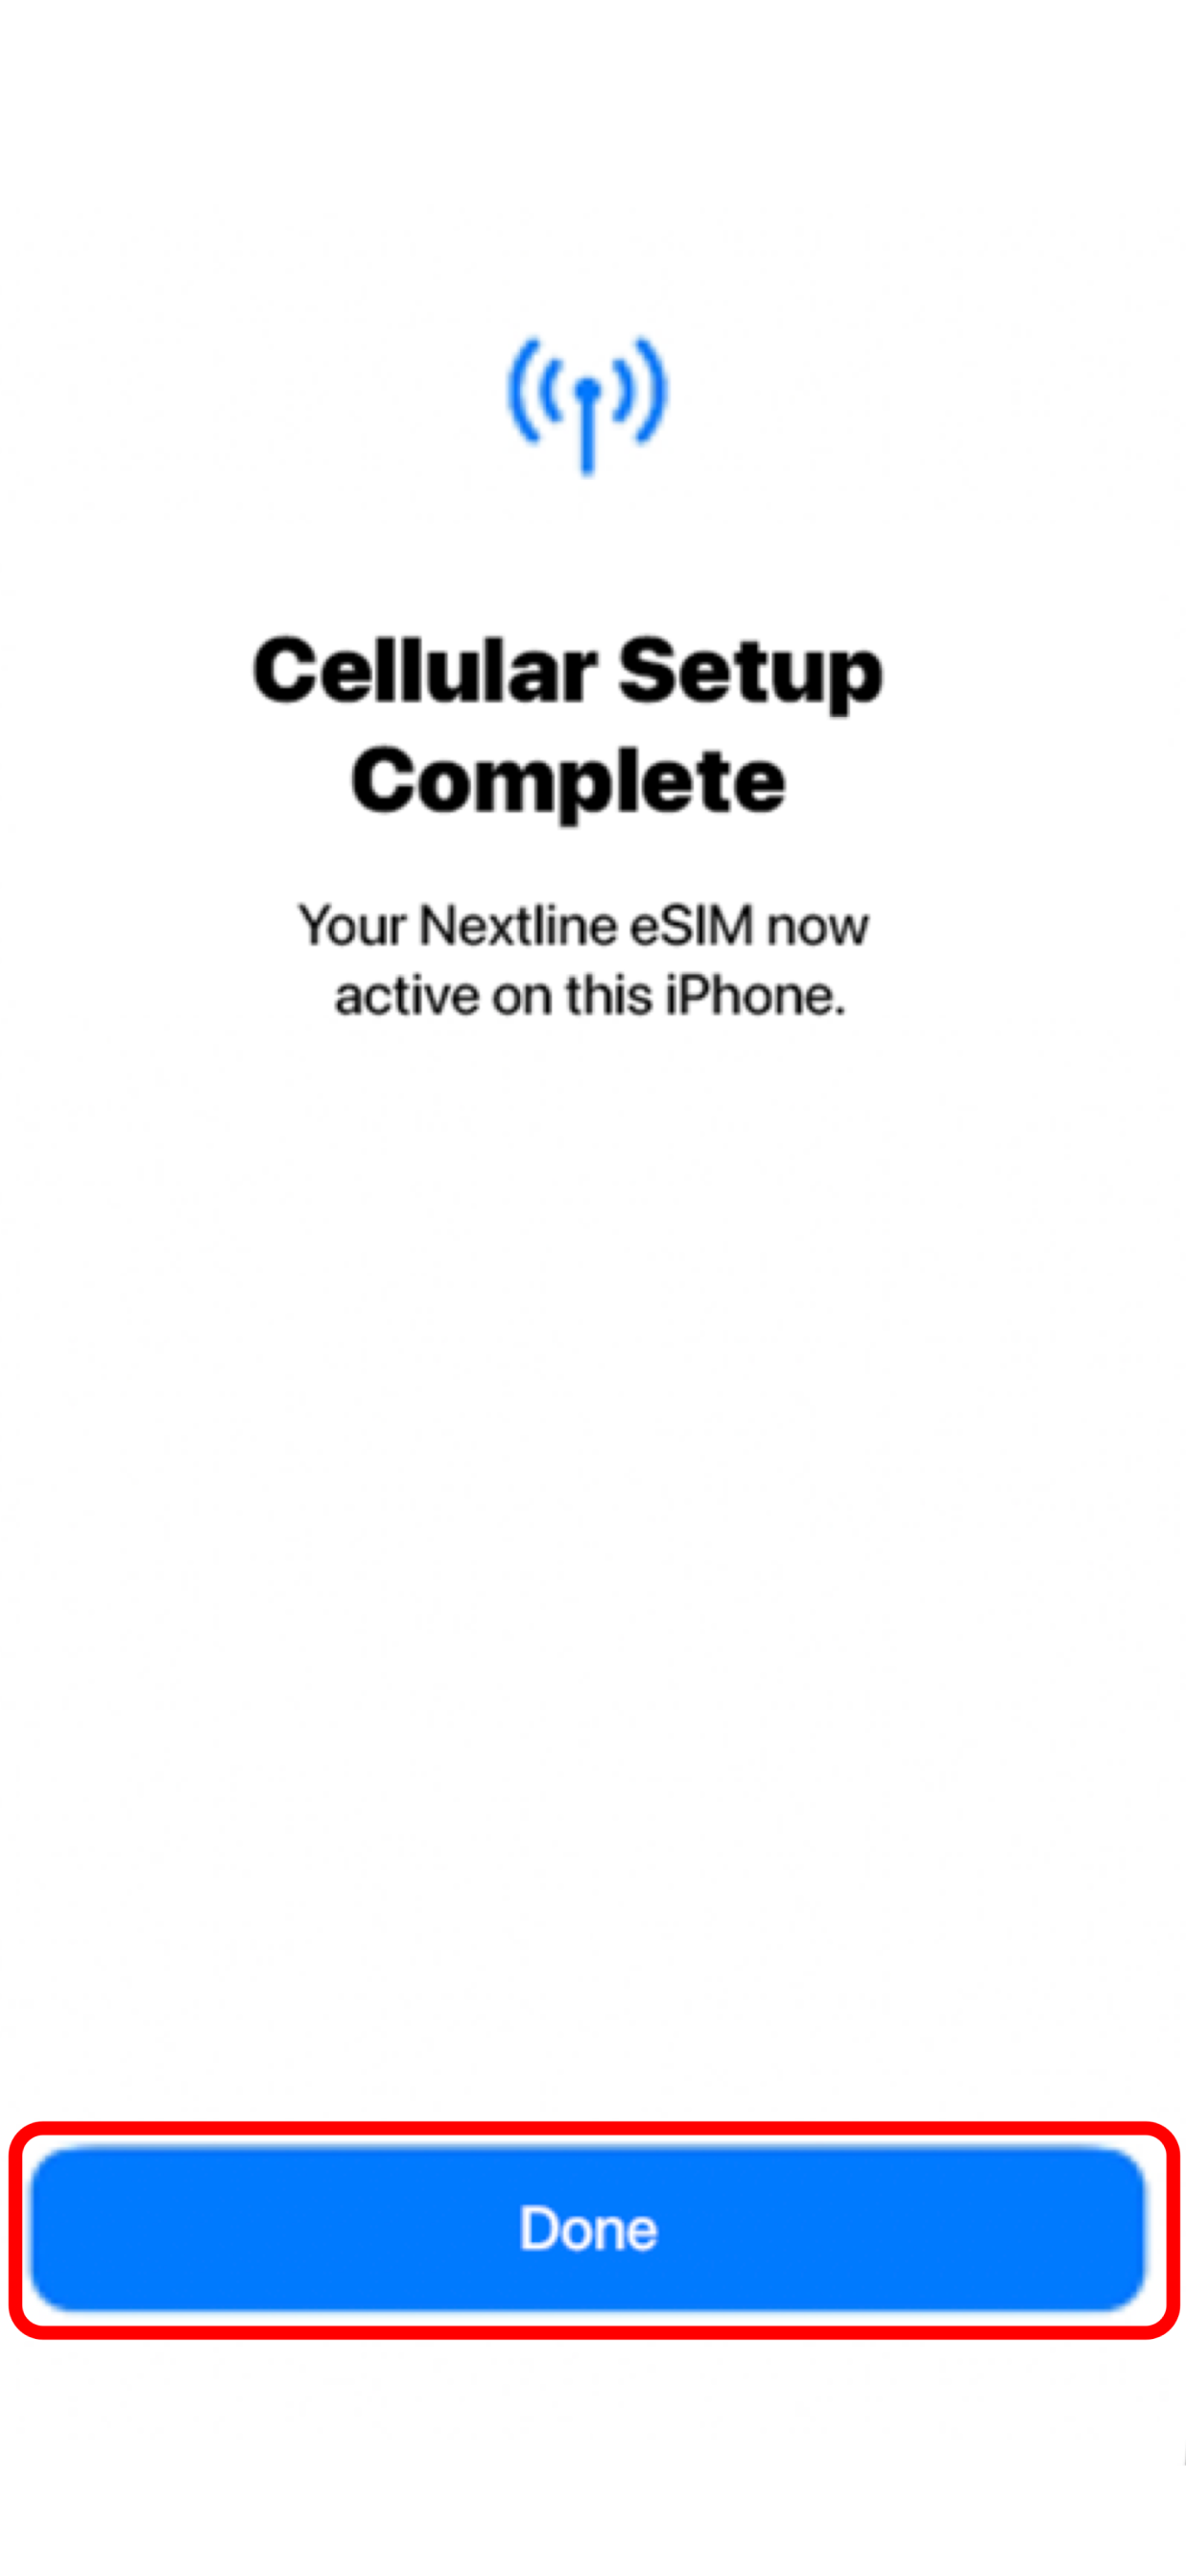
- WAIT a few minutes for your eSIM to activate.
- TAP Done.
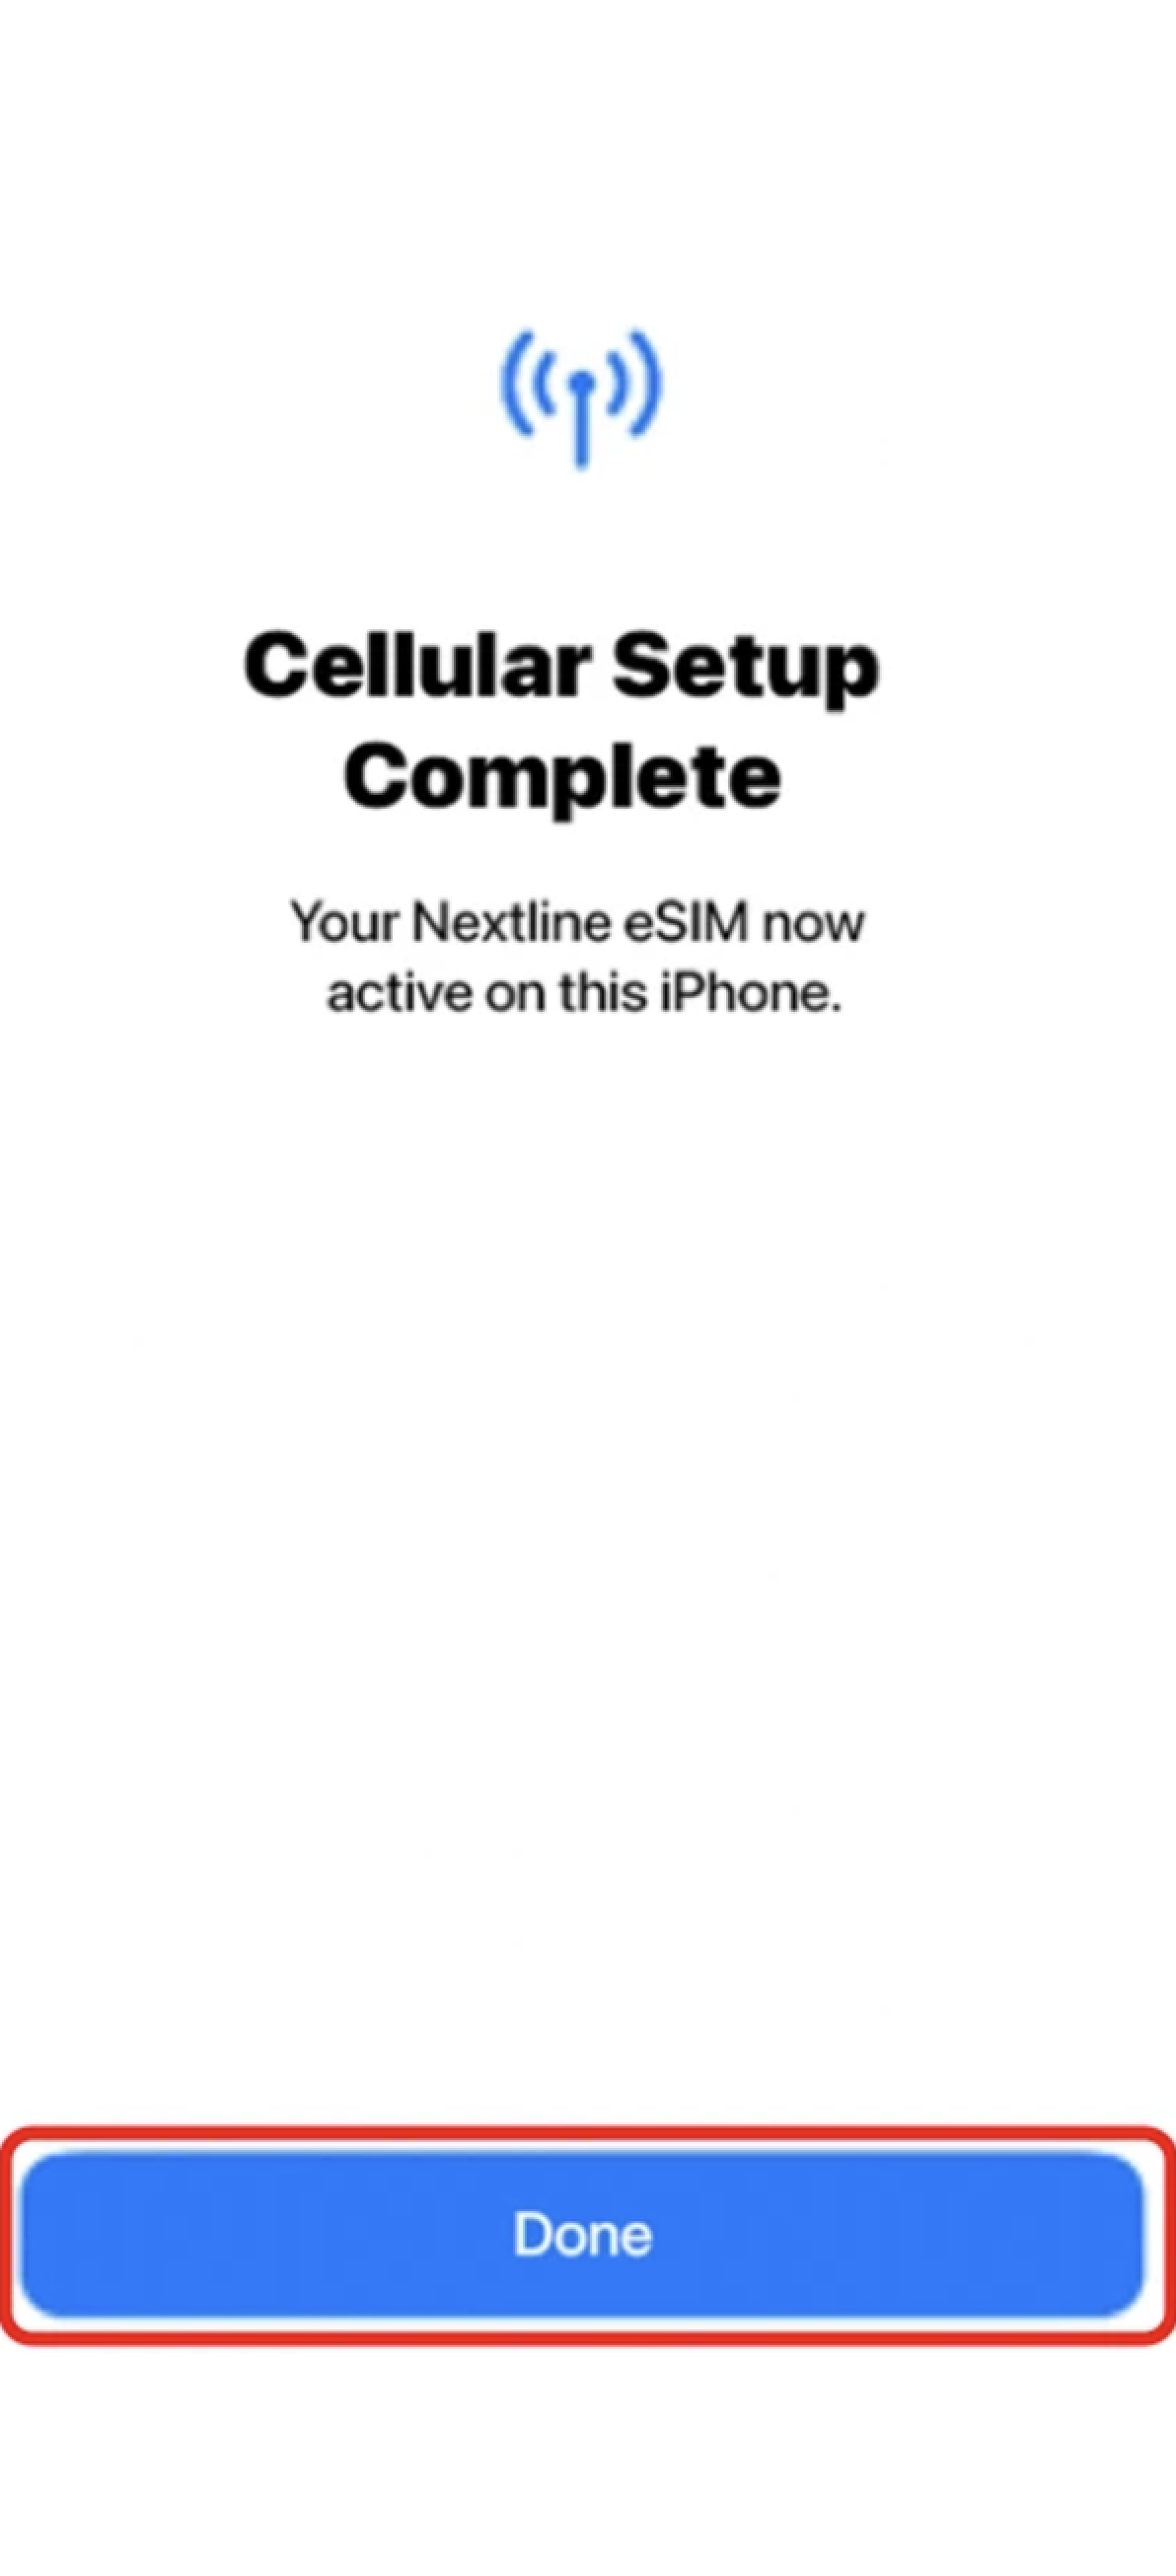
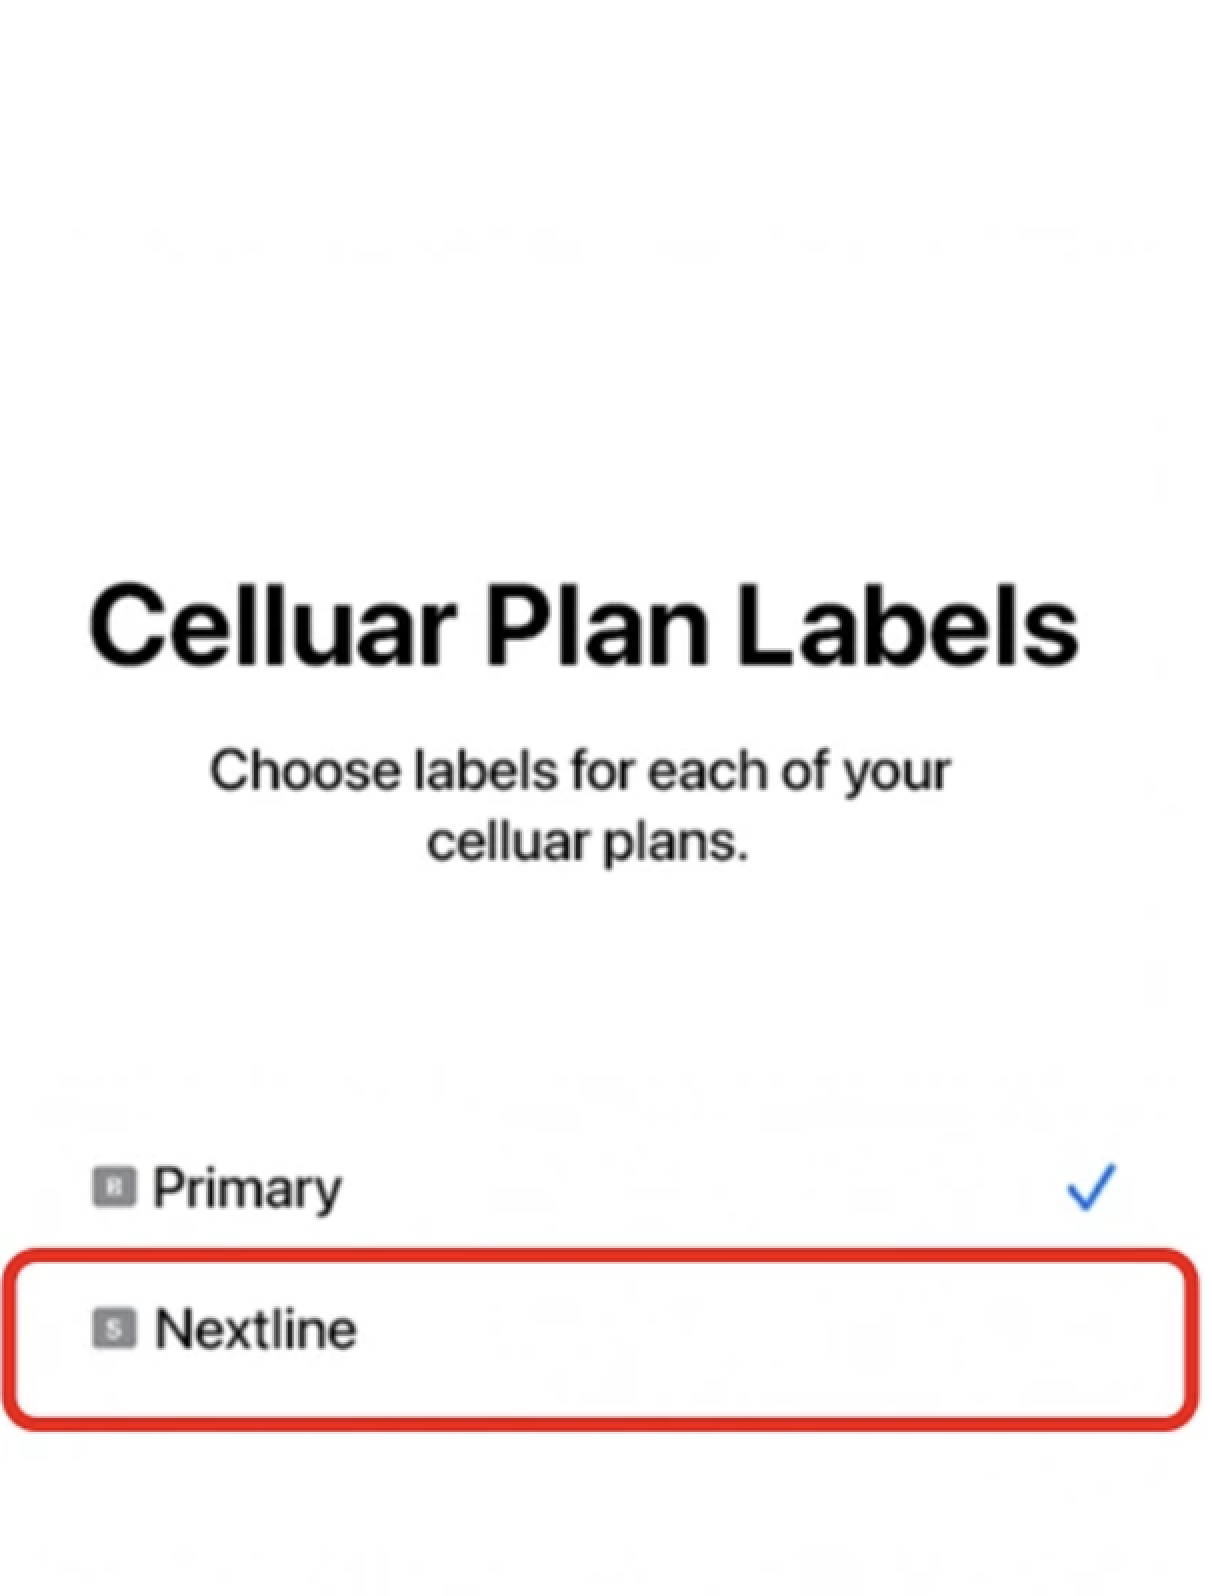
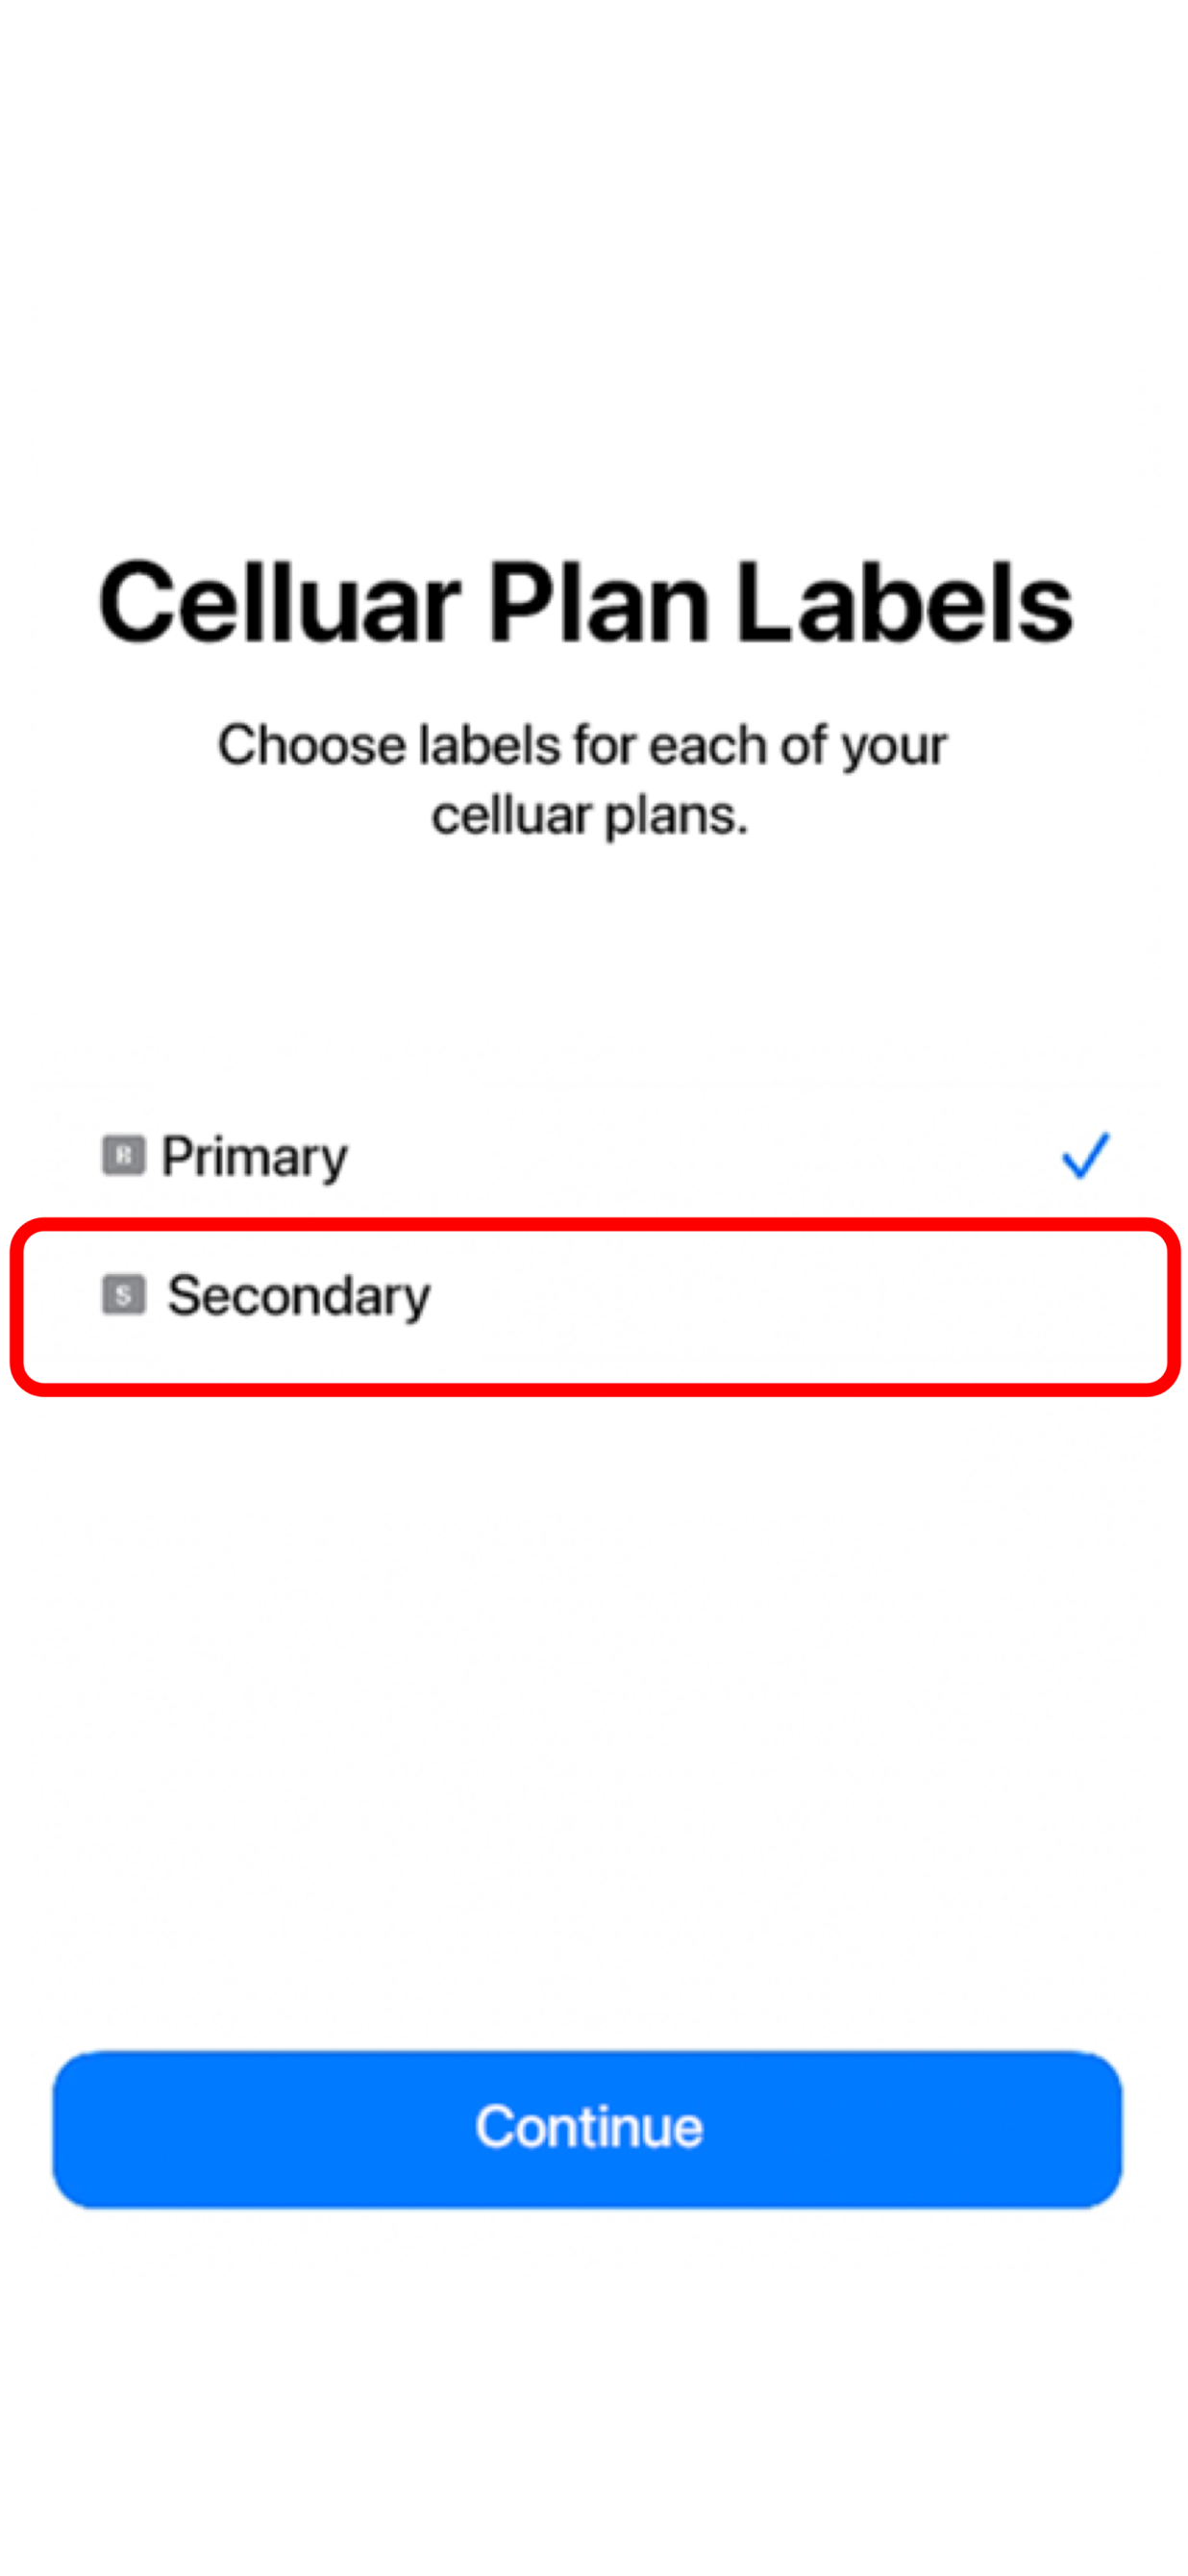
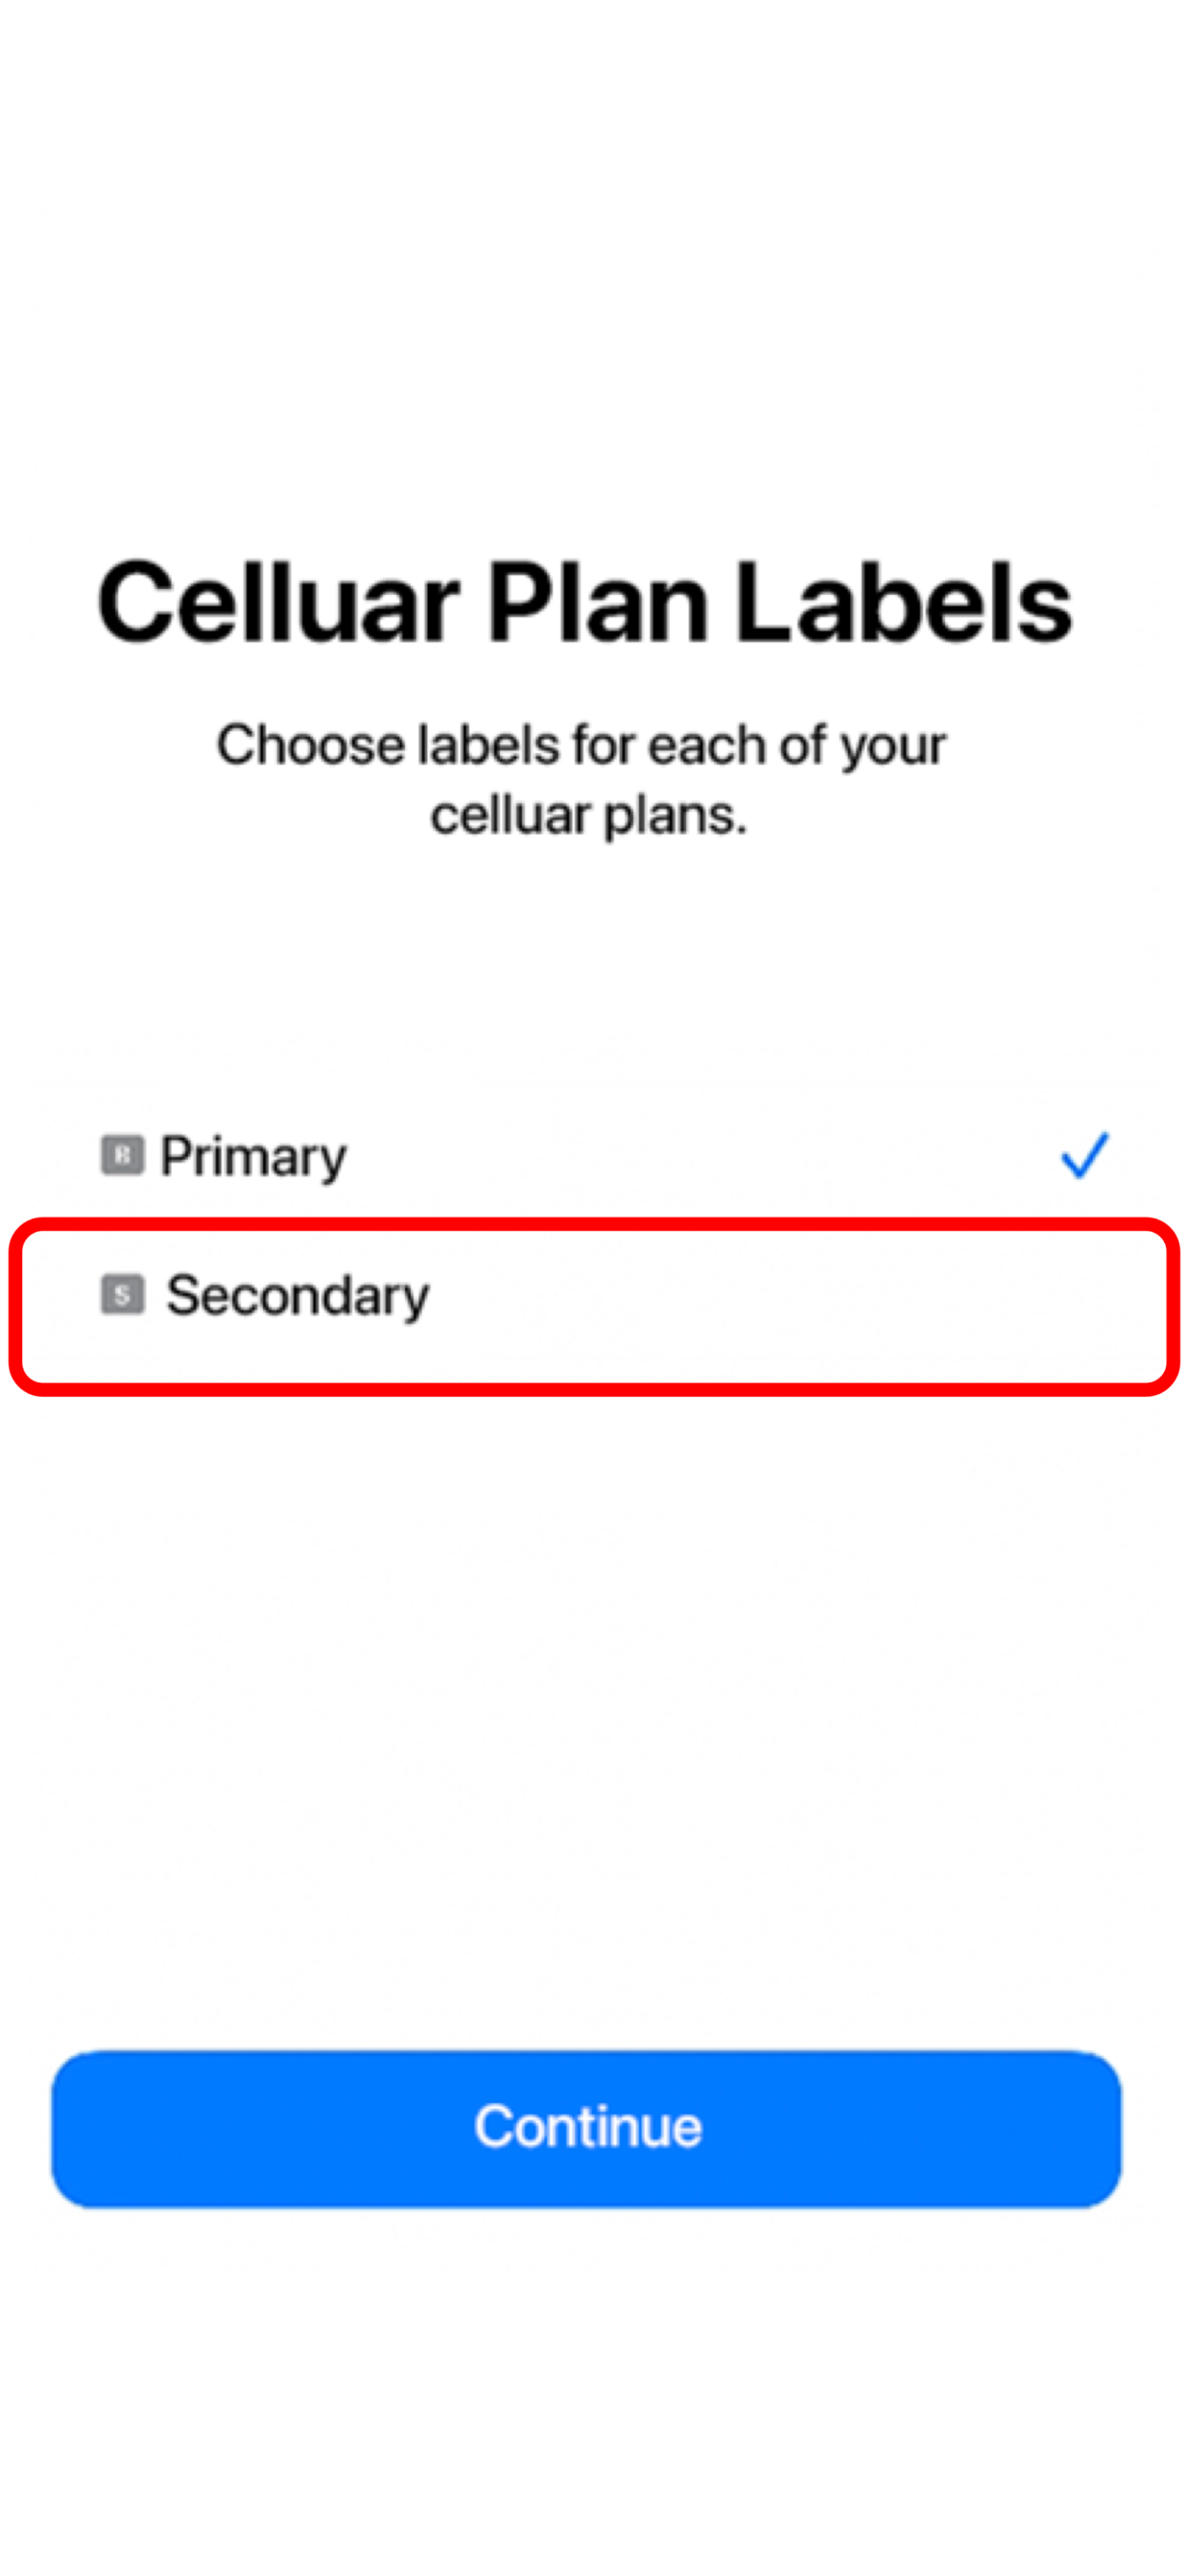
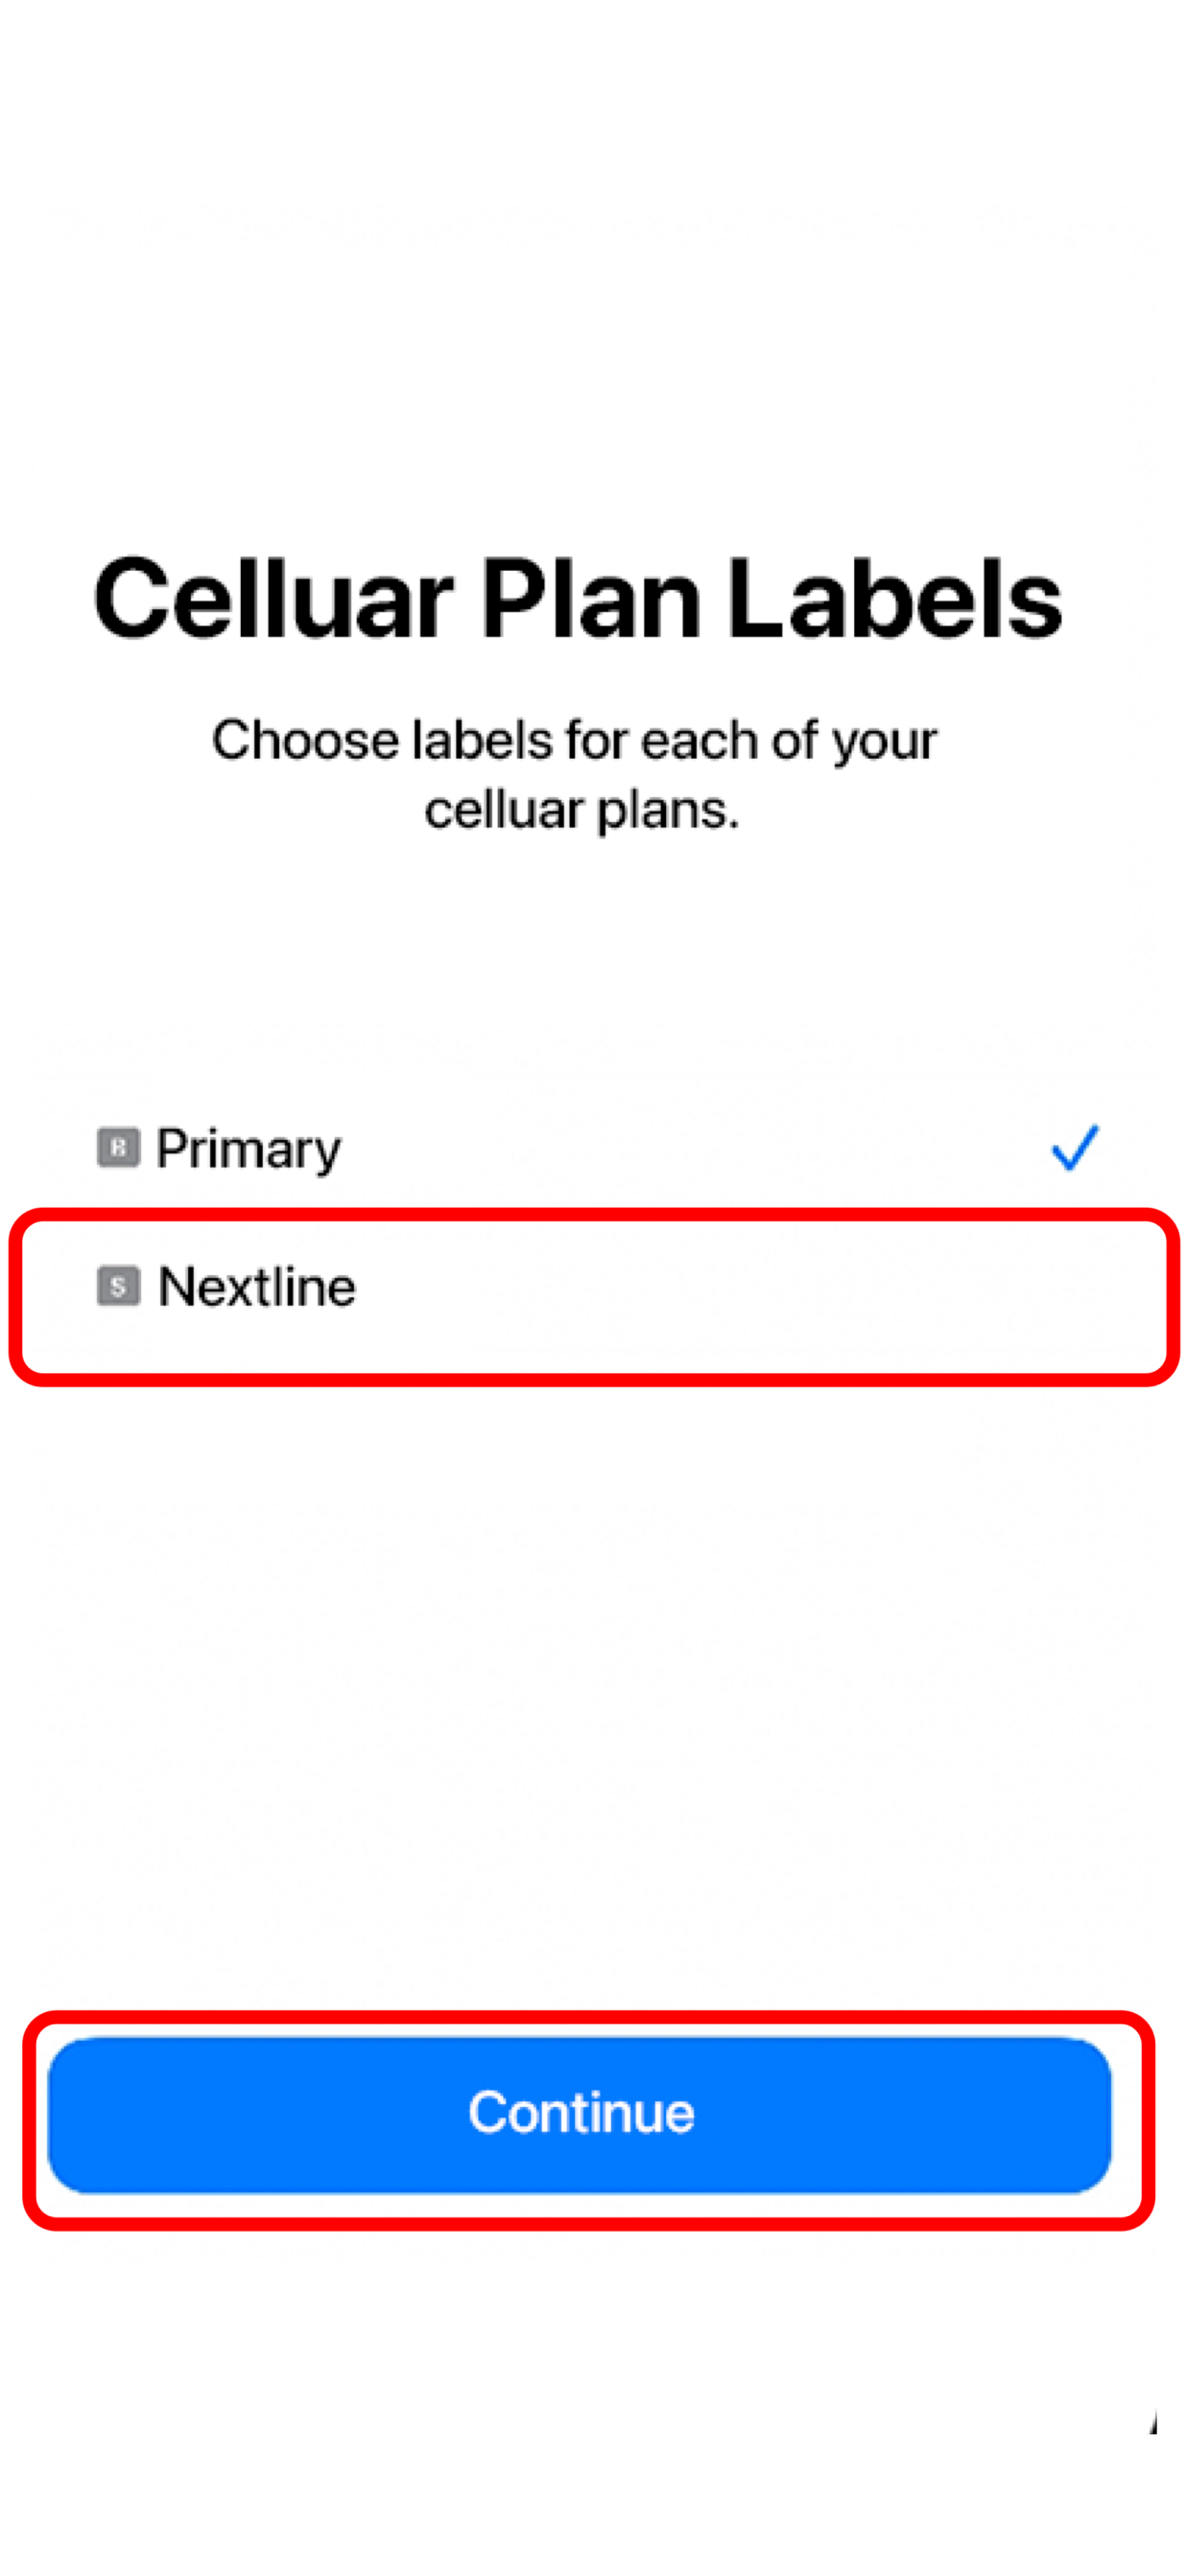
- ADD a Cellular/Mobile Plan Label to the newly installed eSIM.
- TAP Secondary.
- ENTER Nextline or your preferred label.
- TAP Continue.
- TAP Done.

Make sure your iOS device supports eSIMs before proceeding, as not all of them are. Please check if your iOS device is carrier-unlocked and supports eSIMs by following the instructions in this article. To see if your device supports eSIM we have a list for you. See Here
You can set up an eSIM by following these instructions after you have verified that your iOS device supports eSIMs and is linked to a reliable internet connection.
I. INSTALLATION- OPEN the Nextline app.
- TAP My eSIMs.
- TAP the eSIM you want to install.
- TAP View Instructions.
- TAP Manual.

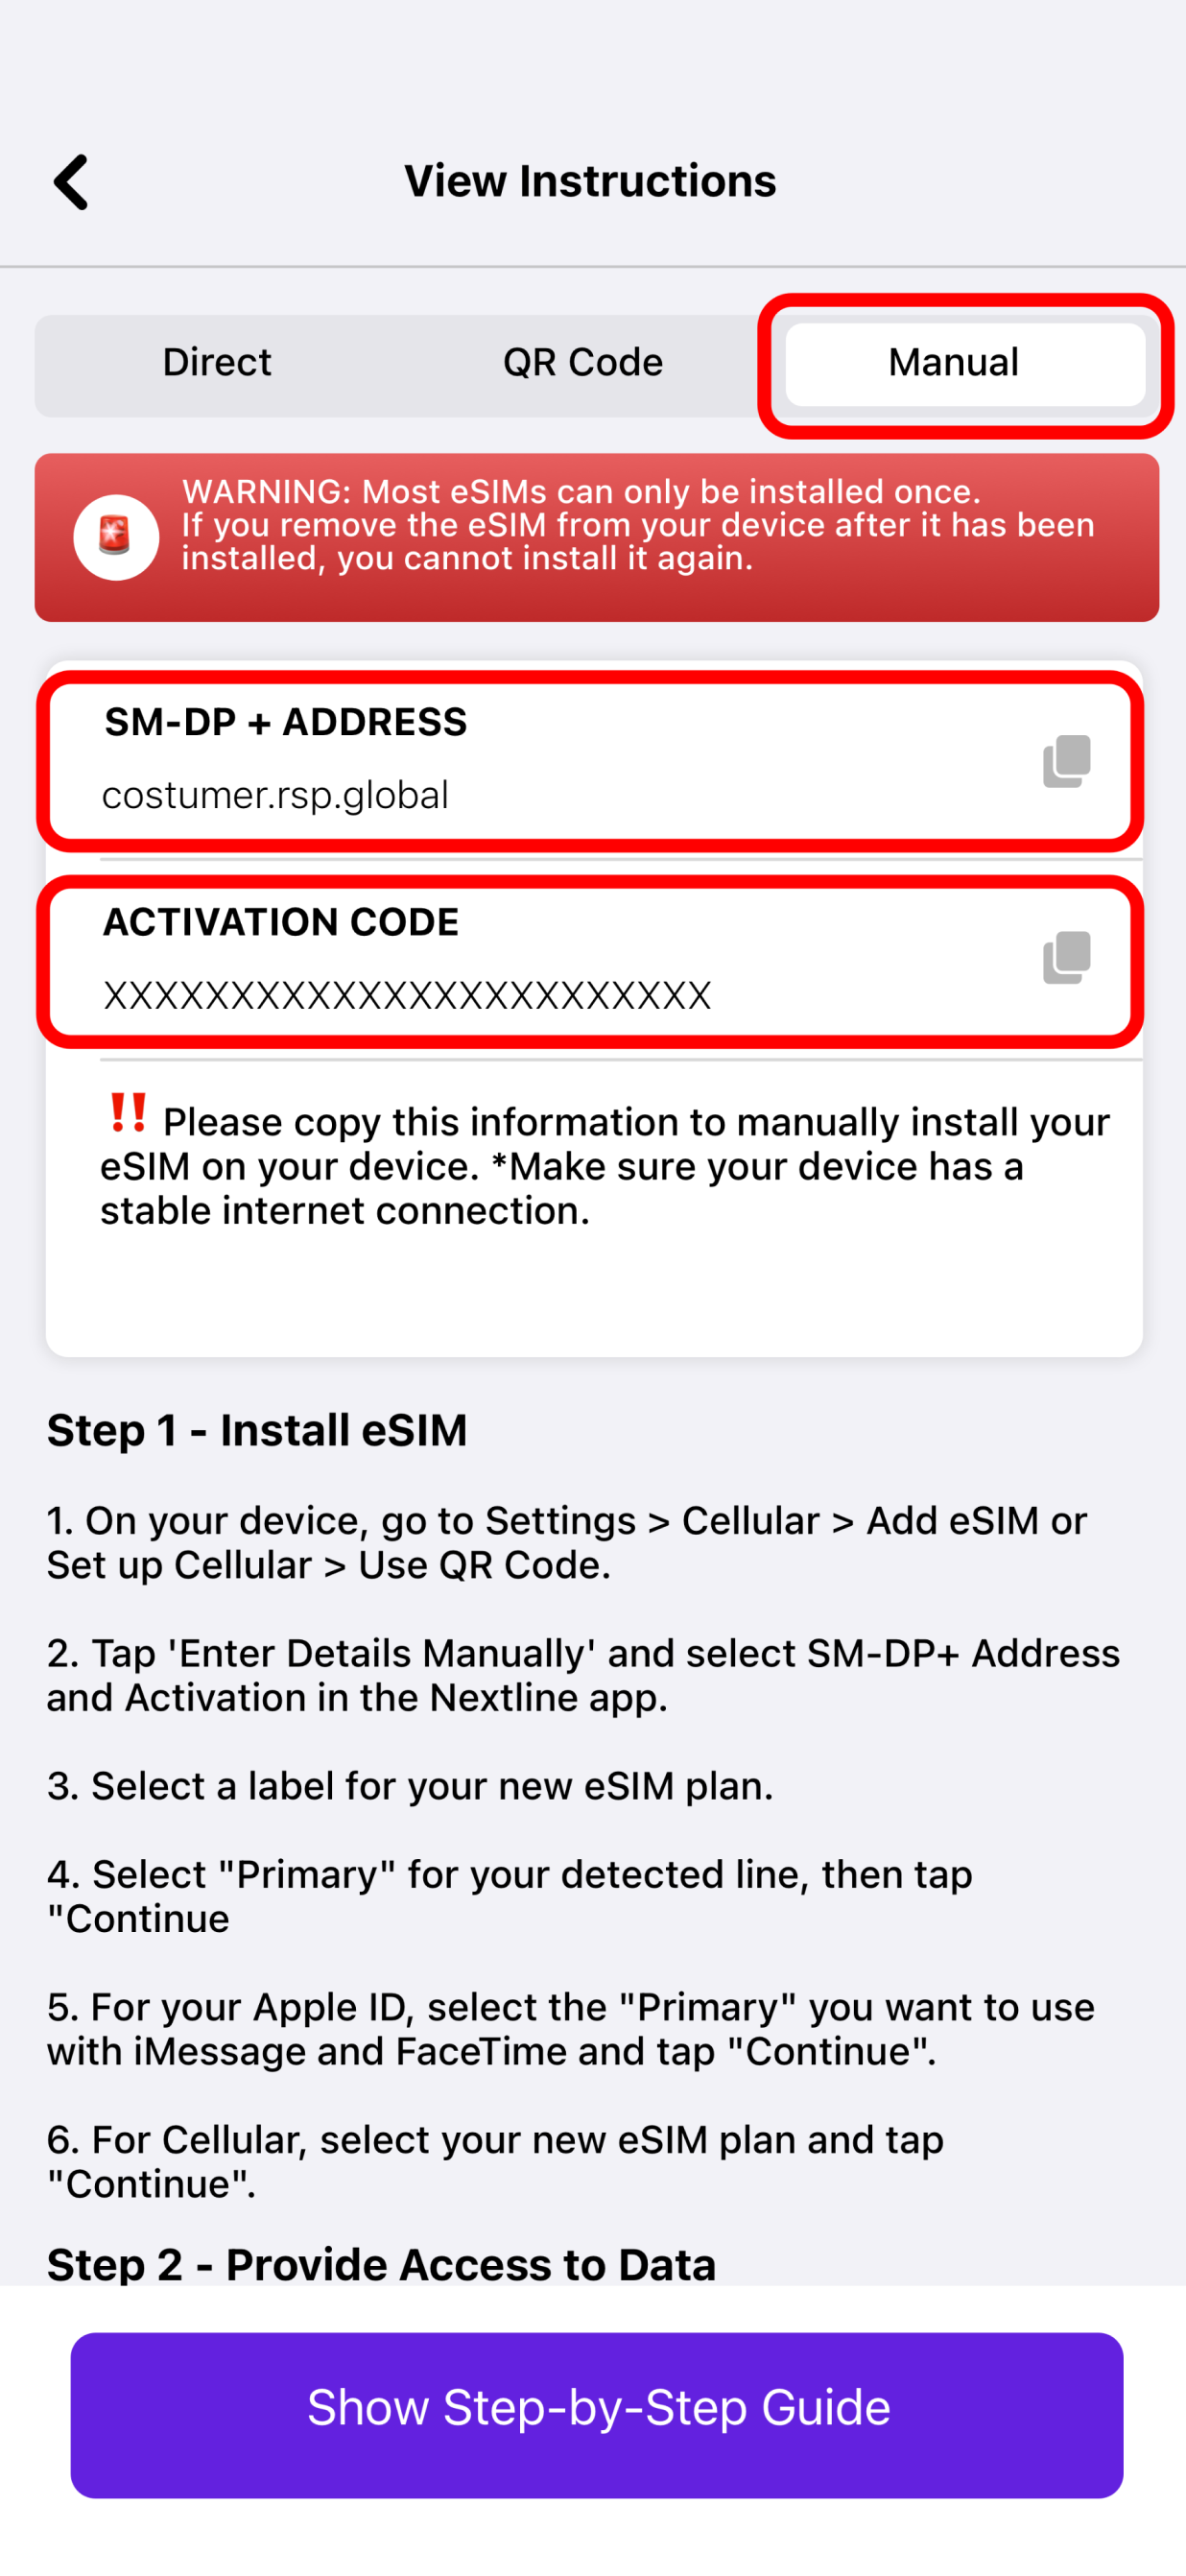
- EXIT the Nextline app, then GO to Settings.
- TAP Cellular or Mobile.
- .TAP Add eSIM.
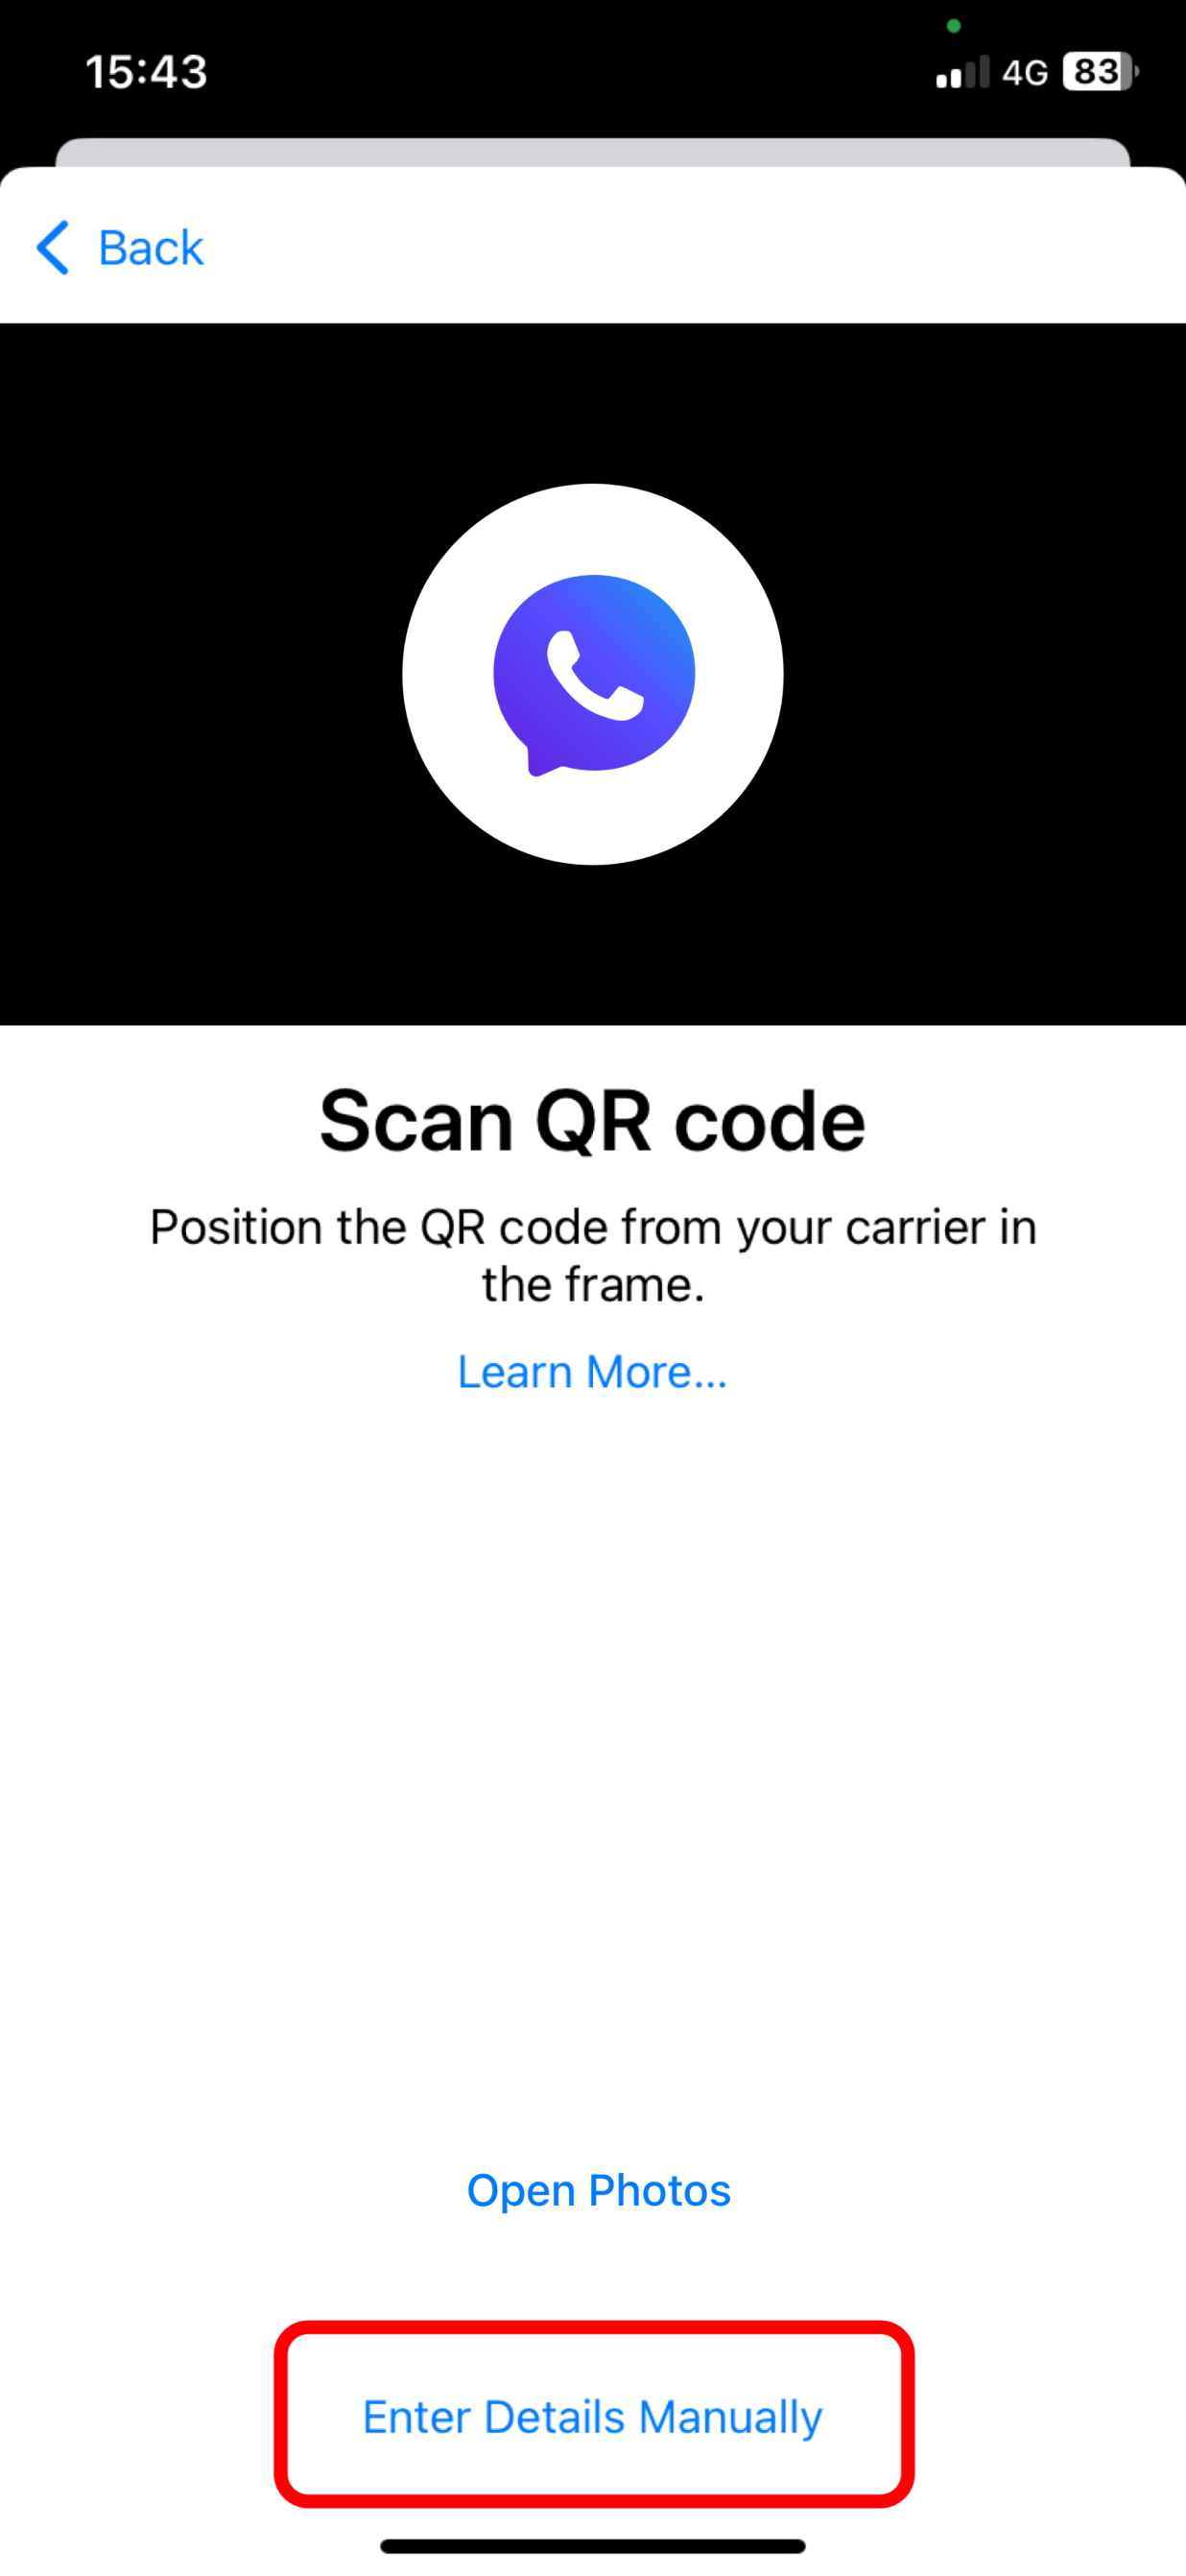
- TAP Use QR Code.
- TAP Enter Details Manually.
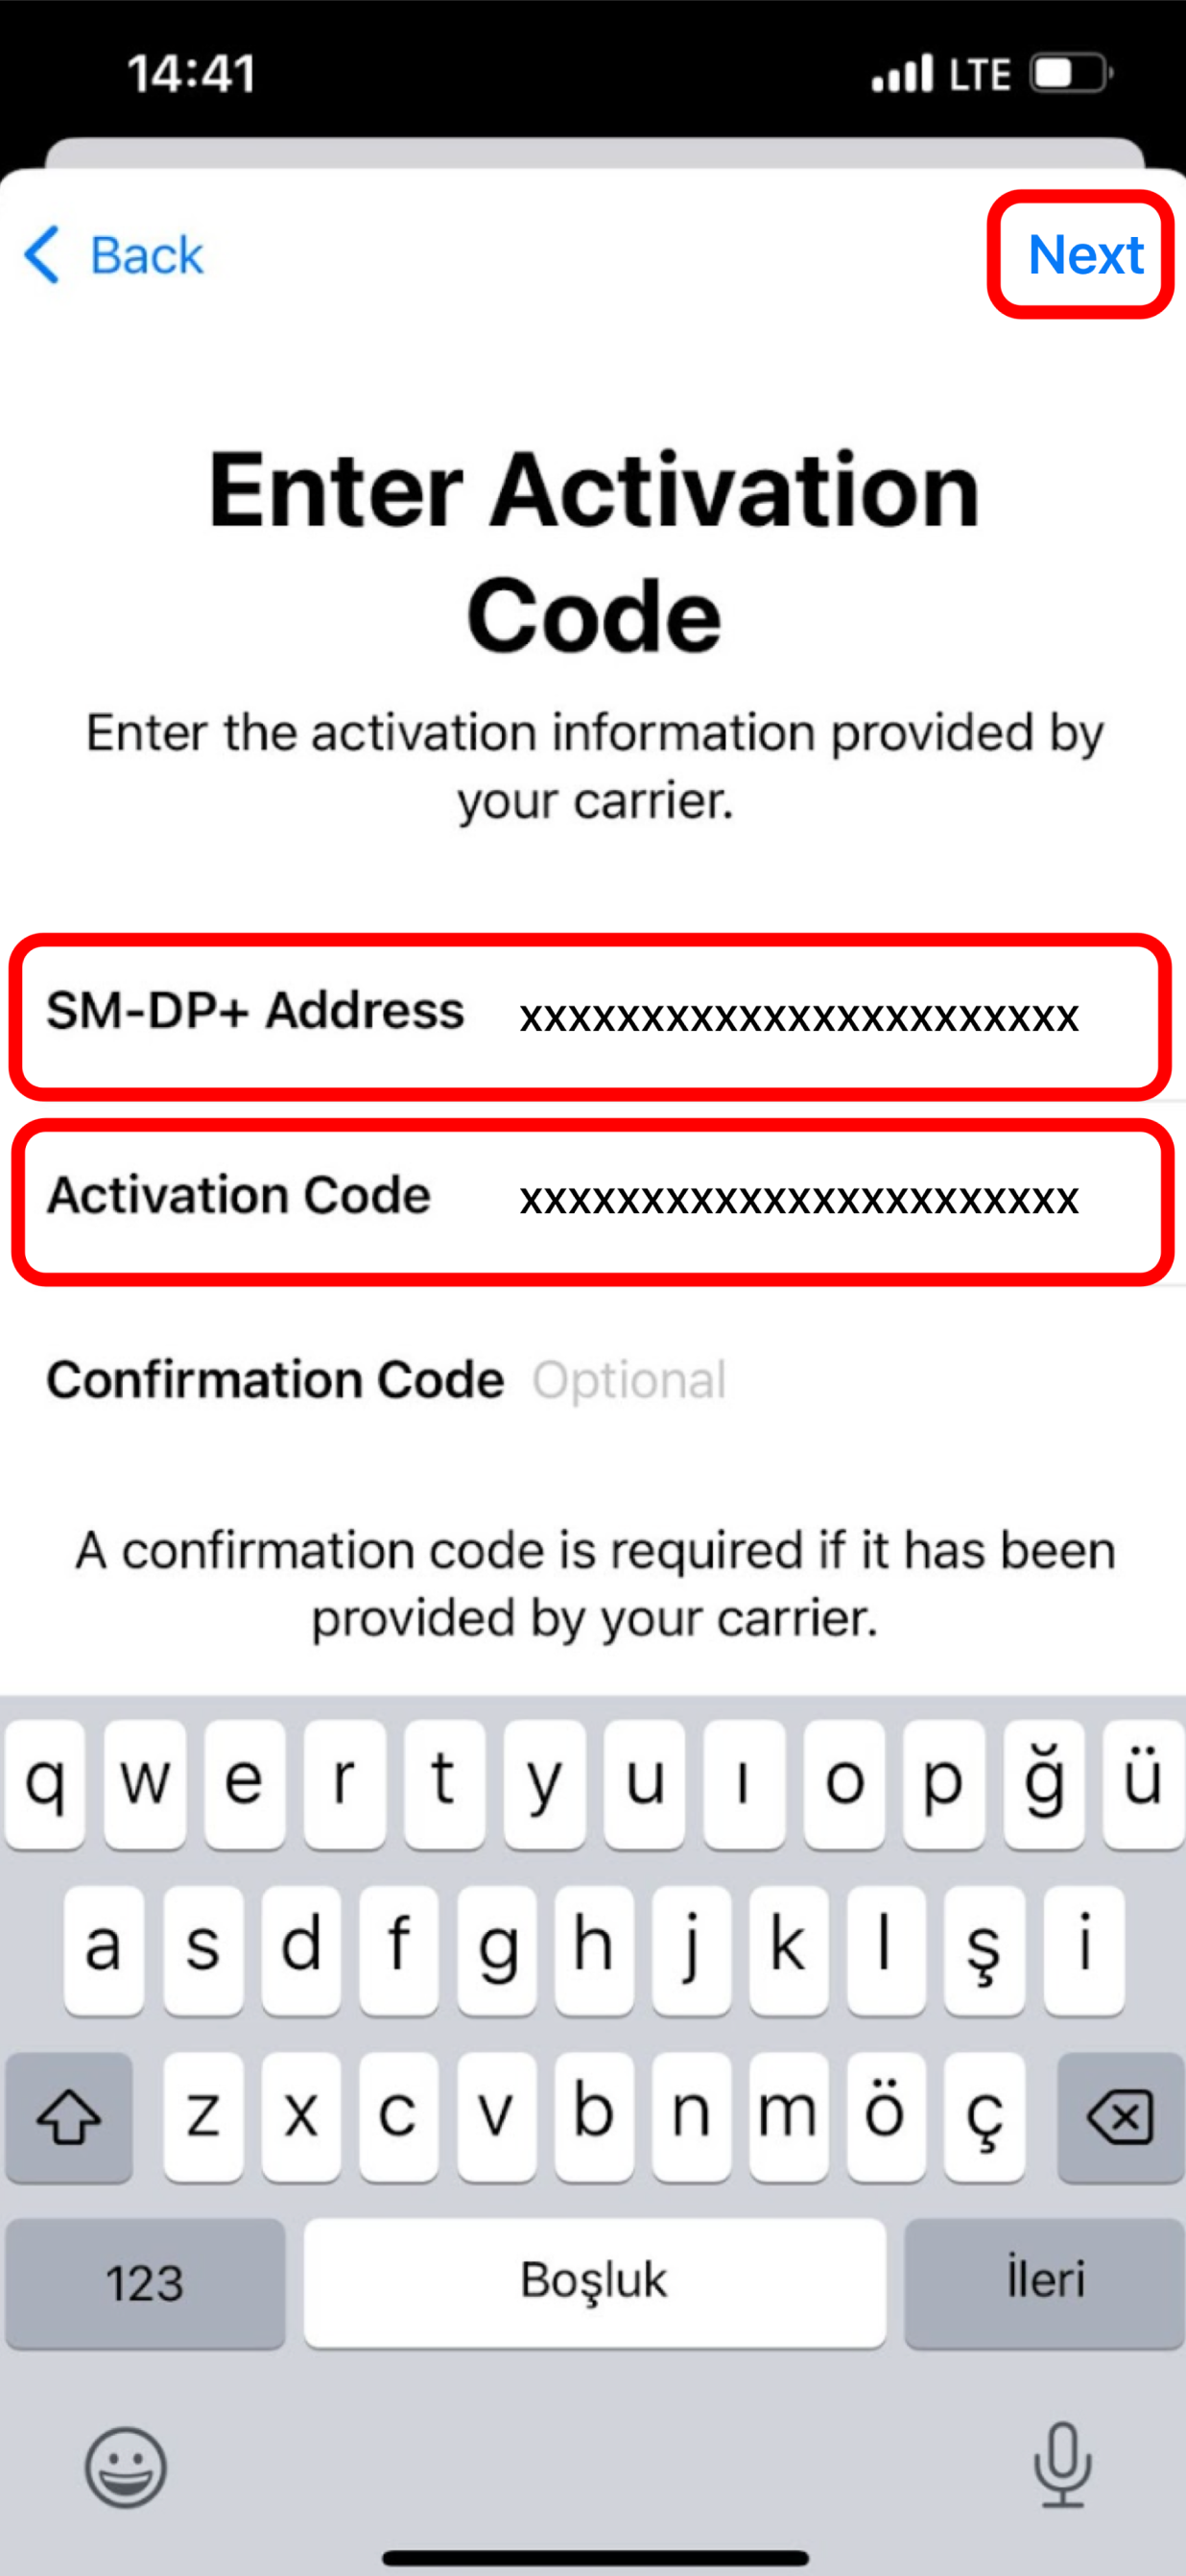
- From the Nextline app, COPY the SM-DP+ Address and paste it into the SM-DP+ Address field.
- Then, COPY and PASTE the Activation Code and Confirmation Code (if prompted)
- TAP NEXT.
- TAP Continue twice.
- WAIT a few minutes for your eSIM to activate.
- TAP Done.
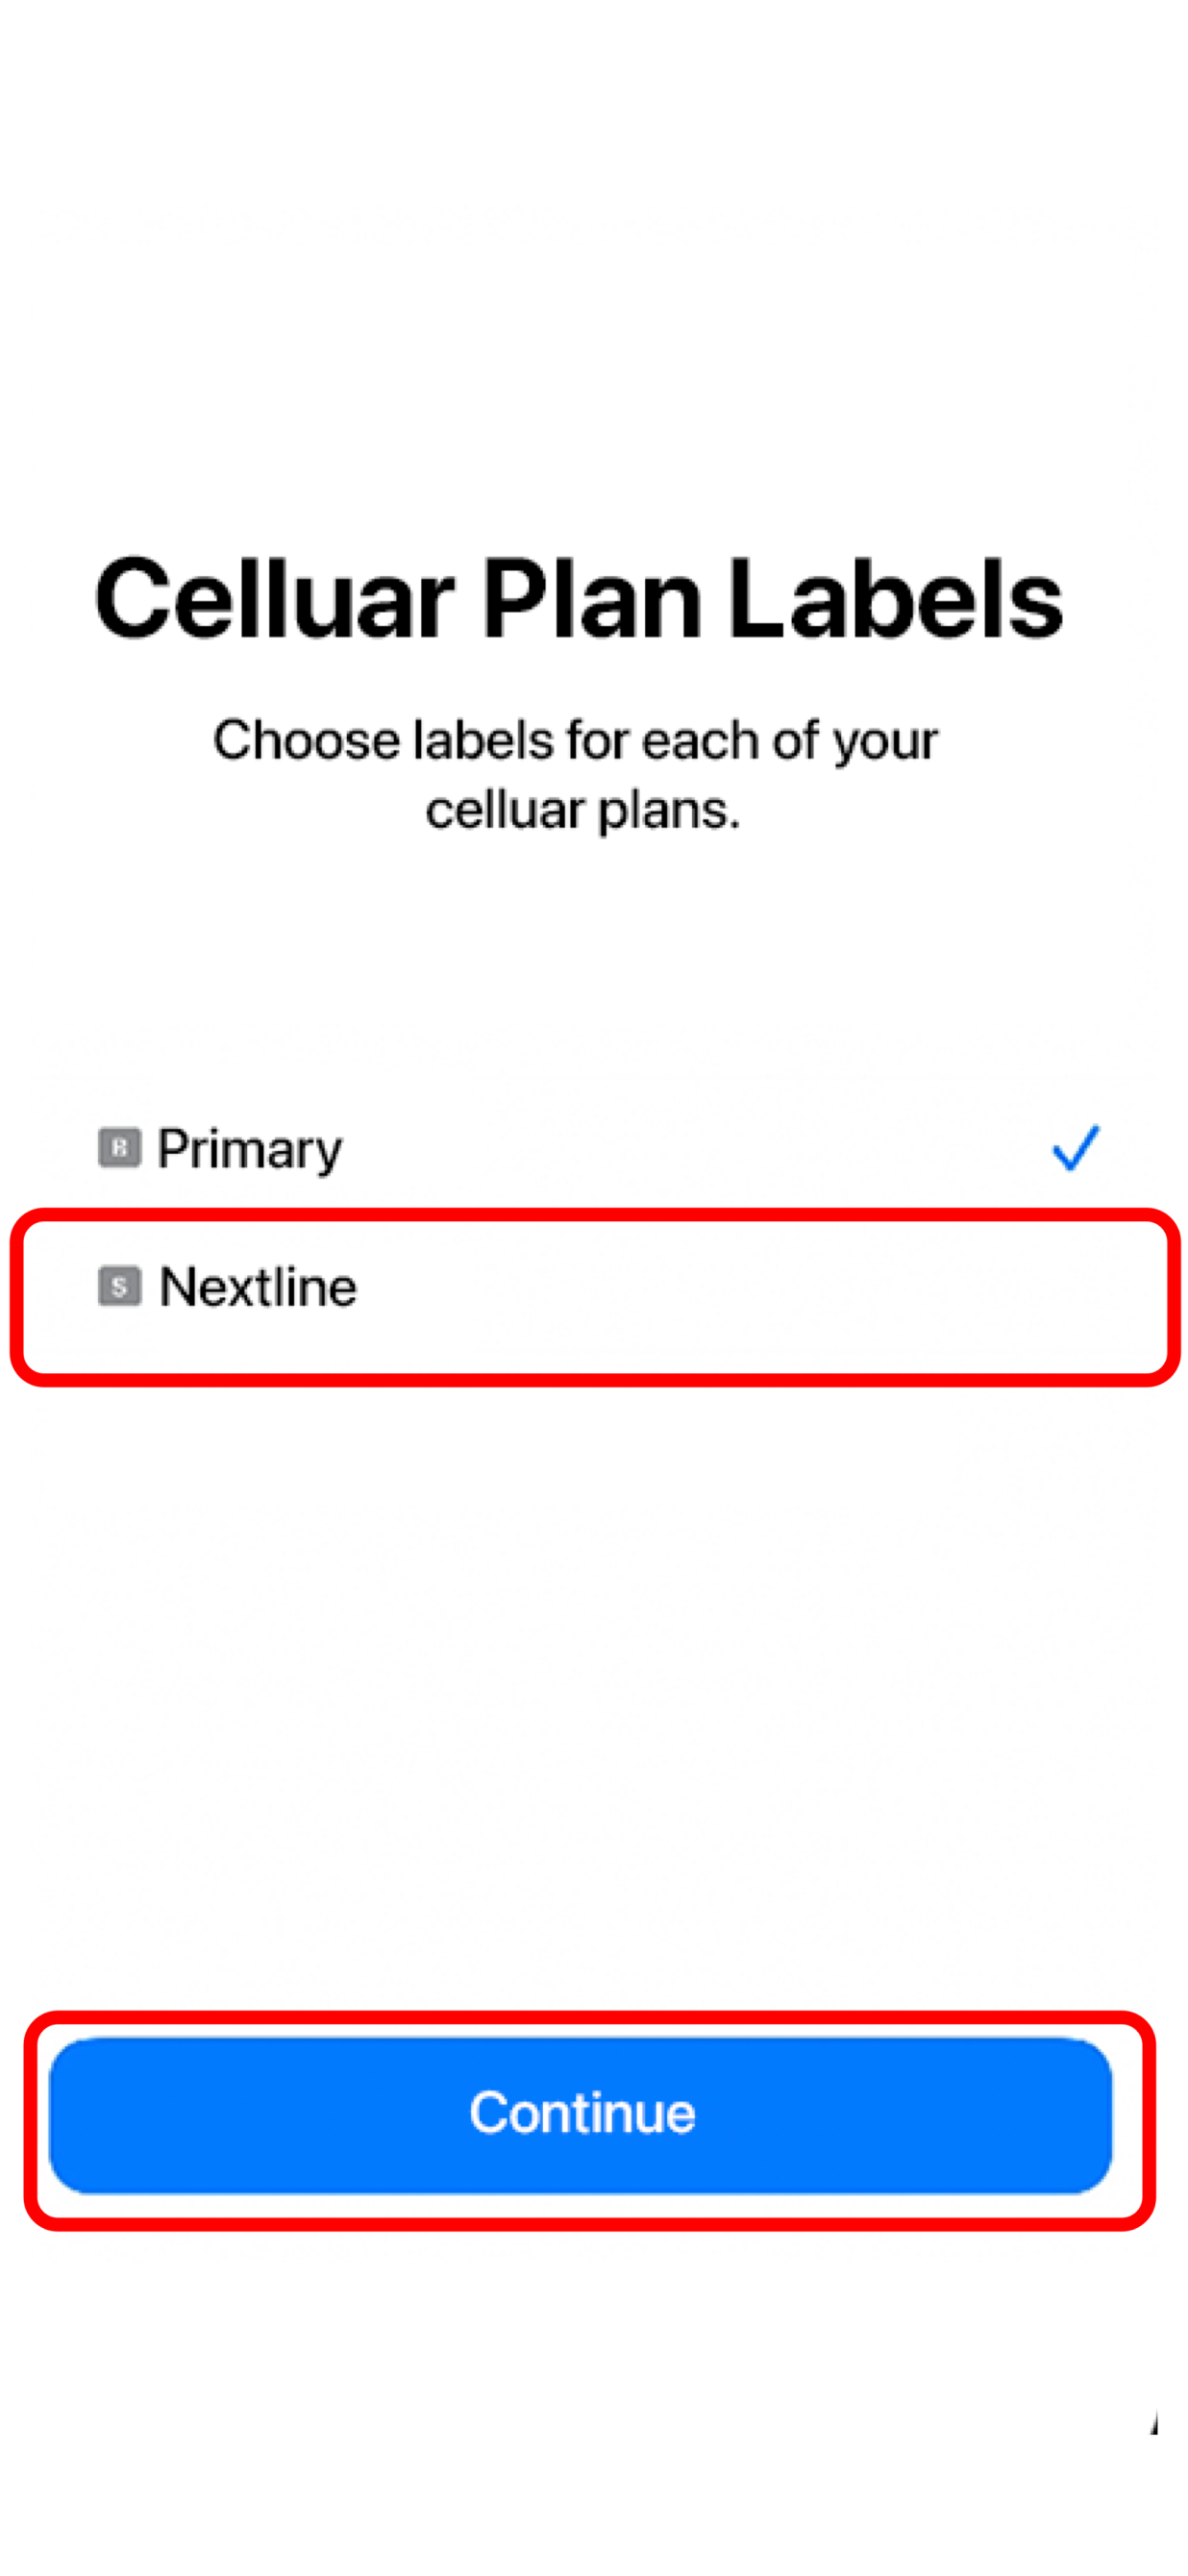
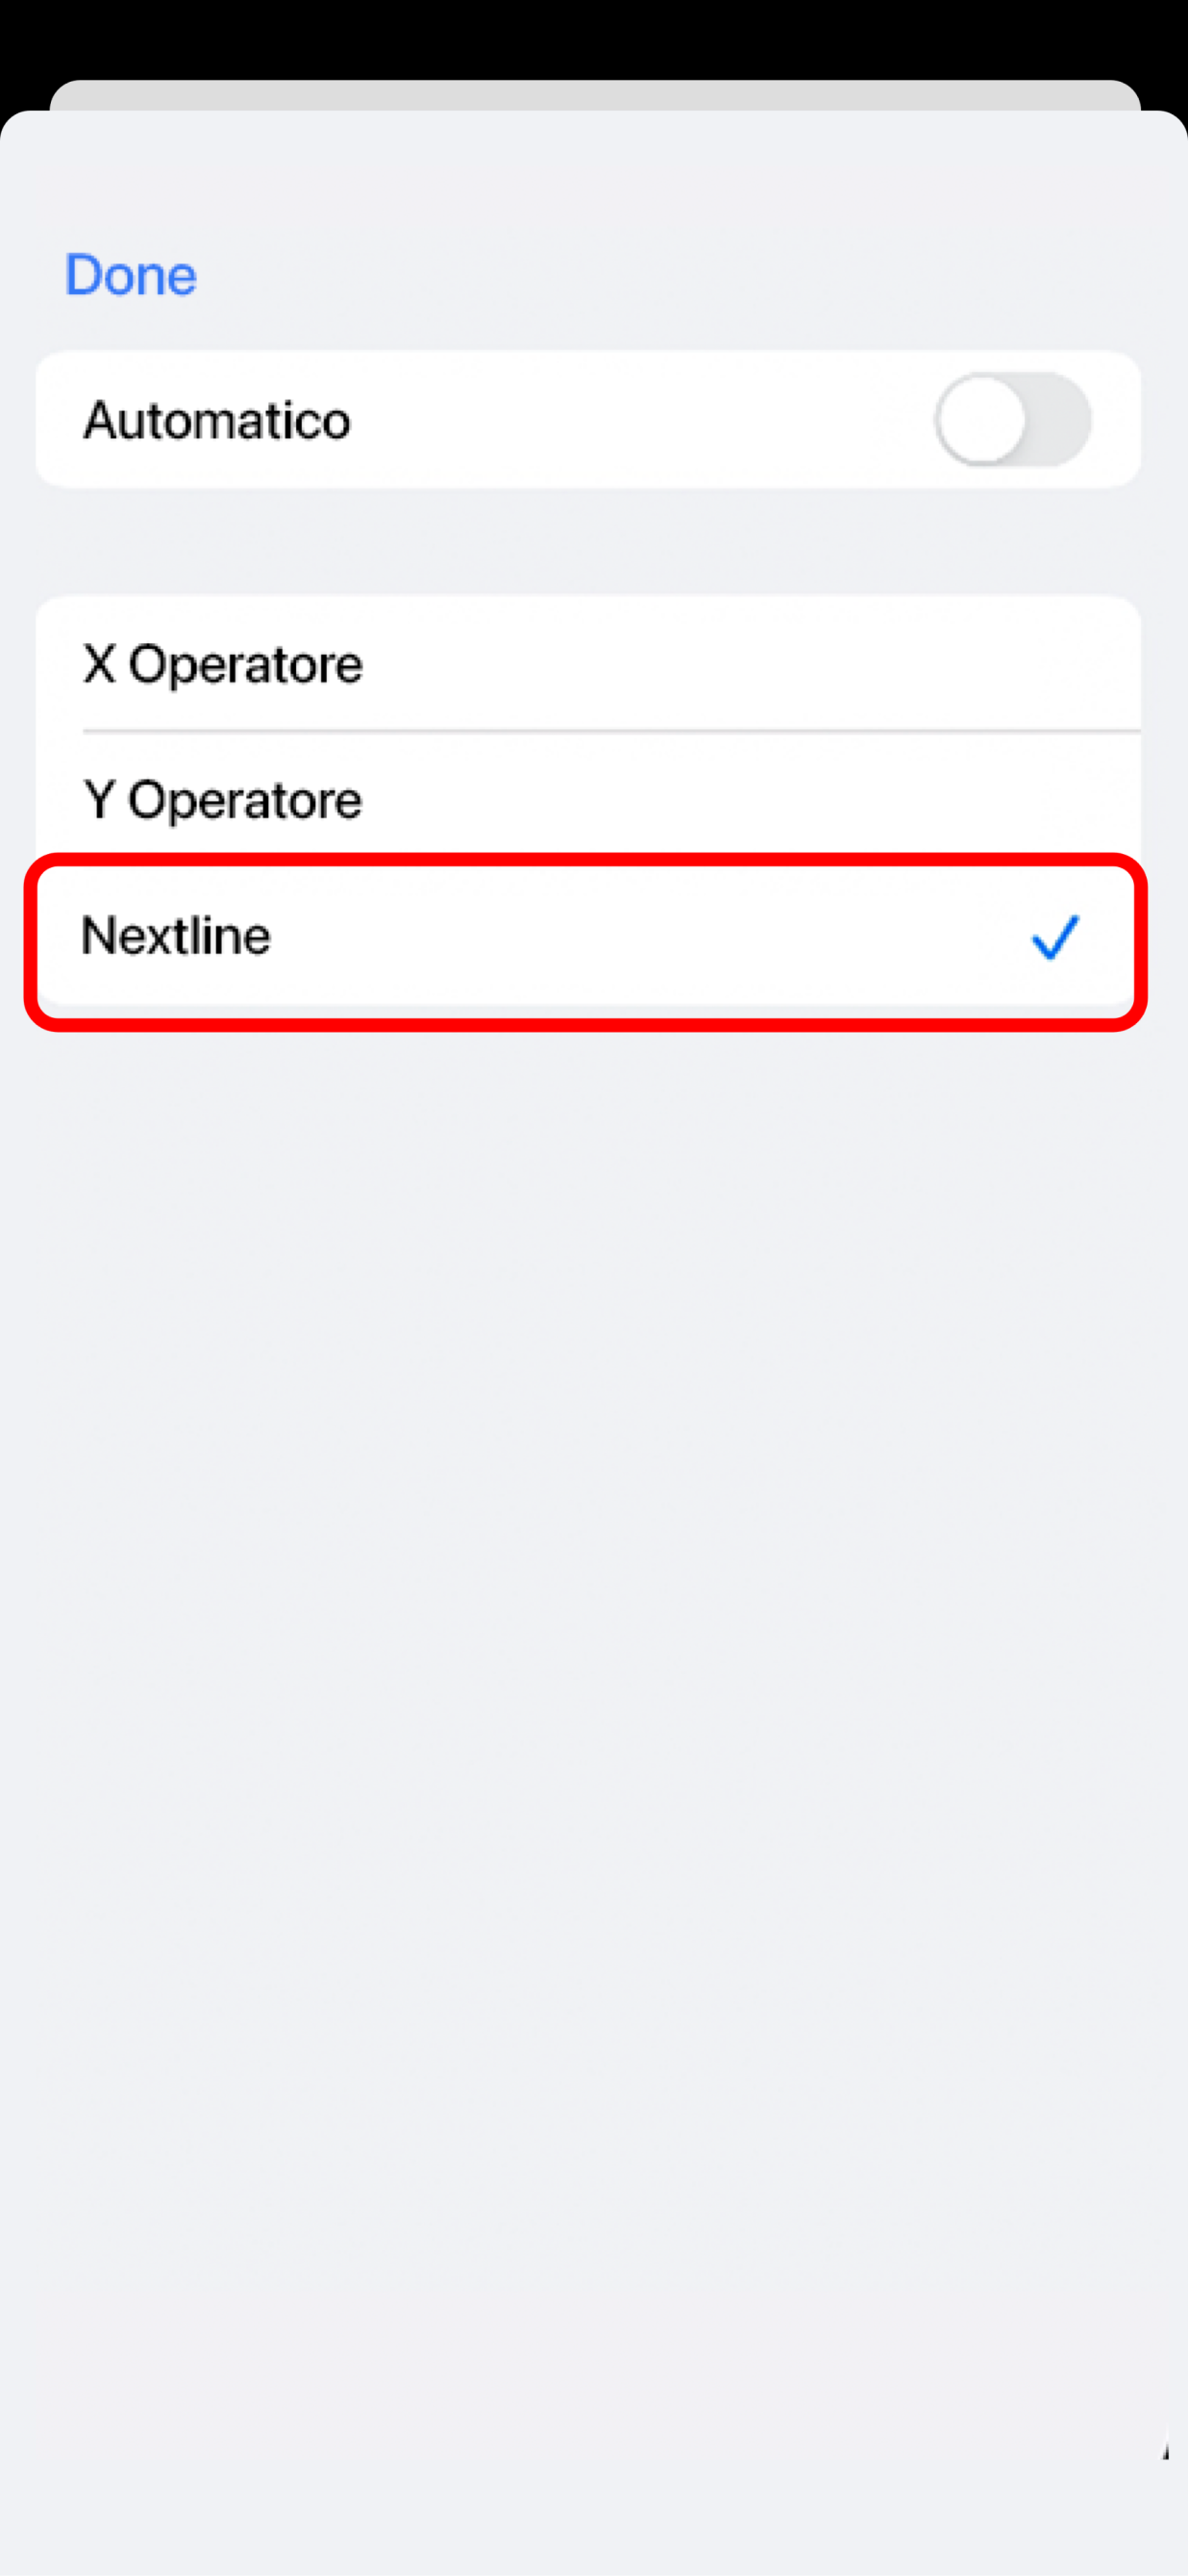
- ADD a Cellular/Mobile Plan Label to the newly installed eSIM.
- TAP Secondary.
- ENTER Nextline or your preferred label.
- TAP Done.
- TAP Continue.
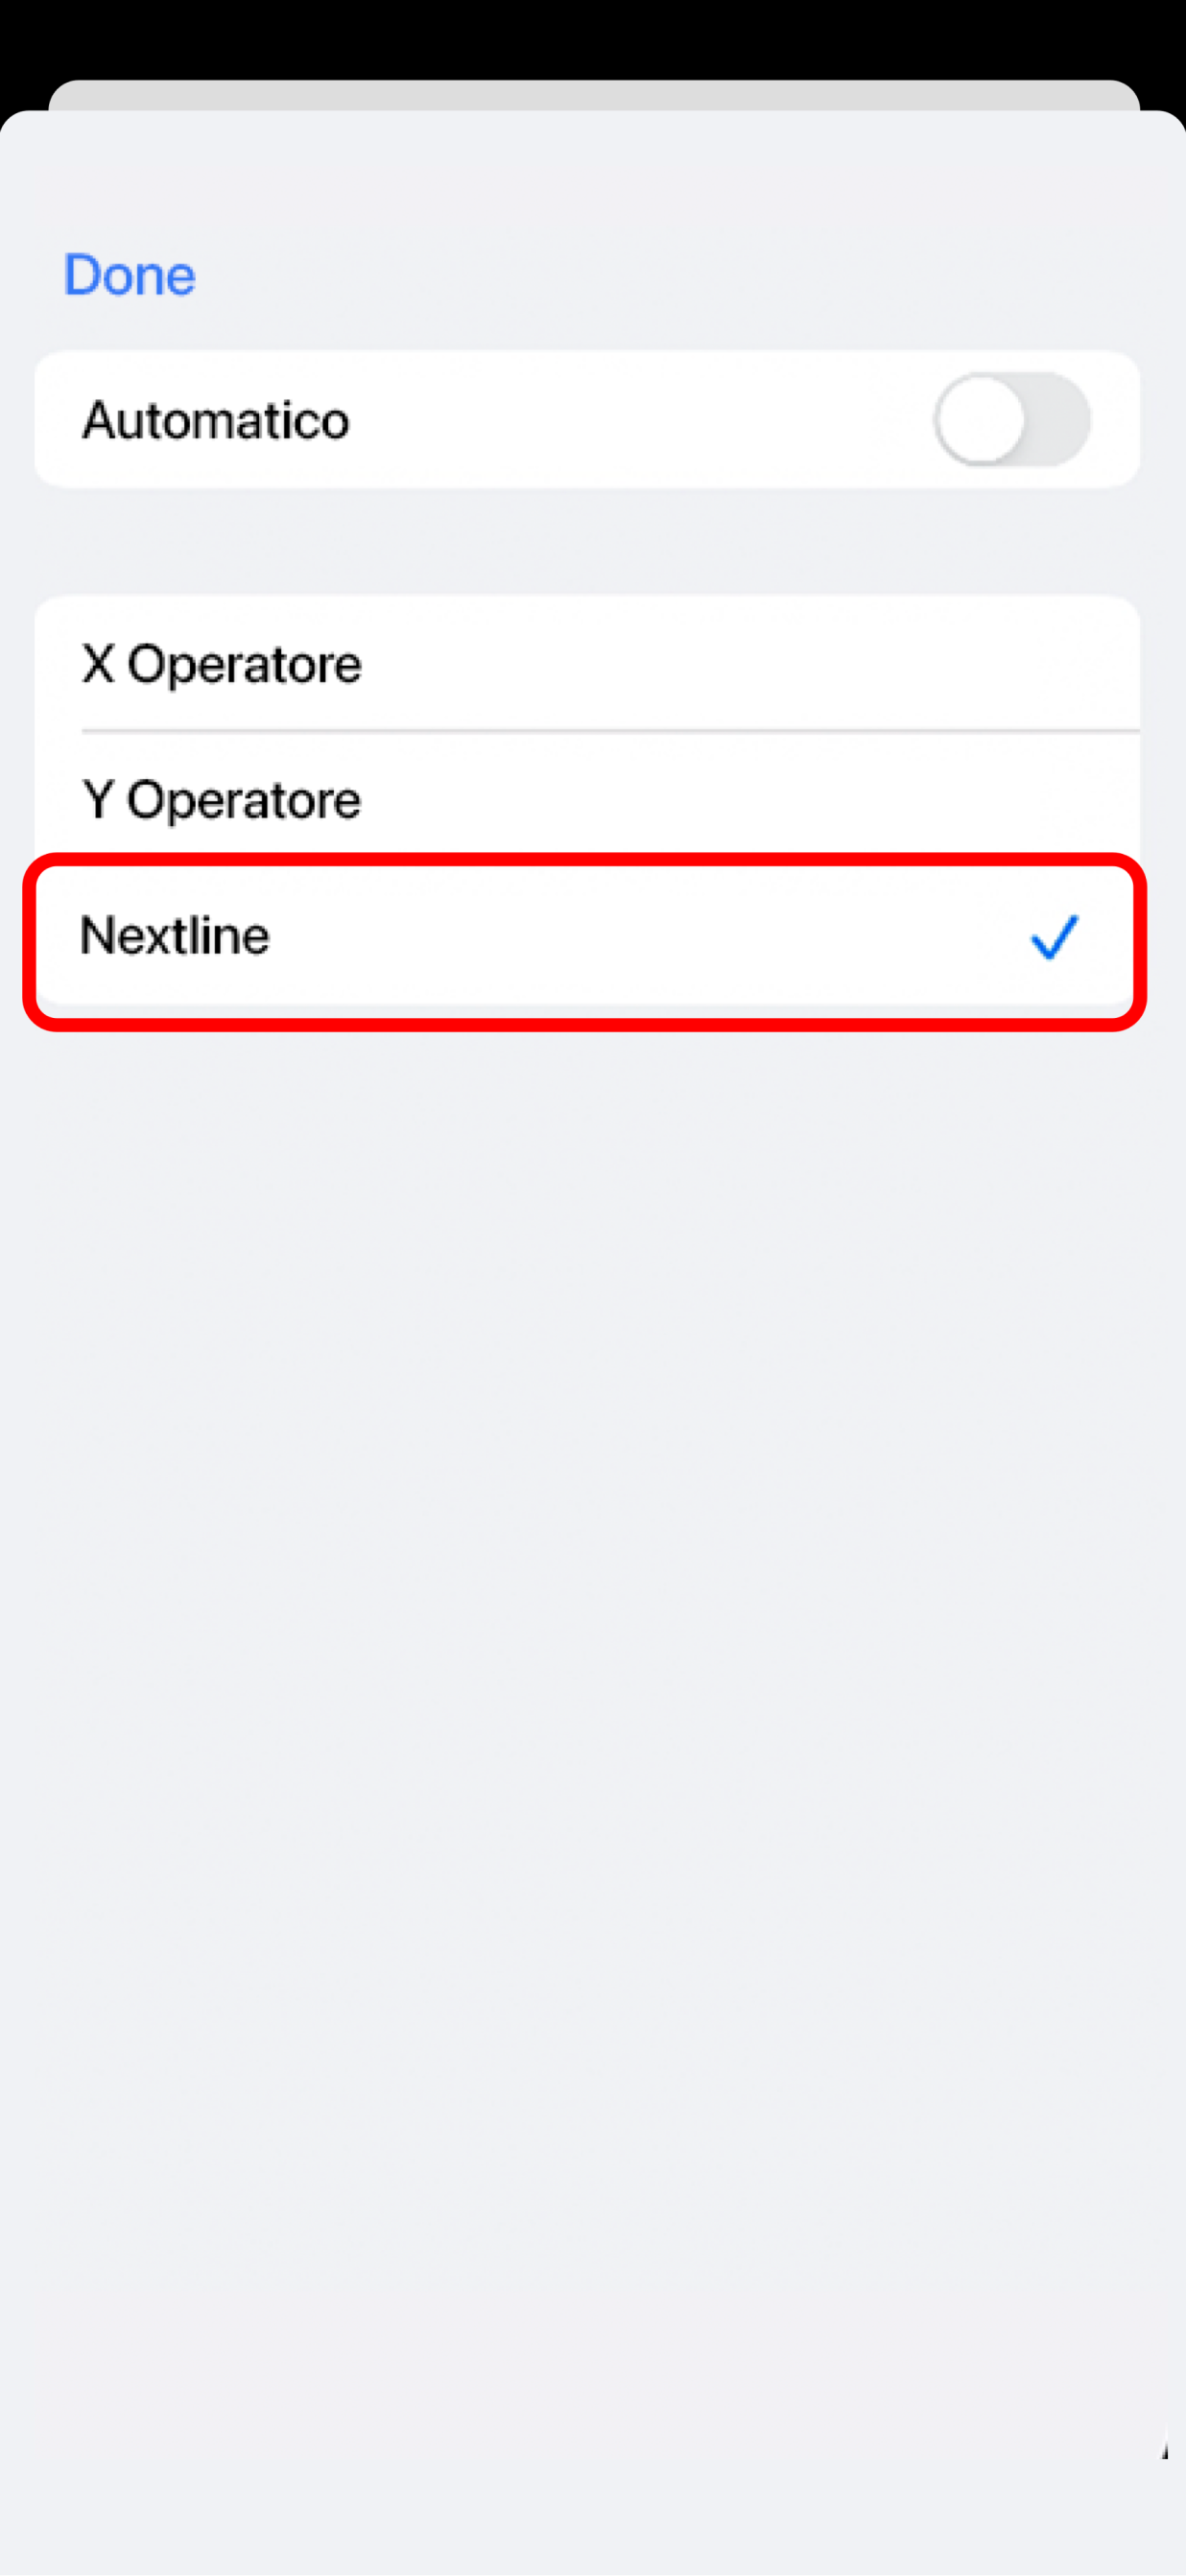
- SELECT your Primary line for calls and text messages.
- TAP Continue.
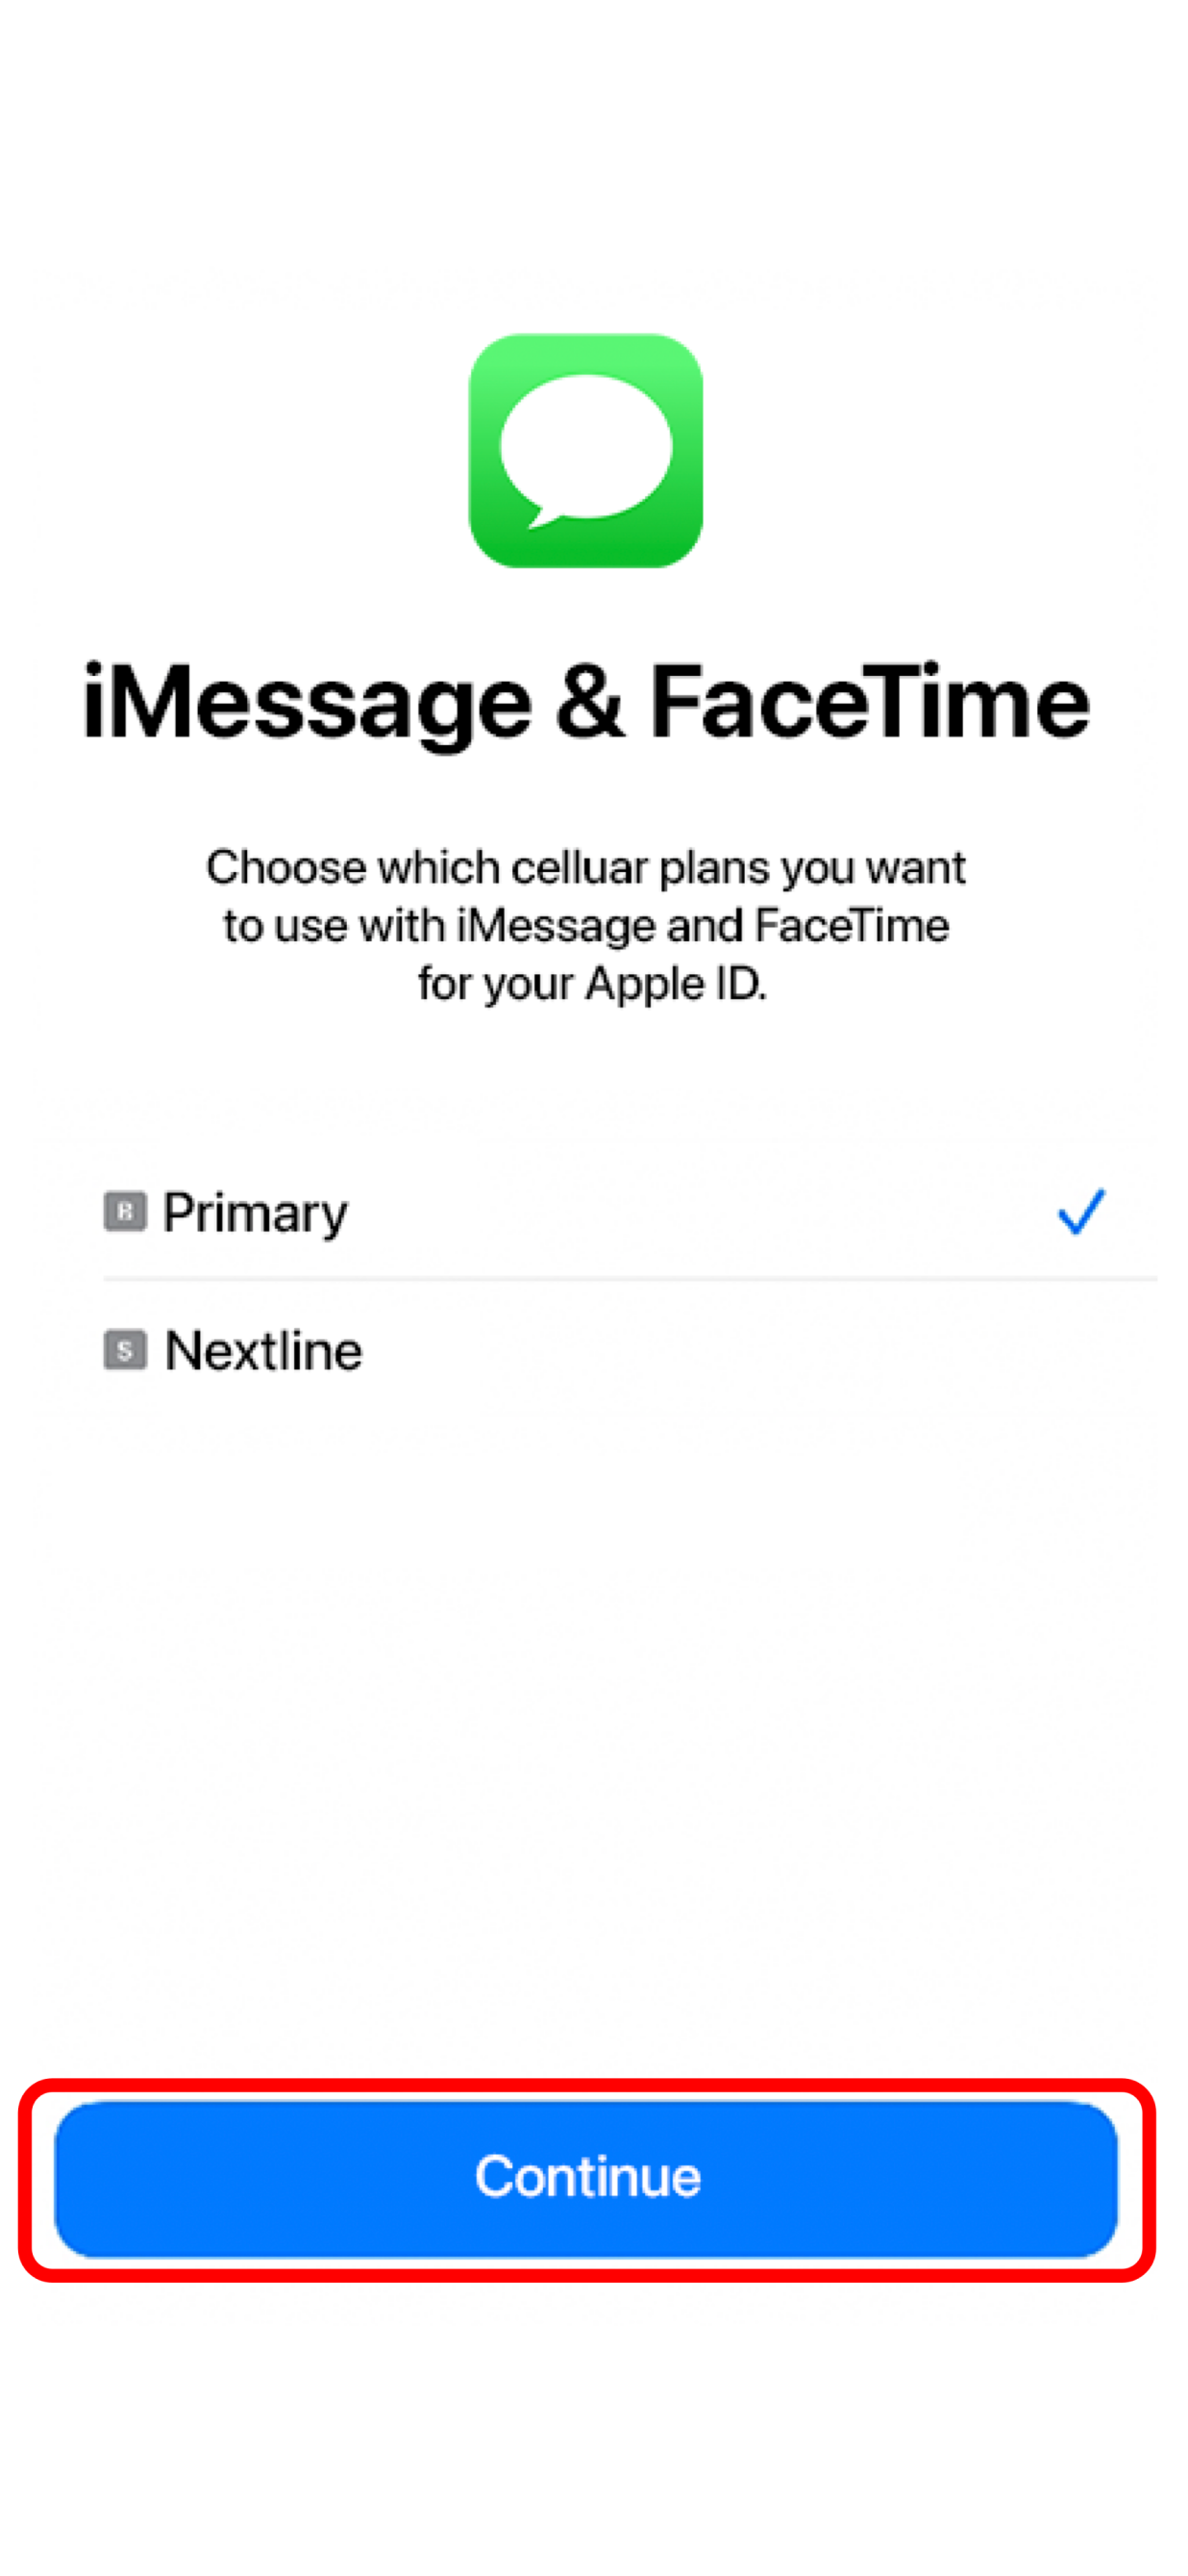
- SELECT your Primary line for iMessage & FaceTime.
- TAP Continue.
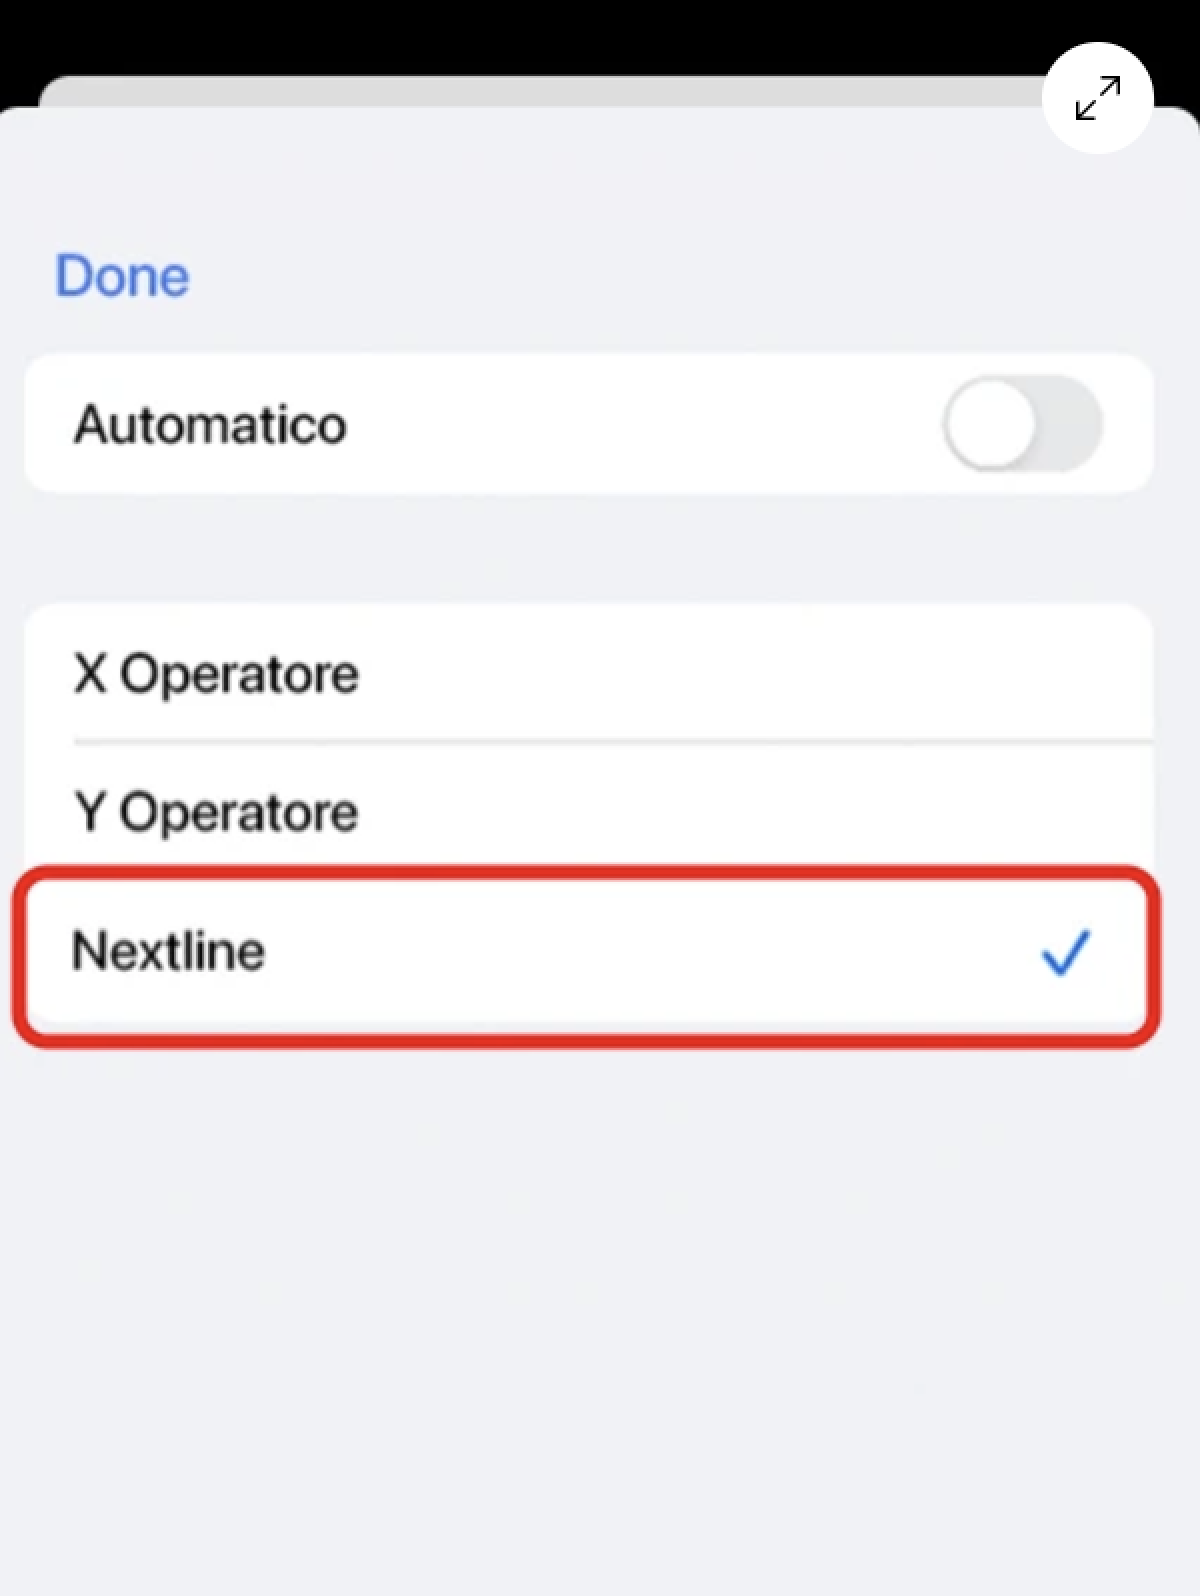
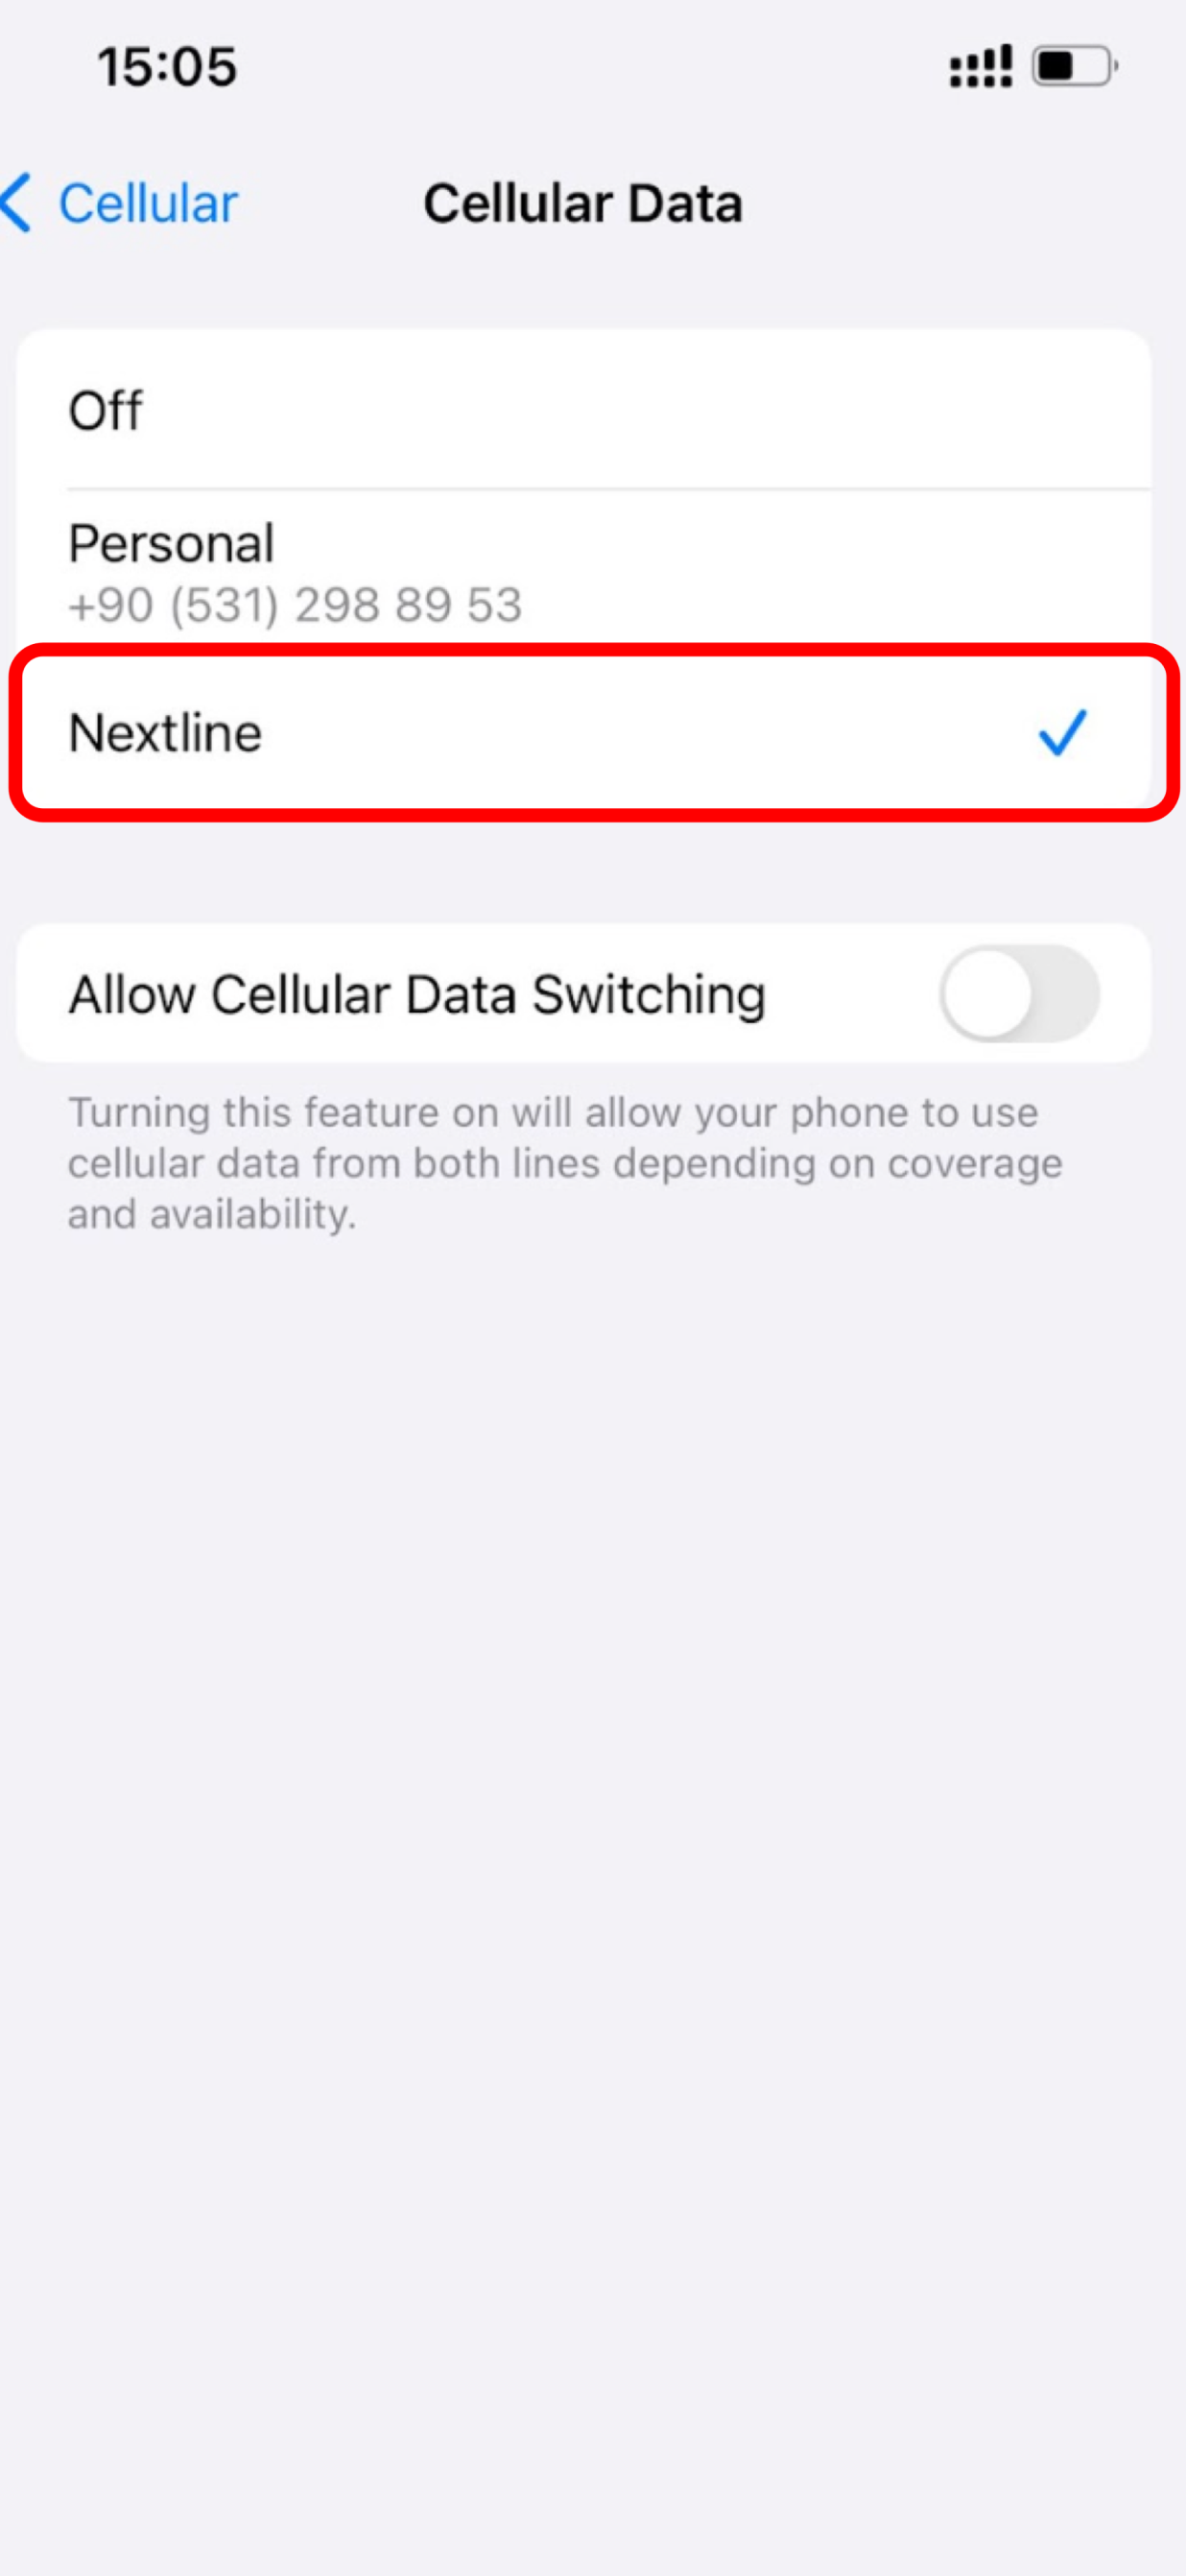
- SELECT your Nextline eSIM for Cellular/Mobile Data.
- ENSURE that Allow Cellular Data Switching is turned off.
- TAP Continue.
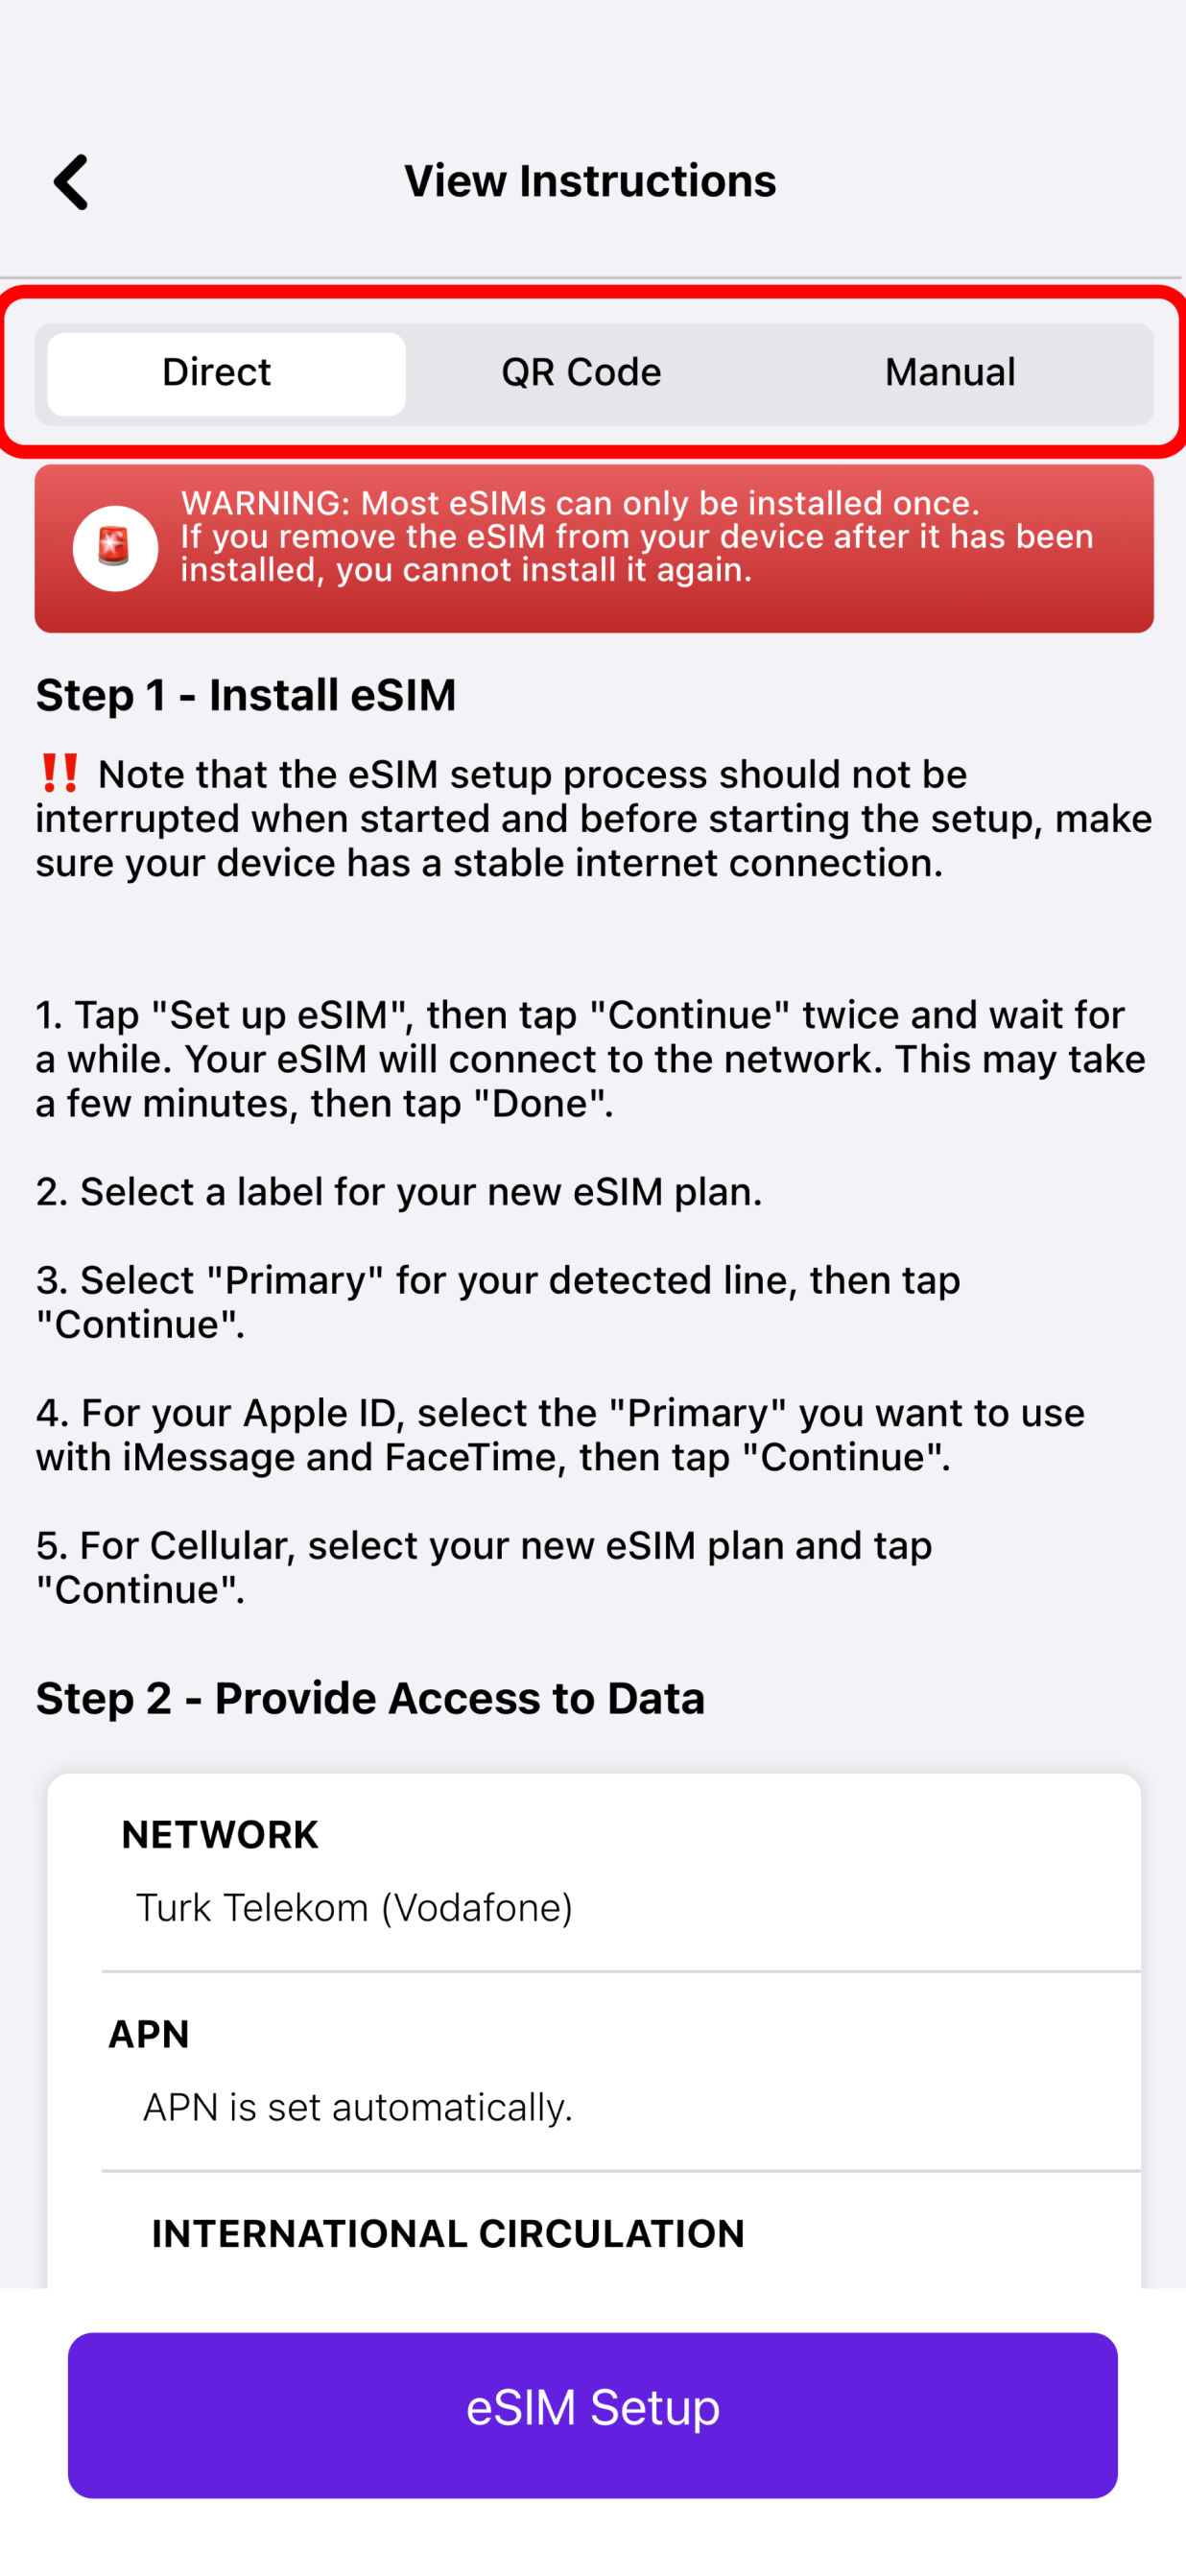
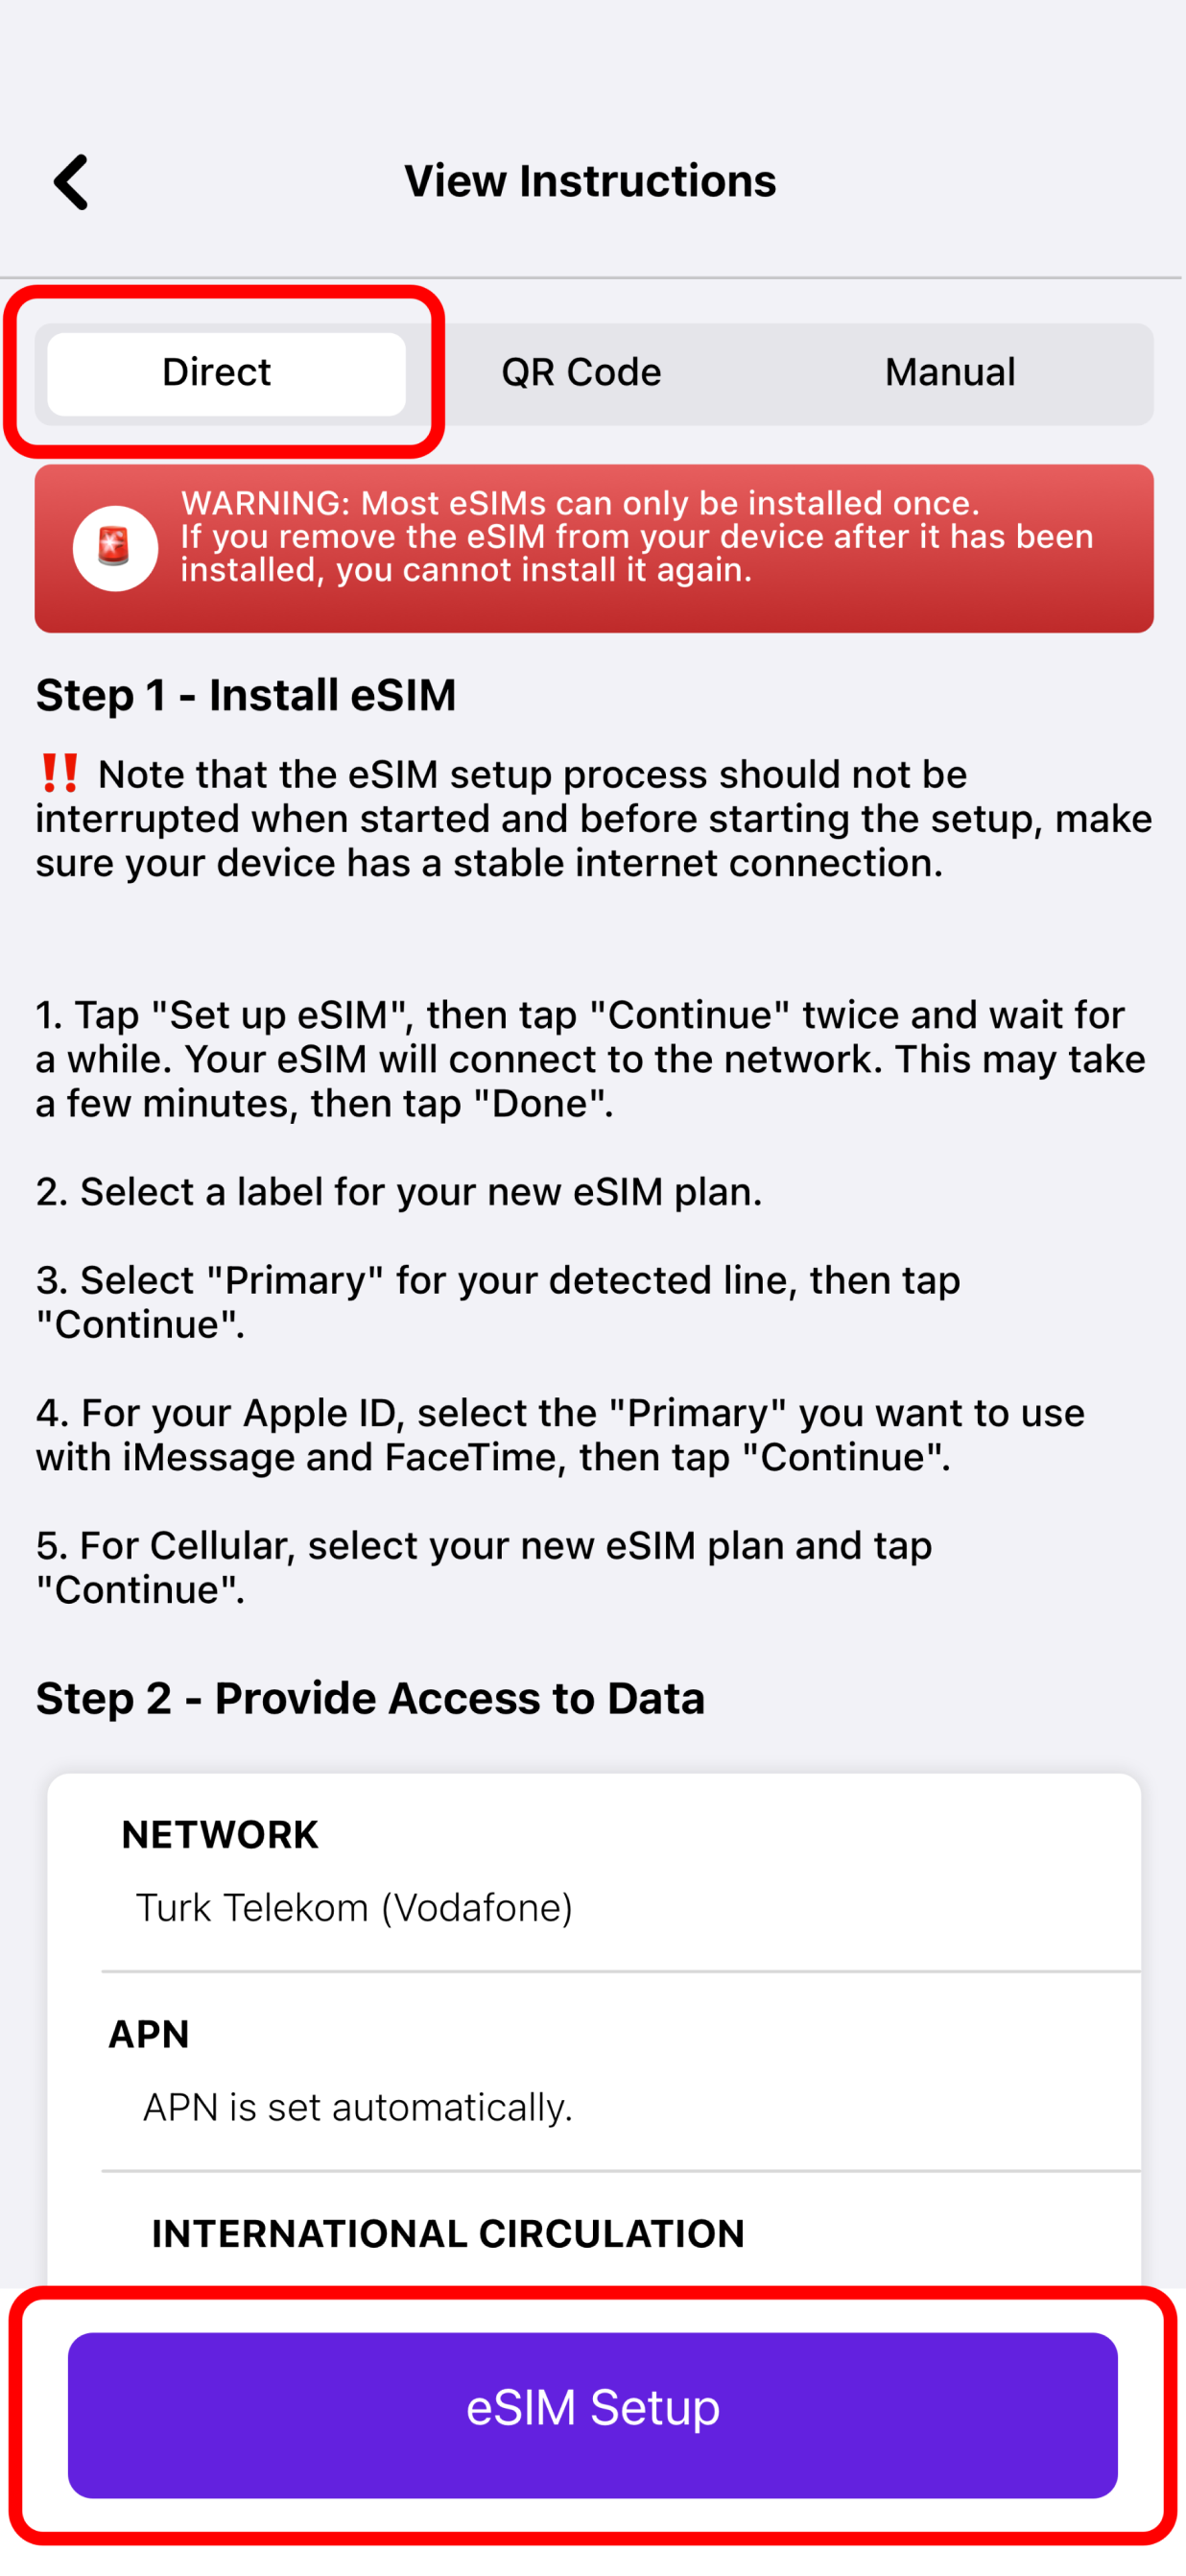
Make sure your iOS device supports eSIMs before proceeding, as not all of them are. Please check if your iOS device is carrier-unlocked and supports eSIMs by following the instructions in this article. To see if your device supports eSIM we have a list for you. See Here
You can set up an eSIM by following these instructions after you have verified that your iOS device supports eSIMs and is linked to a reliable internet connection.
I. INSTALLATION- OPEN the Nextline app.
- TAP My eSIMs.
- TAP the eSIM you want to install.
- TAP View Instructions.
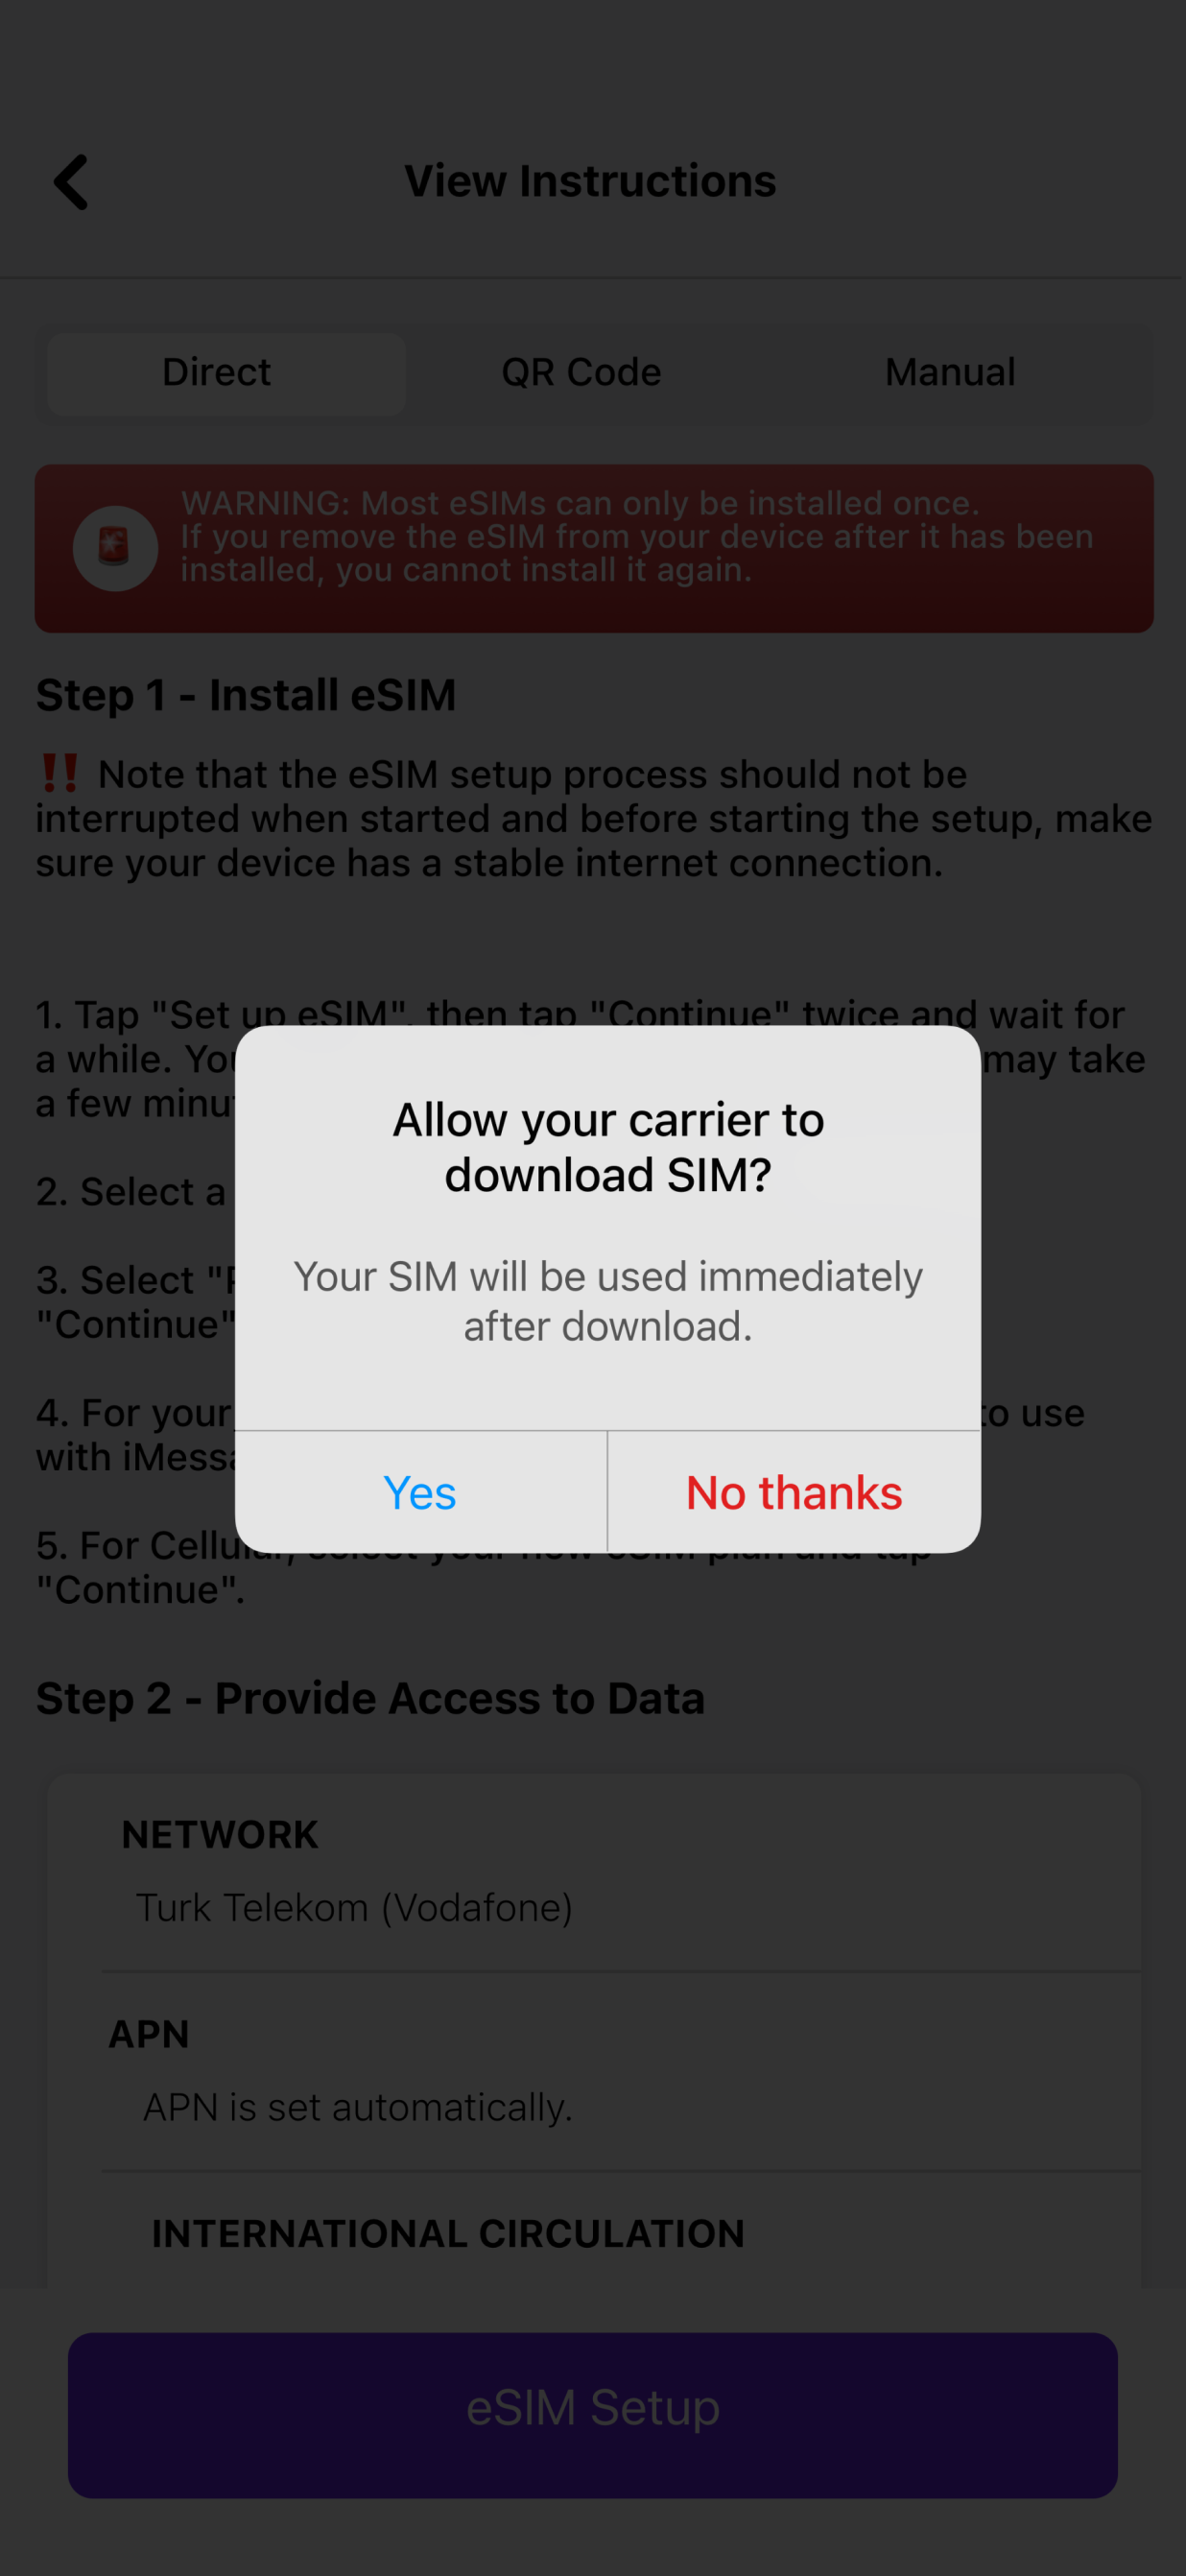
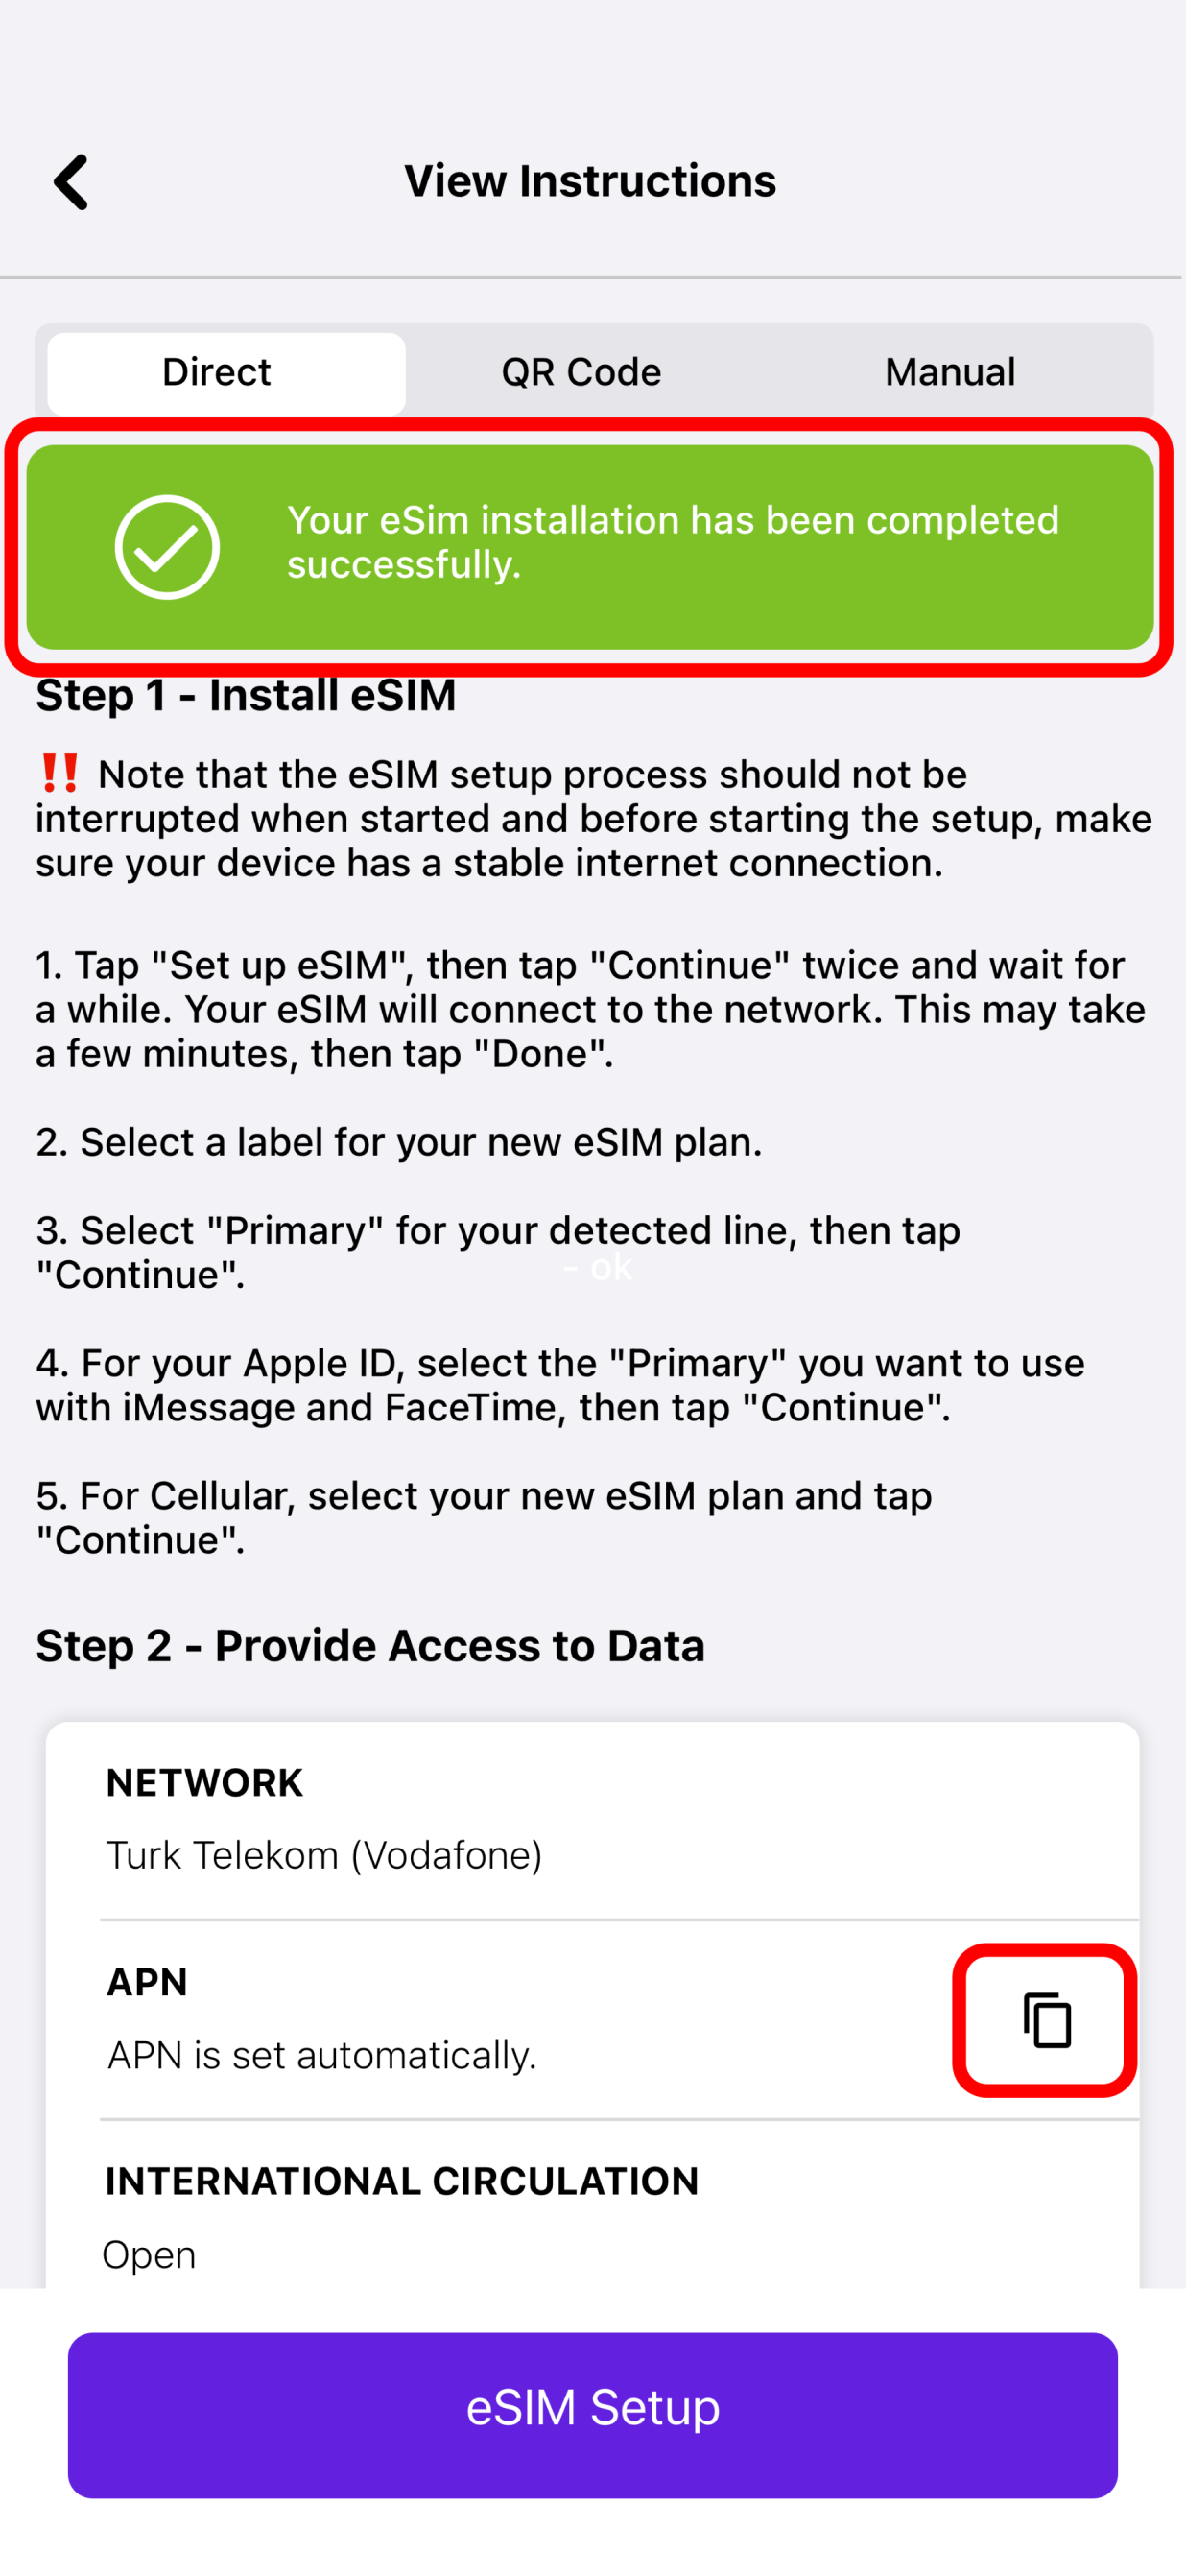
- TAP Direct.
- TAP Install eSIM.

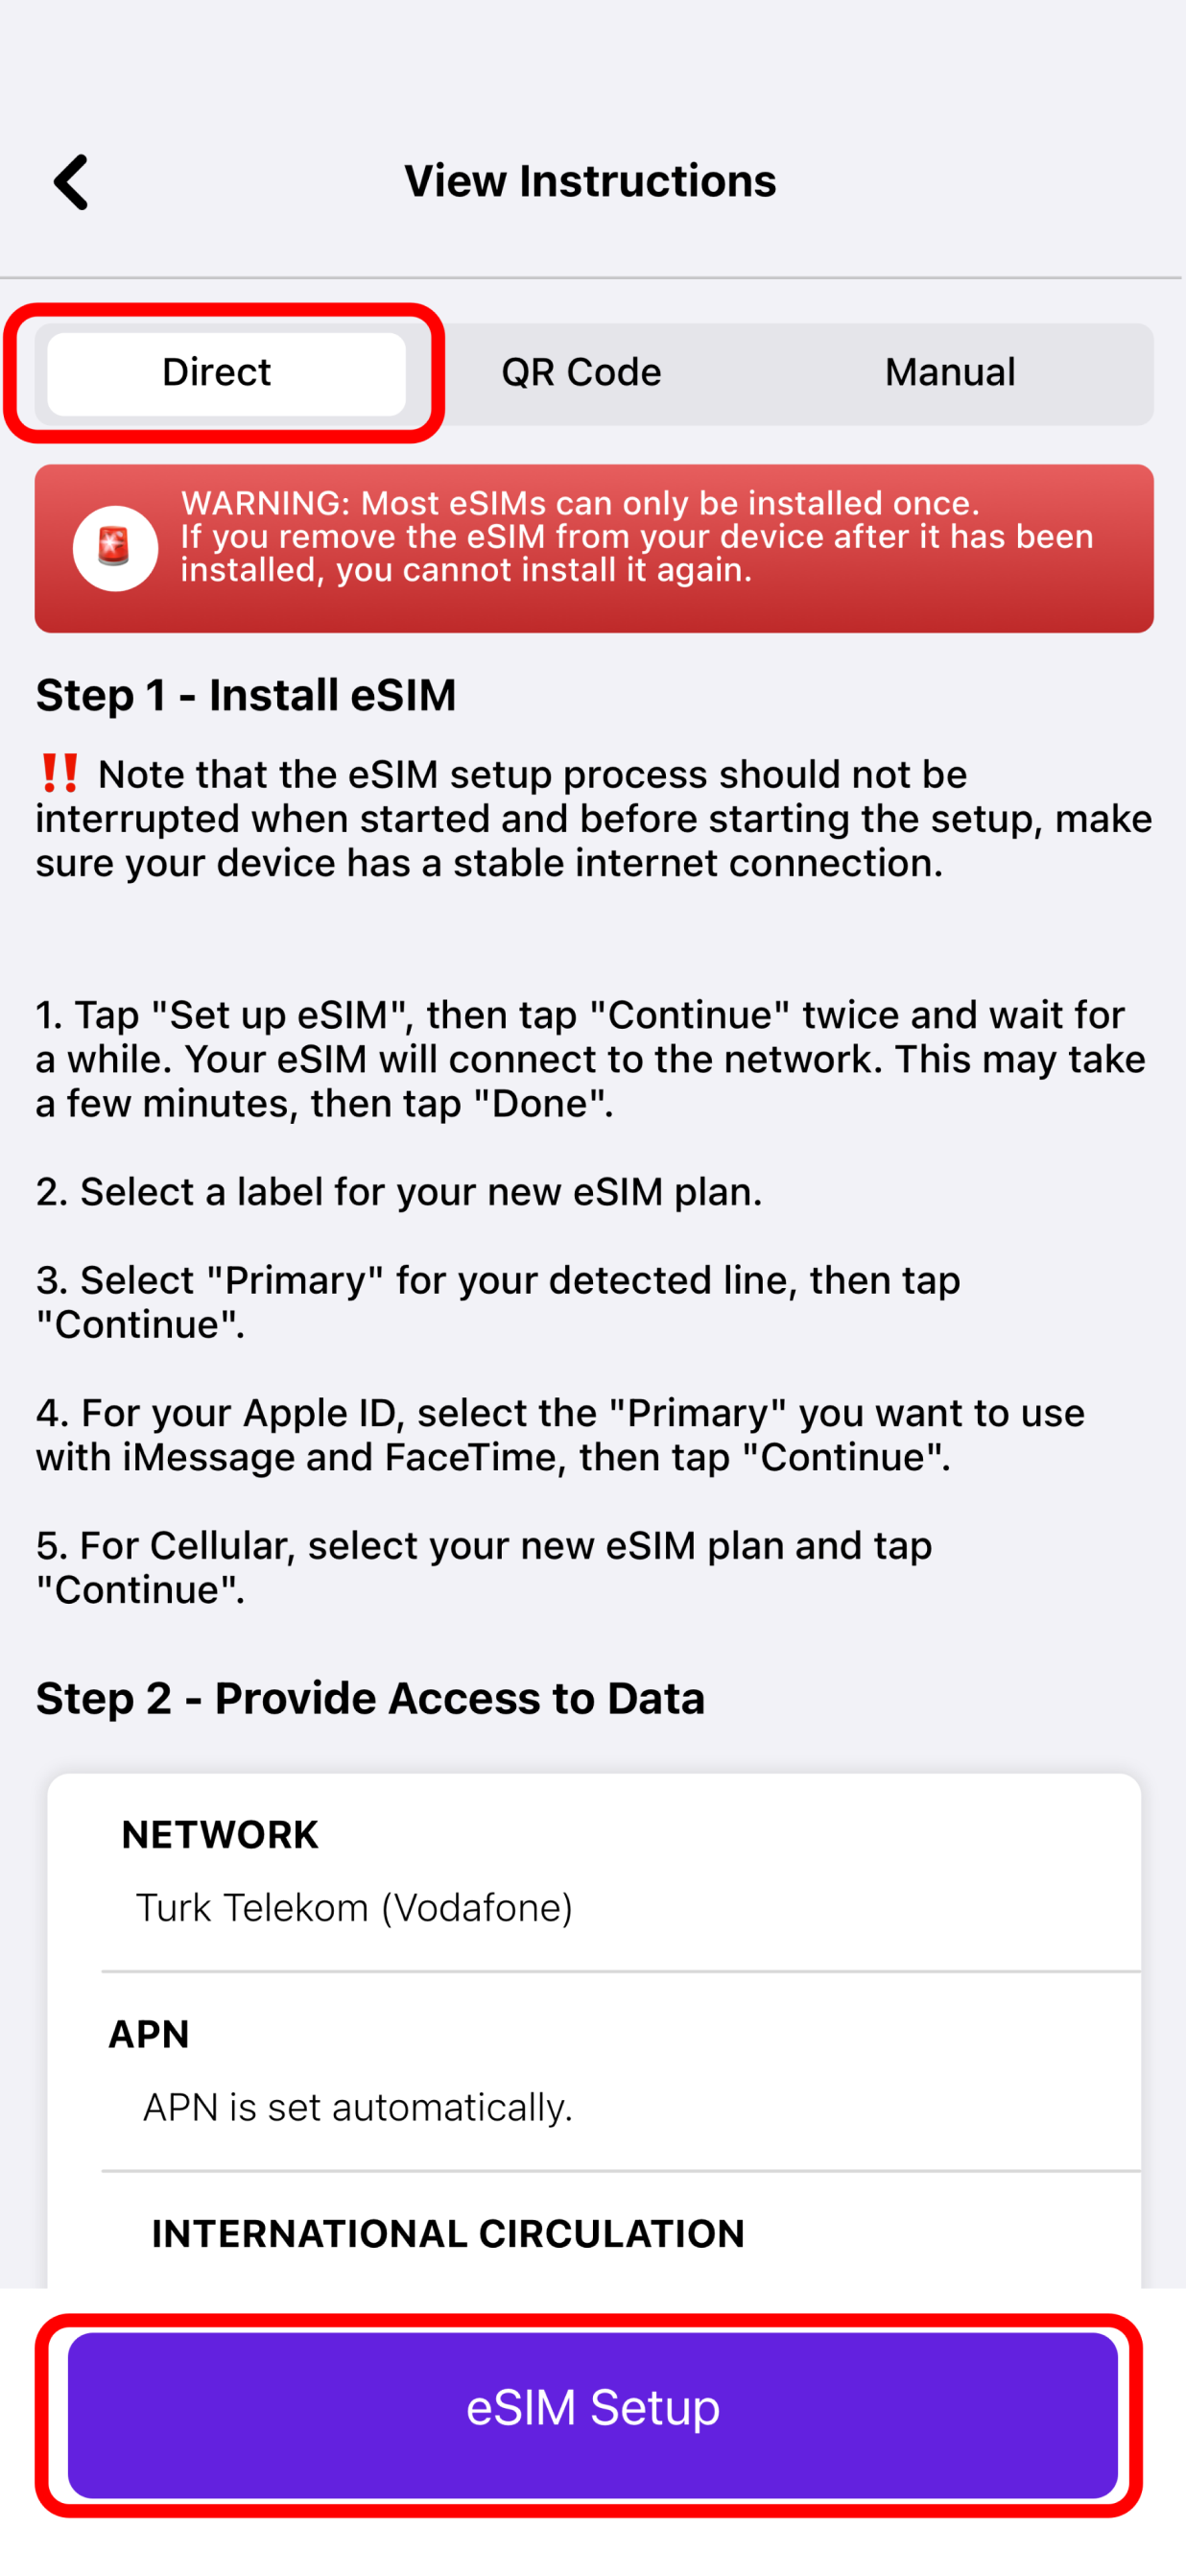
- TAP NEXT to move through the step-by-step guide.
- TAP Continue twice.
- WAIT a few minutes for your eSIM to activate.
- TAP Done.
- ADD a Cellular/Mobile Plan Label to the newly installed eSIM.
- TAP Secondary.
- .ENTER Nextline or your preferred label.
- TAP Done.
- TAP Continue.
- SELECT your Primary line for calls and text messages..
- TAP Continue.
- SELECT your Primary line for iMessage & FaceTime.
- TAP Continue.
- SELECT your Nextline eSIM for Cellular/Mobile Data.
- ENSURE that Allow Cellular Data Switching is turned off.
- TAP Continue.


- SELECT your Primary line for calls and text messages.
- TAP Continue.
- SELECT your Primary line for iMessage & FaceTime.
- TAP Continue.
- SELECT your Nextline eSIM for Cellular/Mobile Data.
- ENSURE that Allow Cellular Data Switching is turned off.
- TAP Continue.
You need to understand the activation policy in order to determine when you can install your eSIM. Most eSIMs will be activated at their destination after connecting to a supported network. However, certain eSIMs, independent of location, come with quick activation upon installation.
How can I know when my eSIM will be activated?
Check the activation policy of your eSIM. Prior to purchase:
- Search for the country you want to buy an eSIM for.
- Choose the eSIM that you prefer.
- Check the Additional Details
- To access the Activation Policy, tap "Show more."
After Purchase:
- Go to My eSIMs > Details > Show more > Activation Policy
The following will be the activation policy:
"The validity period starts when the eSIM connects to any supported network(s)": When you reach your location, if the configuration has been finished as instructed on your eSIM installation page, you can connect by turning on your eSIM line.
"The validity period starts at the installation": It means that even though you haven't arrived at your destination yet, your eSIM will activate quickly after installation, beginning the validity period.
If you have any questions, please feel free to contact our support team, and we'll be happy to help!
Either before or after you land, you can install your eSIM. Your activation policy will determine the optimal time for you to install your eSIM. For further details on your eSIM's activation policy, please see "When can I install my eSIM?"
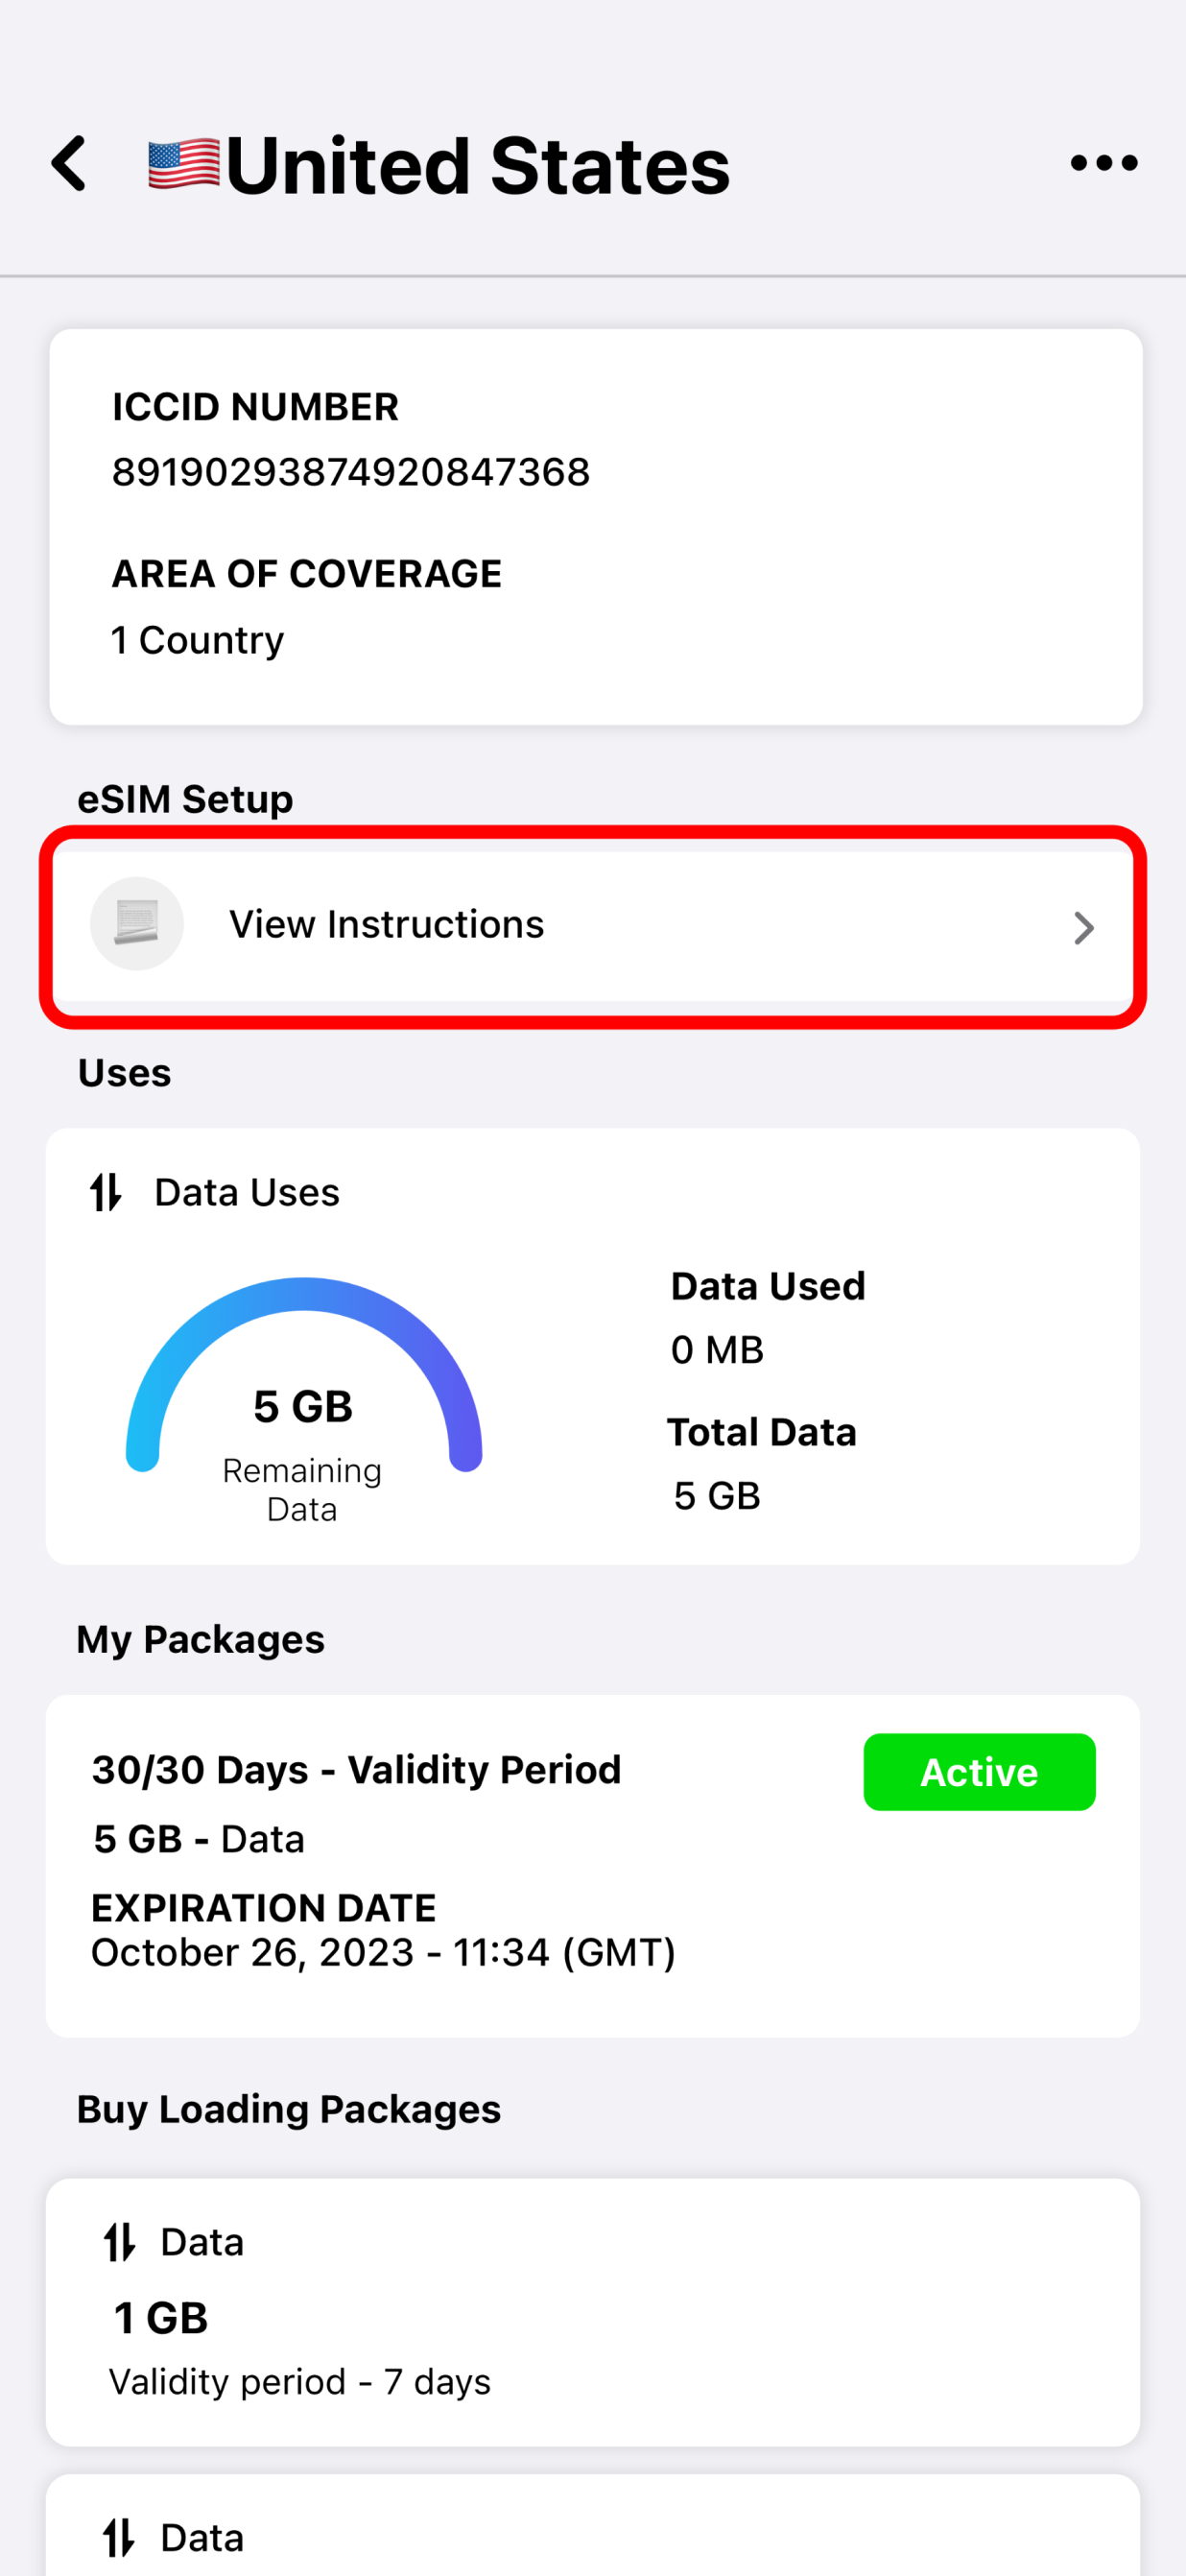
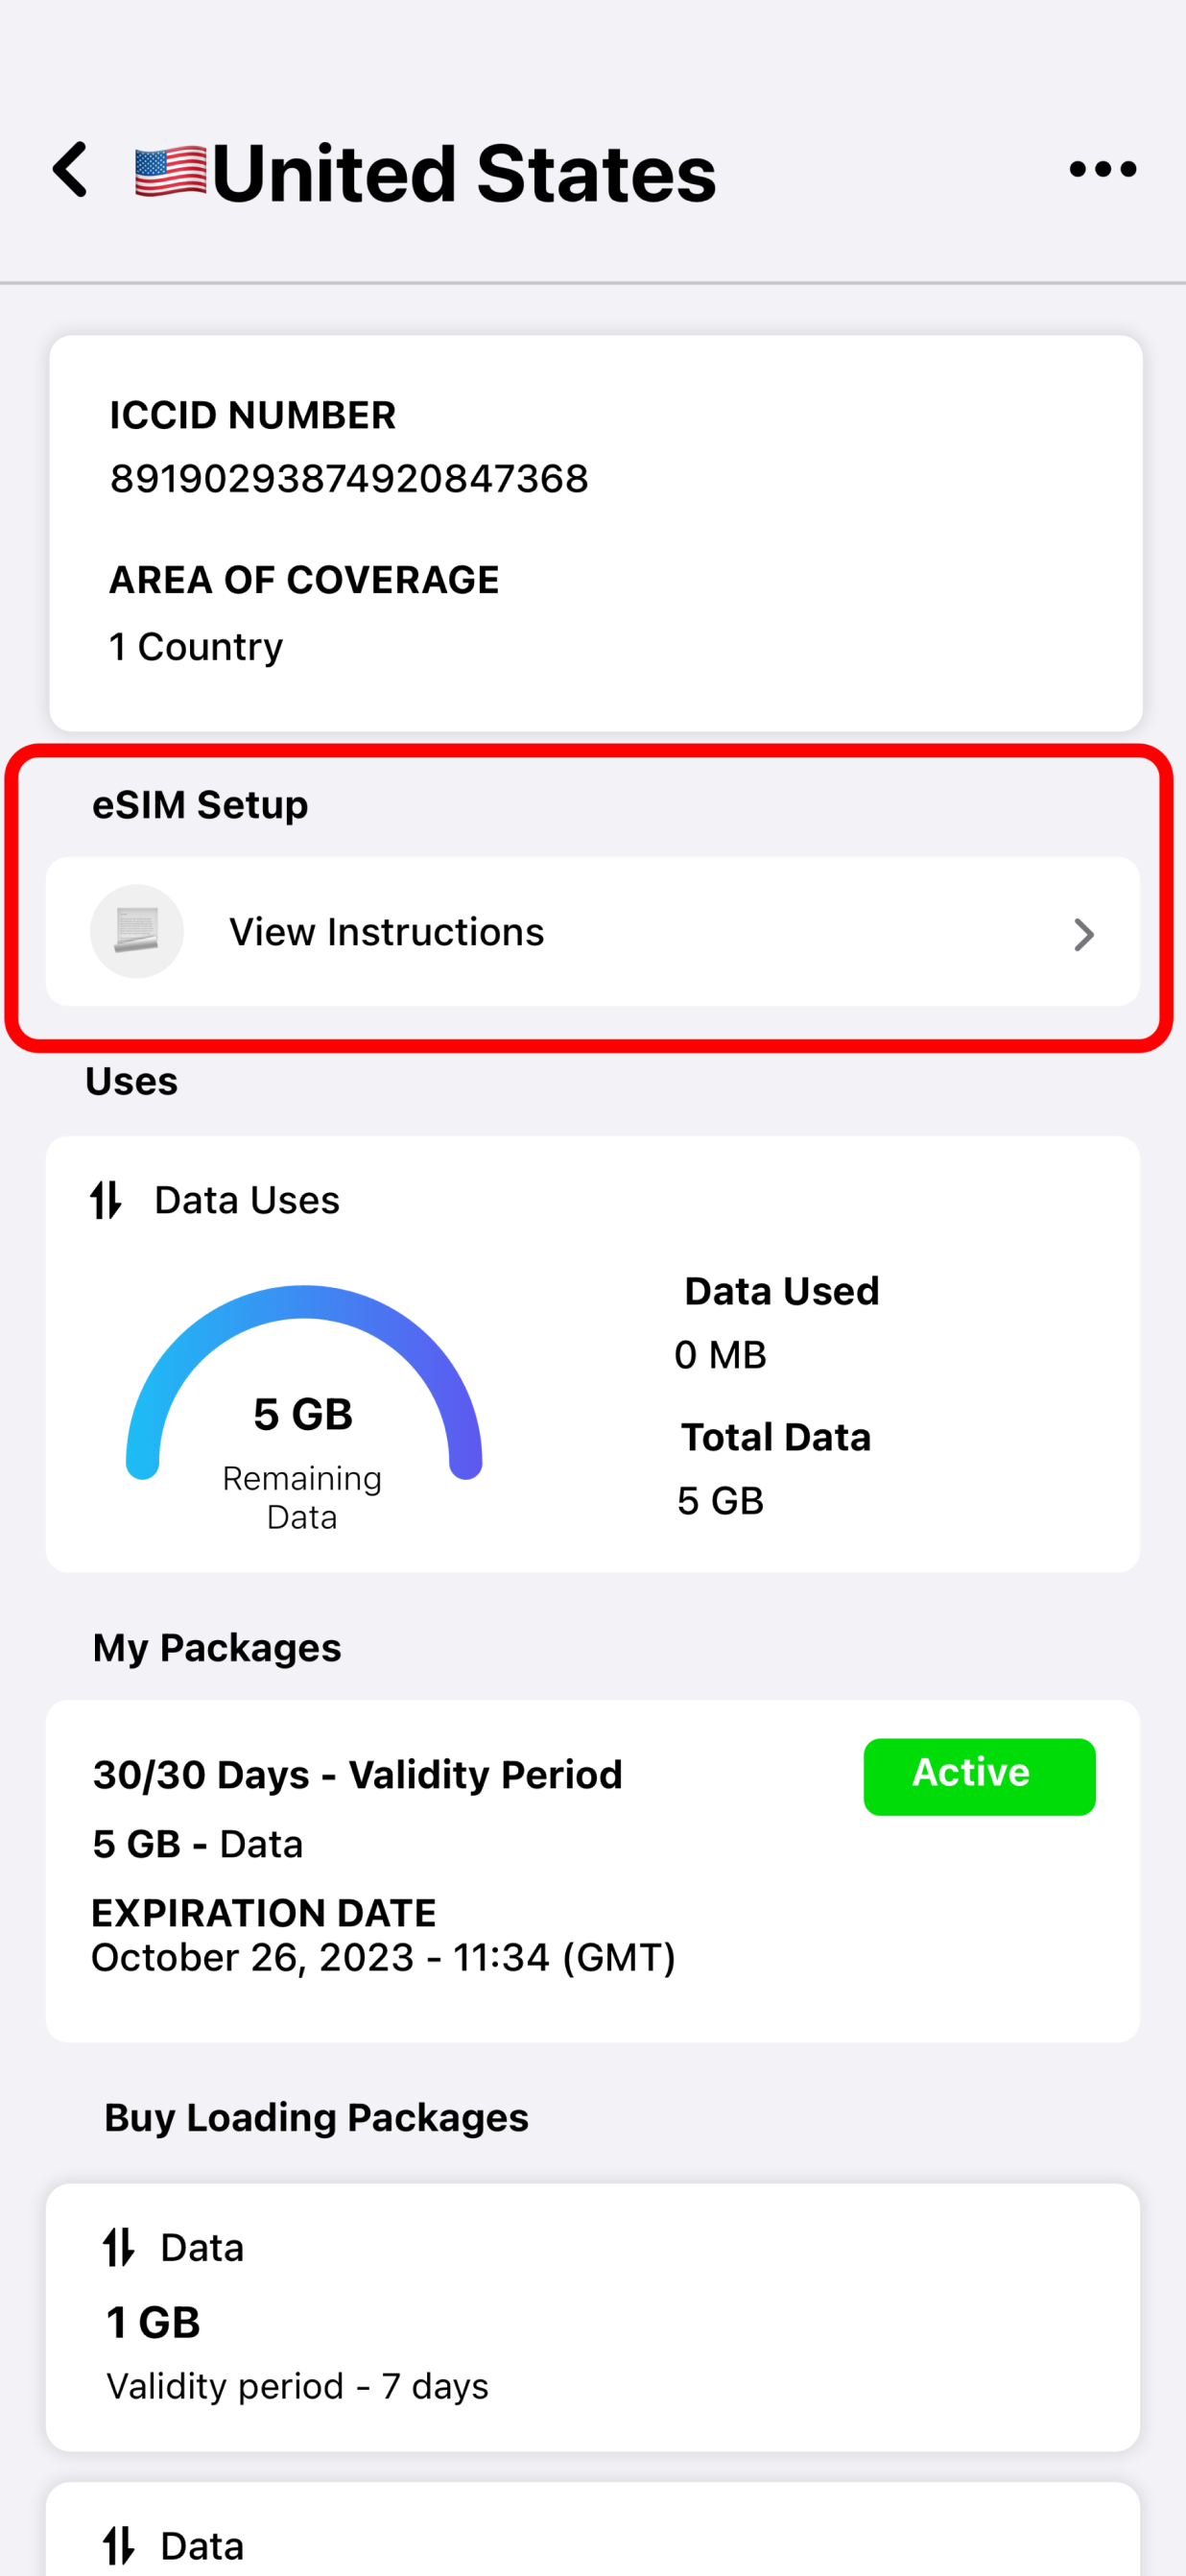
You must complete the Access Data Steps in order to set up your eSIM after installing it (My eSIMs > Details > Install eSIM/Access Data).
You should have your Access Data Steps on hand in case you decide to put off the setup. You can download them to your smartphone by doing the actions listed below:
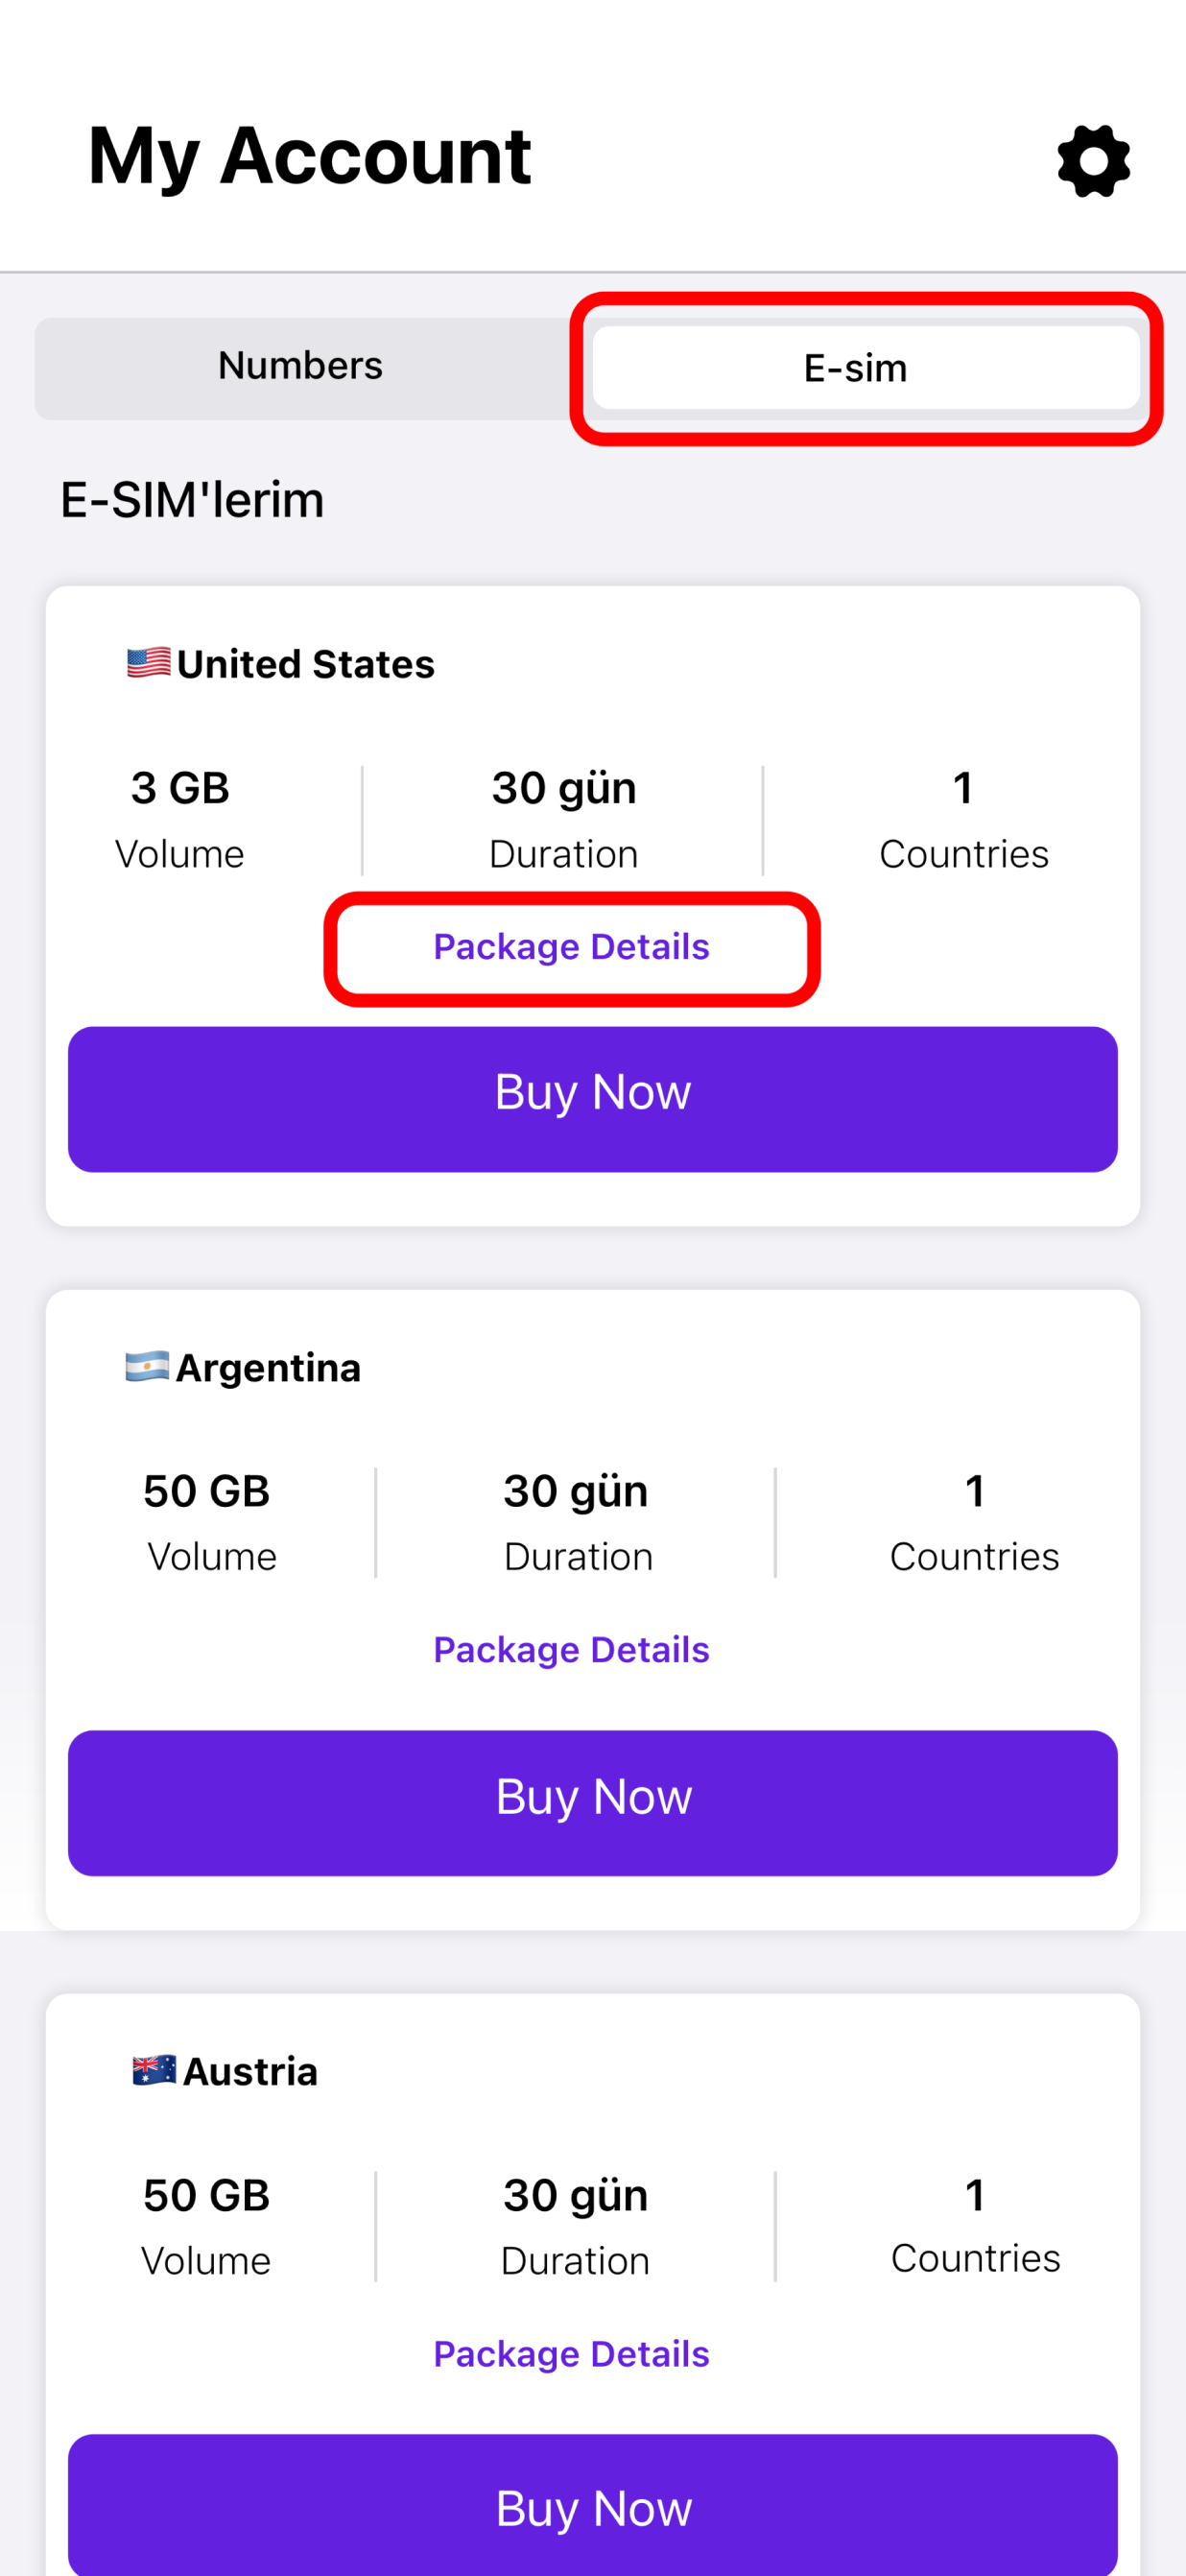
Local and Regional eSIMs
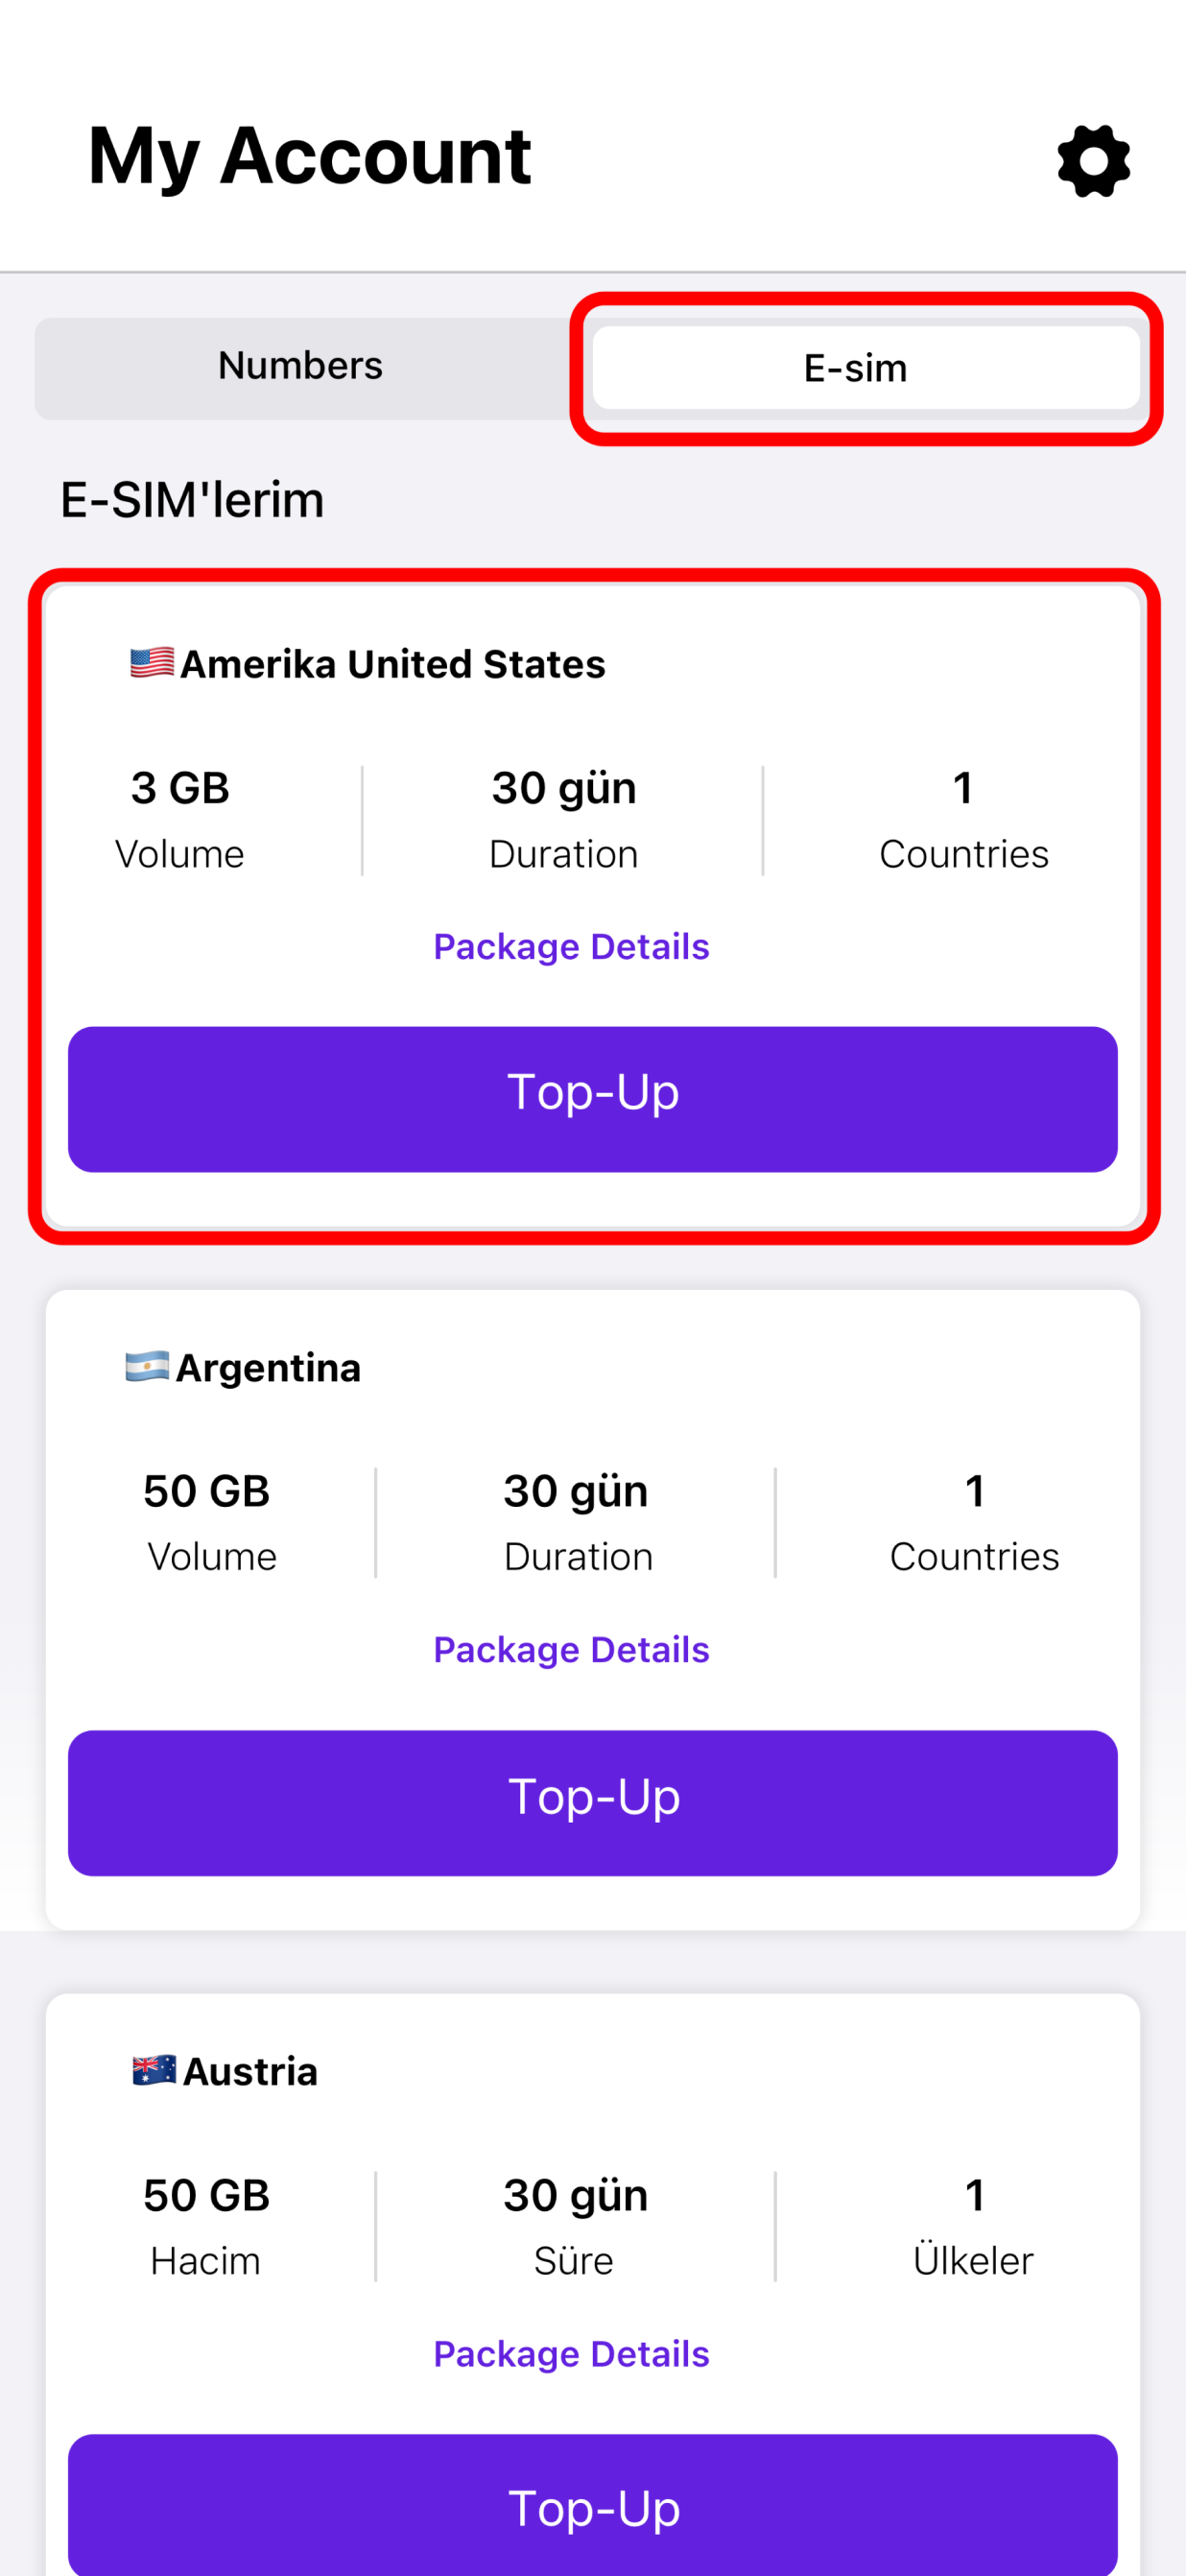
- Go to "My eSIMs" and tap "Details"
- Tap "Install eSIM/Access Data"
- Tap the 3 dots in the upper right
- Select "Save a Screenshot"
Global eSIMs
- Go to "My eSIMs" and tap "Details"
- Tap "Install eSIM/Access Data"
- Tap the 3 dots in the upper right
- Select "Save a Screenshot"
- Select your next destination country to save the settings accordingly.
*The APN settings may vary depending on the country, which is why it is important to choose the country so you can save the Installation/Access Data steps for the desired destination.
You can finish the setup and begin using your eSIM at a later time by saving your Installation/Access Data Steps to your smartphone.
If you have any questions, please feel free to contact our support team, and we'll be happy to help!
In order to ensure that you can install and set up your eSIM correctly, please make sure to check the following:
You've got a stable connection—ideally WiFi. (You must correctly download the eSIM to your smartphone, and you absolutely need a reliable internet connection.)
On your device, you can install an eSIM in three different ways:
- Direct method
- QR Code method
- Manual method
By clicking these links, you can complete the process of installing and setting up eSIM on your device.
If you have any questions, please feel free to contact our support team, and we'll be happy to help!
The following payment options are accepted by us:
- Credit and debit cards (VISA, Mastercard, American Express, and UnionPay)
- Paypal
- Apple Pay (not available to all countries)
- Alipay (only via the mobile app)
Also, if you have a coupon code, you can pay at a discount by entering your code.
If you have any questions, please feel free to contact our support team, and we'll be happy to help!
Before beginning a new telecommunications service, consumers in several countries must finish a Know Your Customer (KYC) process. The identity and address of the subscriber are electronically validated as part of the paperless KYC authentication procedure known as eKYC. This implies that you will need to upload a document to prove your identity. If an eKYC procedure is needed for an eSIM, it will be specified as follows before purchase.
If you have any questions, please feel free to contact our support team, and we'll be happy to help!
The validity or data consumption of the eSIM determines the expiration date of the eSIM data package. As long as you don't use up all of the data before then, your eSIM data package will remain valid for the specified amount of time. The moment the eSIM activates, the validity period begins. When the installed eSIM at the destination connects to the compatible network, the majority of eSIMs will activate. It may also activate at the moment of installation, independent of your location, based on the eSIM. By selecting Additional Information Activation Policy, you can verify this information before making a purchase. Please go to “When can I install my eSIM?” to determine the ideal time for you to install your eSIM.
If you have any questions, please feel free to contact our support team, and we'll be happy to help!
We most certainly have the eSIM you're searching for! More than 120+ countries and regions are covered by Nextline! To view a list of available eSIM plans, visit our home page or download the Nextline app for free from the Apple App Store (iOS) and enter your desired country.
If you have any questions, please feel free to contact our support team, and we'll be happy to help!
When using specific Nextline eSIMs, you might need to customize your device's APN settings in order to get access to data. Your APN is your device's "Access Point Name."
If your eSIM requires the APN settings, click to My eSIMs > Details > Install eSIM/Access Data to access the APN details on your eSIM installation page.
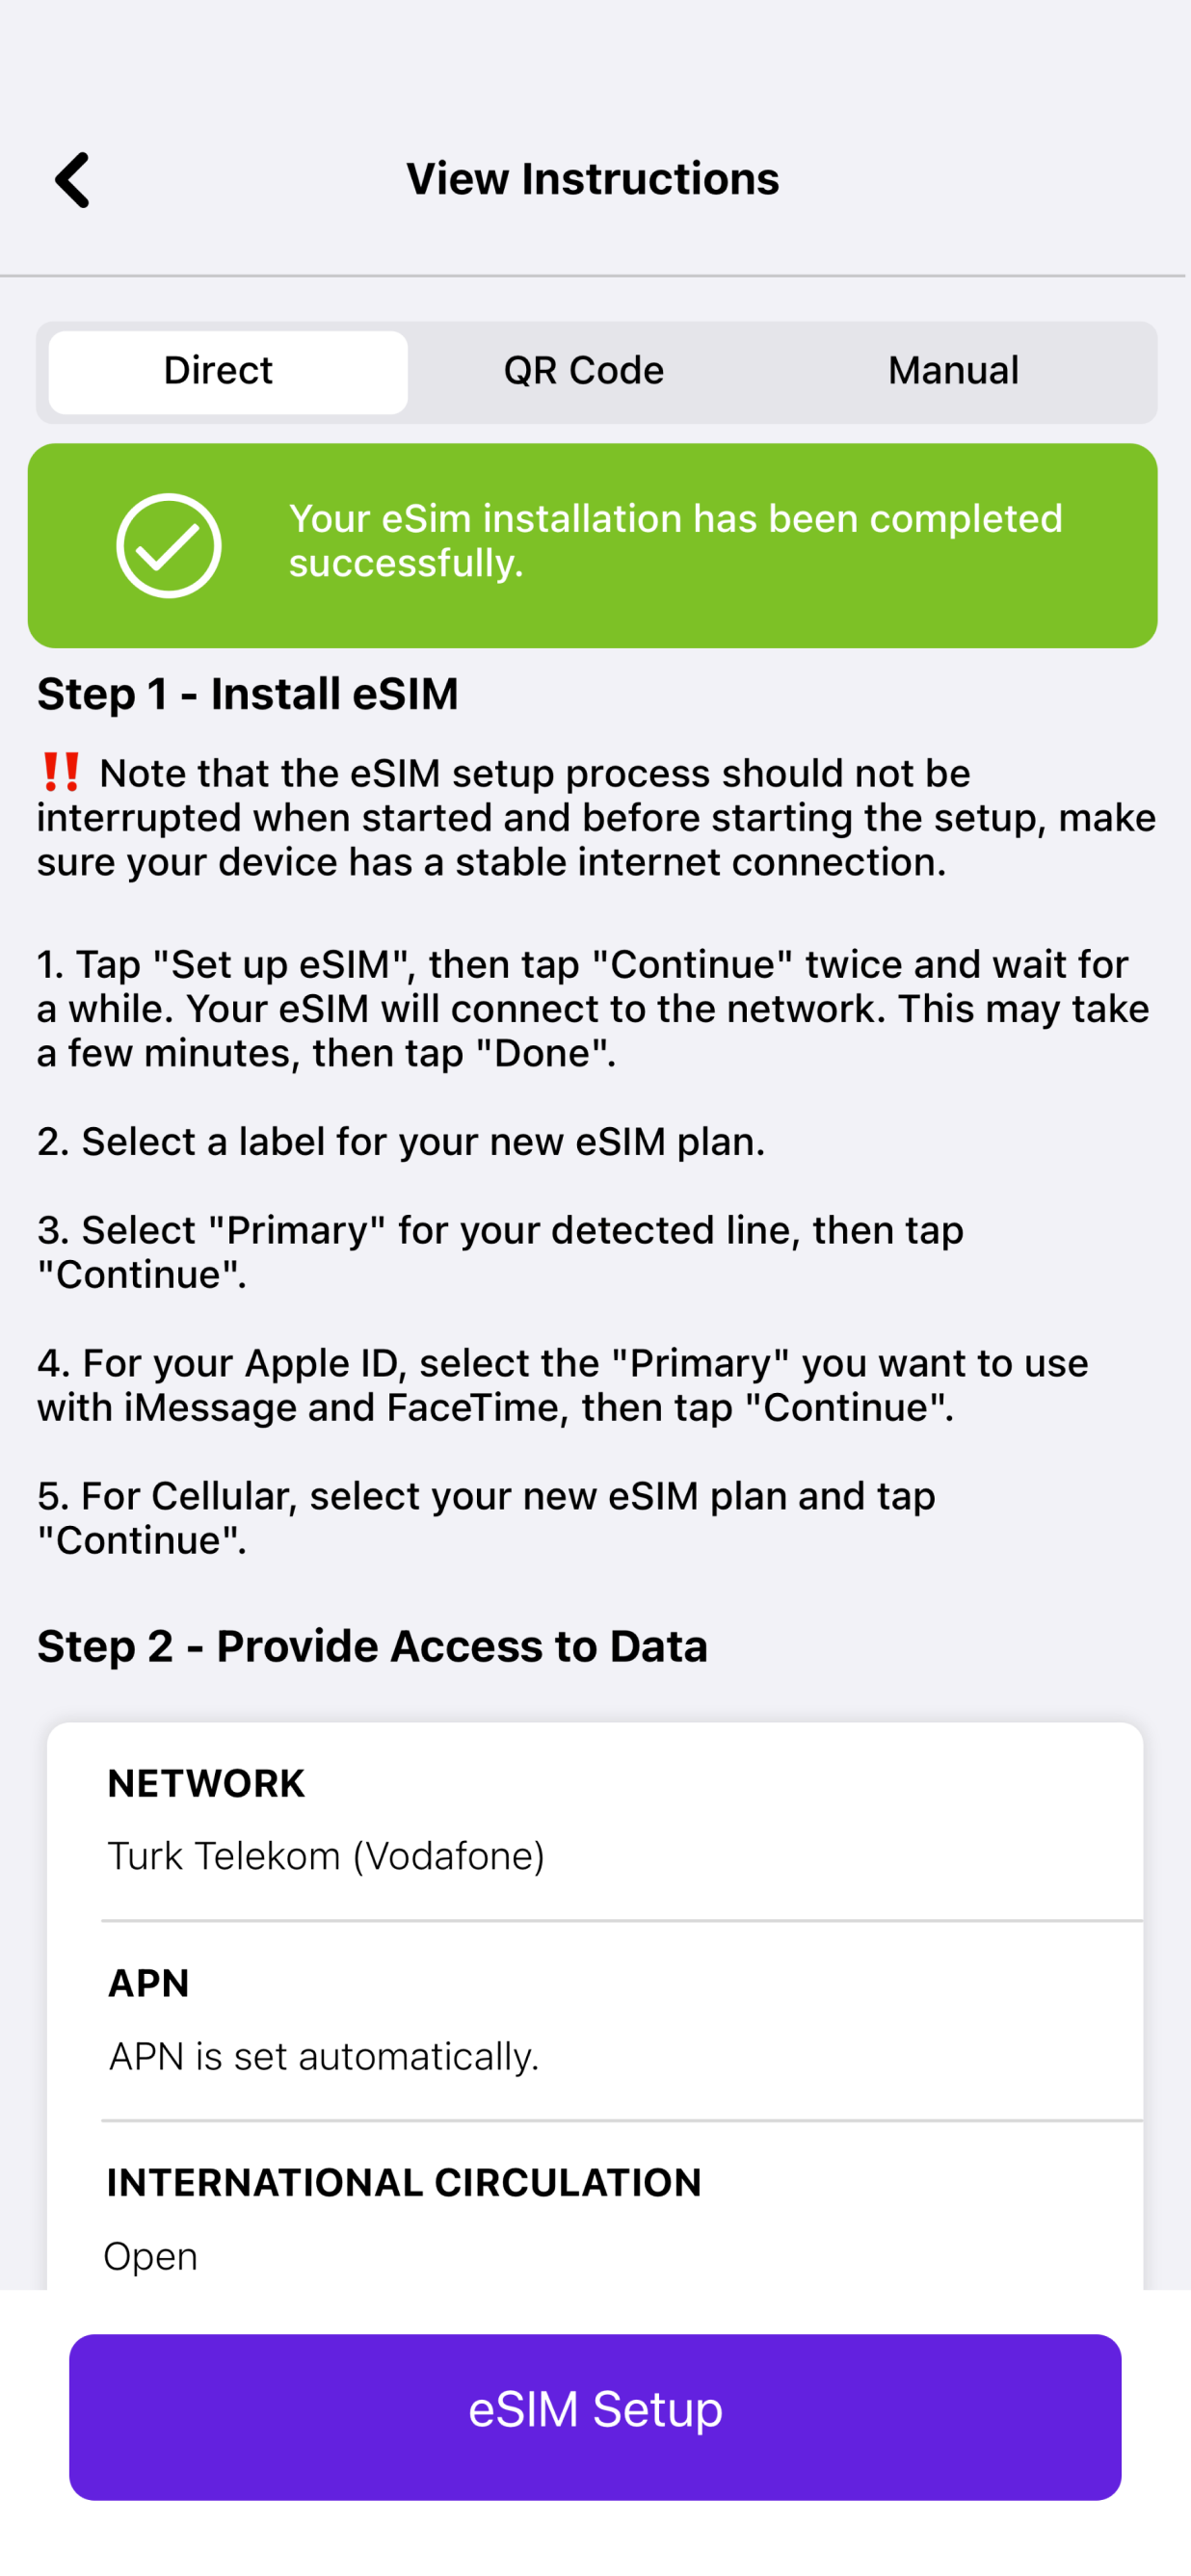
To set up an APN, please follow these steps:
On iOS:- Go to Settings on your device
- Go to Cellular/Mobile Data

- Select your eSIM under Cellular/Mobile Data Plans.
- Go to Cellular/Mobile Data Network.
- Type the new APN settings in the Cellular/Mobile Data APN field as written in the eSIM installation details (all lower case, all one word) *globaldata is an example. Please note that different eSIMs may require different types of APN. You can learn your eSIM's APN by going to the Install eSIM/Access Data page on your Nextline account. In case the APN is not available, it means that the eSIM's APN is automatically configured.
- You can leave the other fields blank.
If you have any questions, please feel free to contact our support team, and we'll be happy to help!
For locations all around the world, Nextline provides eSIMs. Our eSIMs are divided into the following coverage categories:
- Country
- Region
- Global
Go to our website or app (iOS) and type your destination into the search bar to find an eSIM for it. As an alternative, you can navigate through each country and region on the list.
Check COVERAGE to make sure your destination is included for regional and global eSIMs.
If you have any questions, please feel free to contact our support team, and we'll be happy to help!
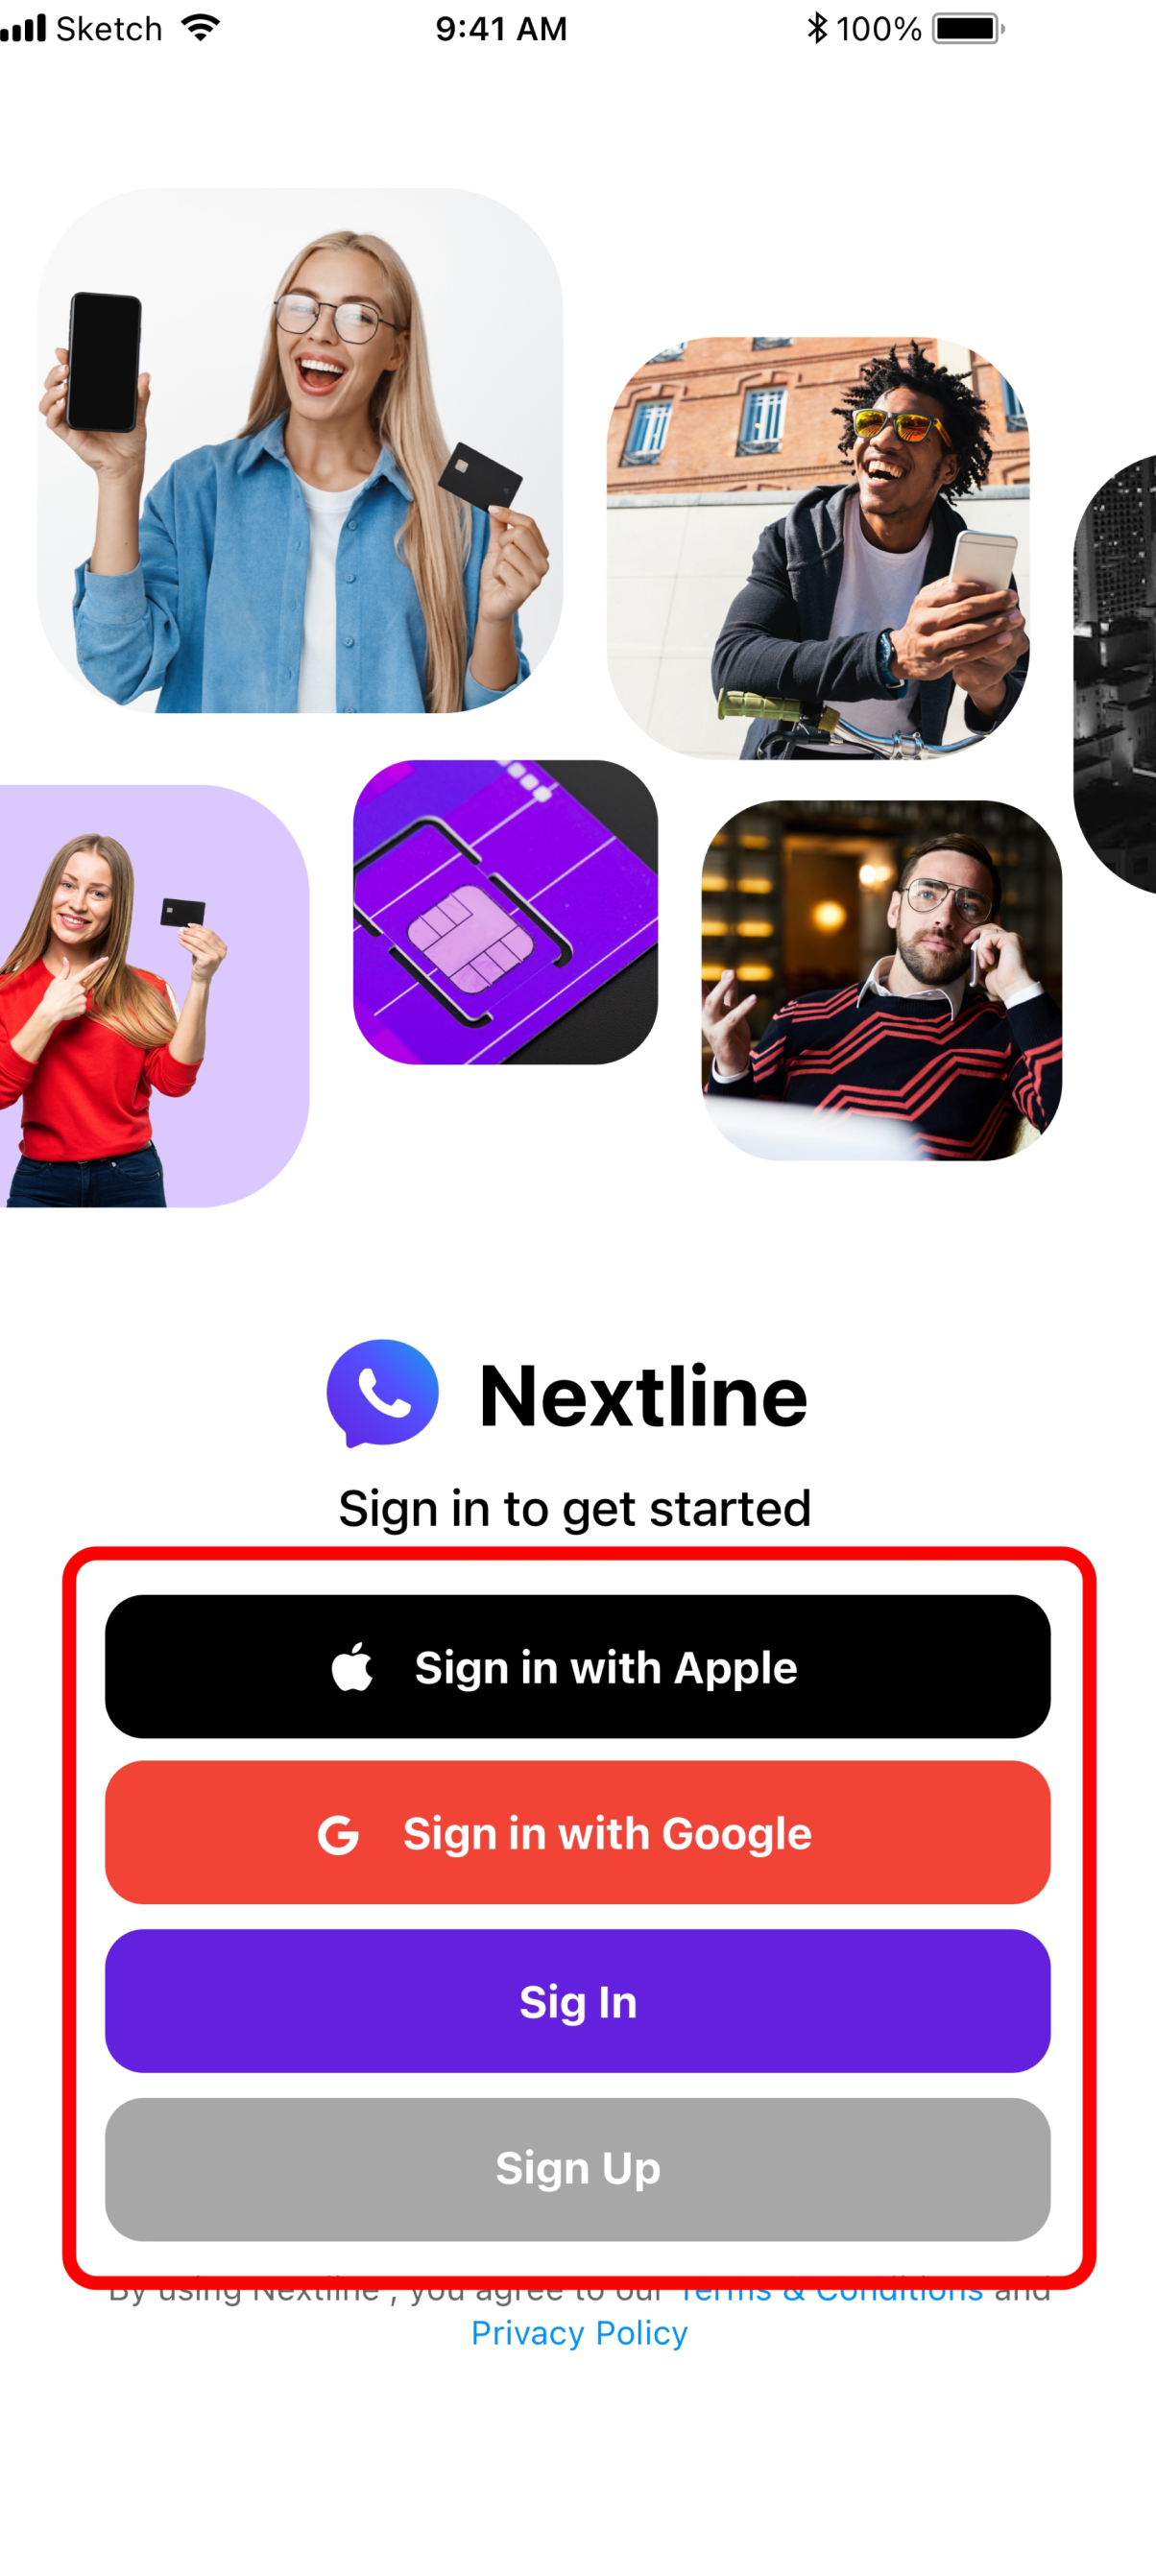
On the Nextline app:
- Select Profile
- Go to "Log in or sign up for an account" at the top.

On Nextline app:
- Open the Nextline app.
- Tap on Profile in the bottom menu.
- Tap on Log in/Sign up.
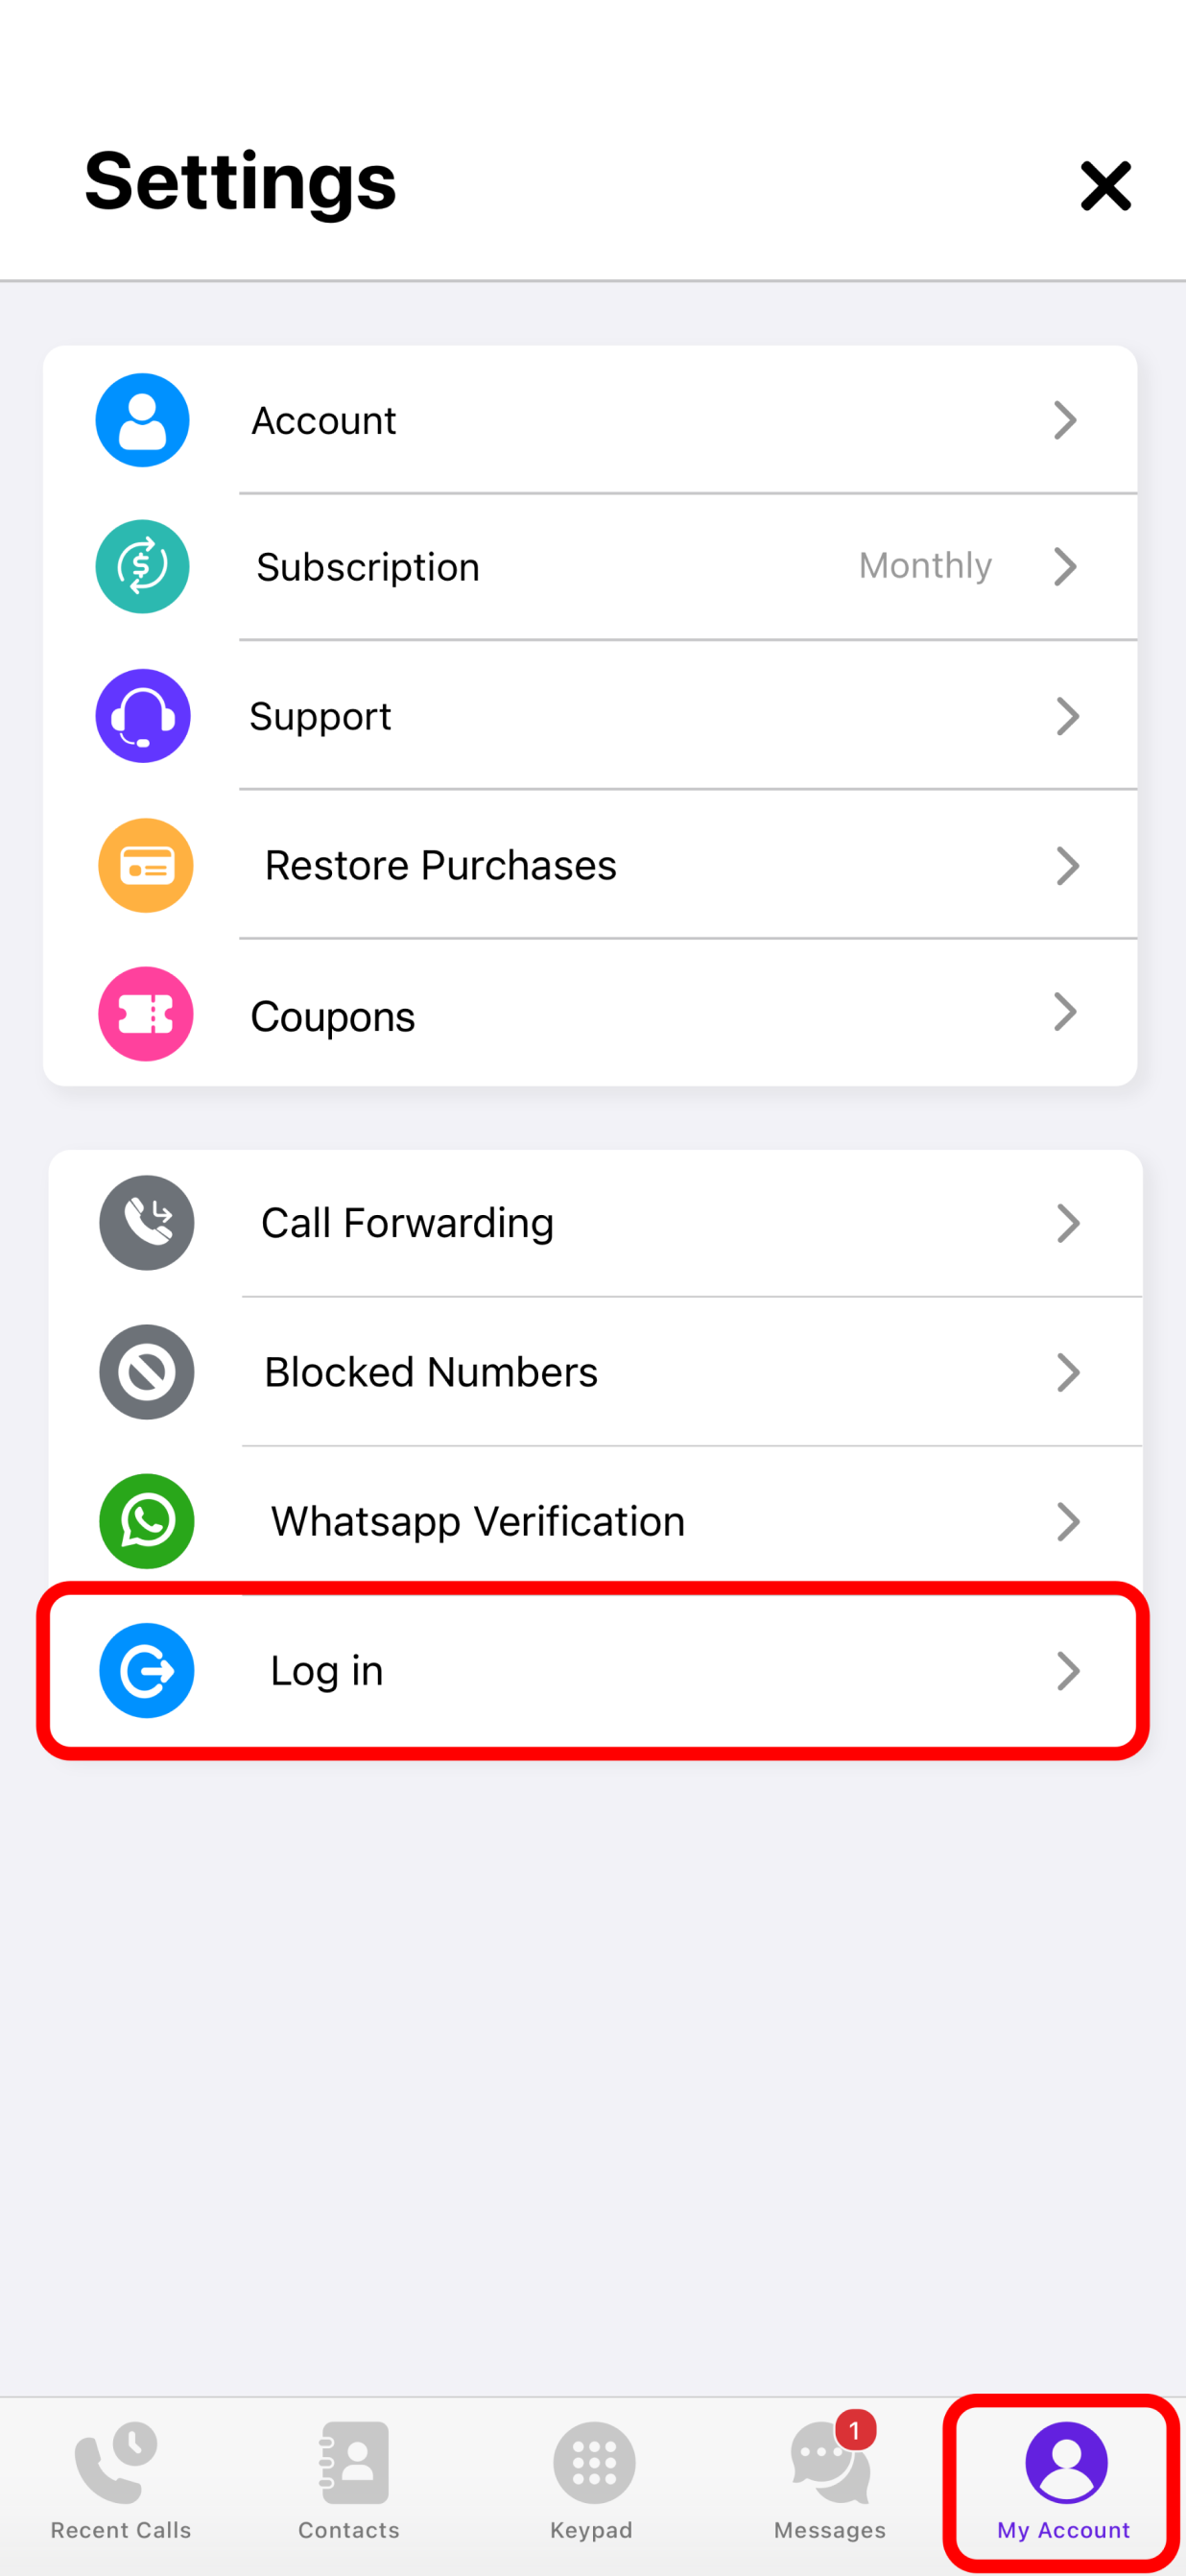
- To sign up with Facebook or Google or Apple ID, click on Apple, or Google icons at the bottom. To sign up by Email, enter your details in the form and click on the Sign-up.
To check if your Pixel device supports eSIM, please follow the steps in this article. To check if your Pixel device supports eSIM, please follow the steps in this article.
Once you confirm that your Google Pixel device is eSIM compatible and carrier unlocked, you can follow the steps below to set up an eSIM.
I. Preparation- Log in to your Nextline account.
- Go to My eSIMs section.
- TTap the Details button on the eSIM you want to set up.
- Tap Set up eSIM/Access Data.
- Choose your preferred installation method by tapping Direct, QR Code or Manual. Regarding QR Code or Manual installation, please use a different device to view the QR code or copy the installation code.


- Go to My eSIMs in the Nextline app.
- Tap the Details button on the eSIM you want to set up.
- Tap Set up eSIM/Access Data.
- TOUCH Direct, then install eSIM.
- Tap Yes.
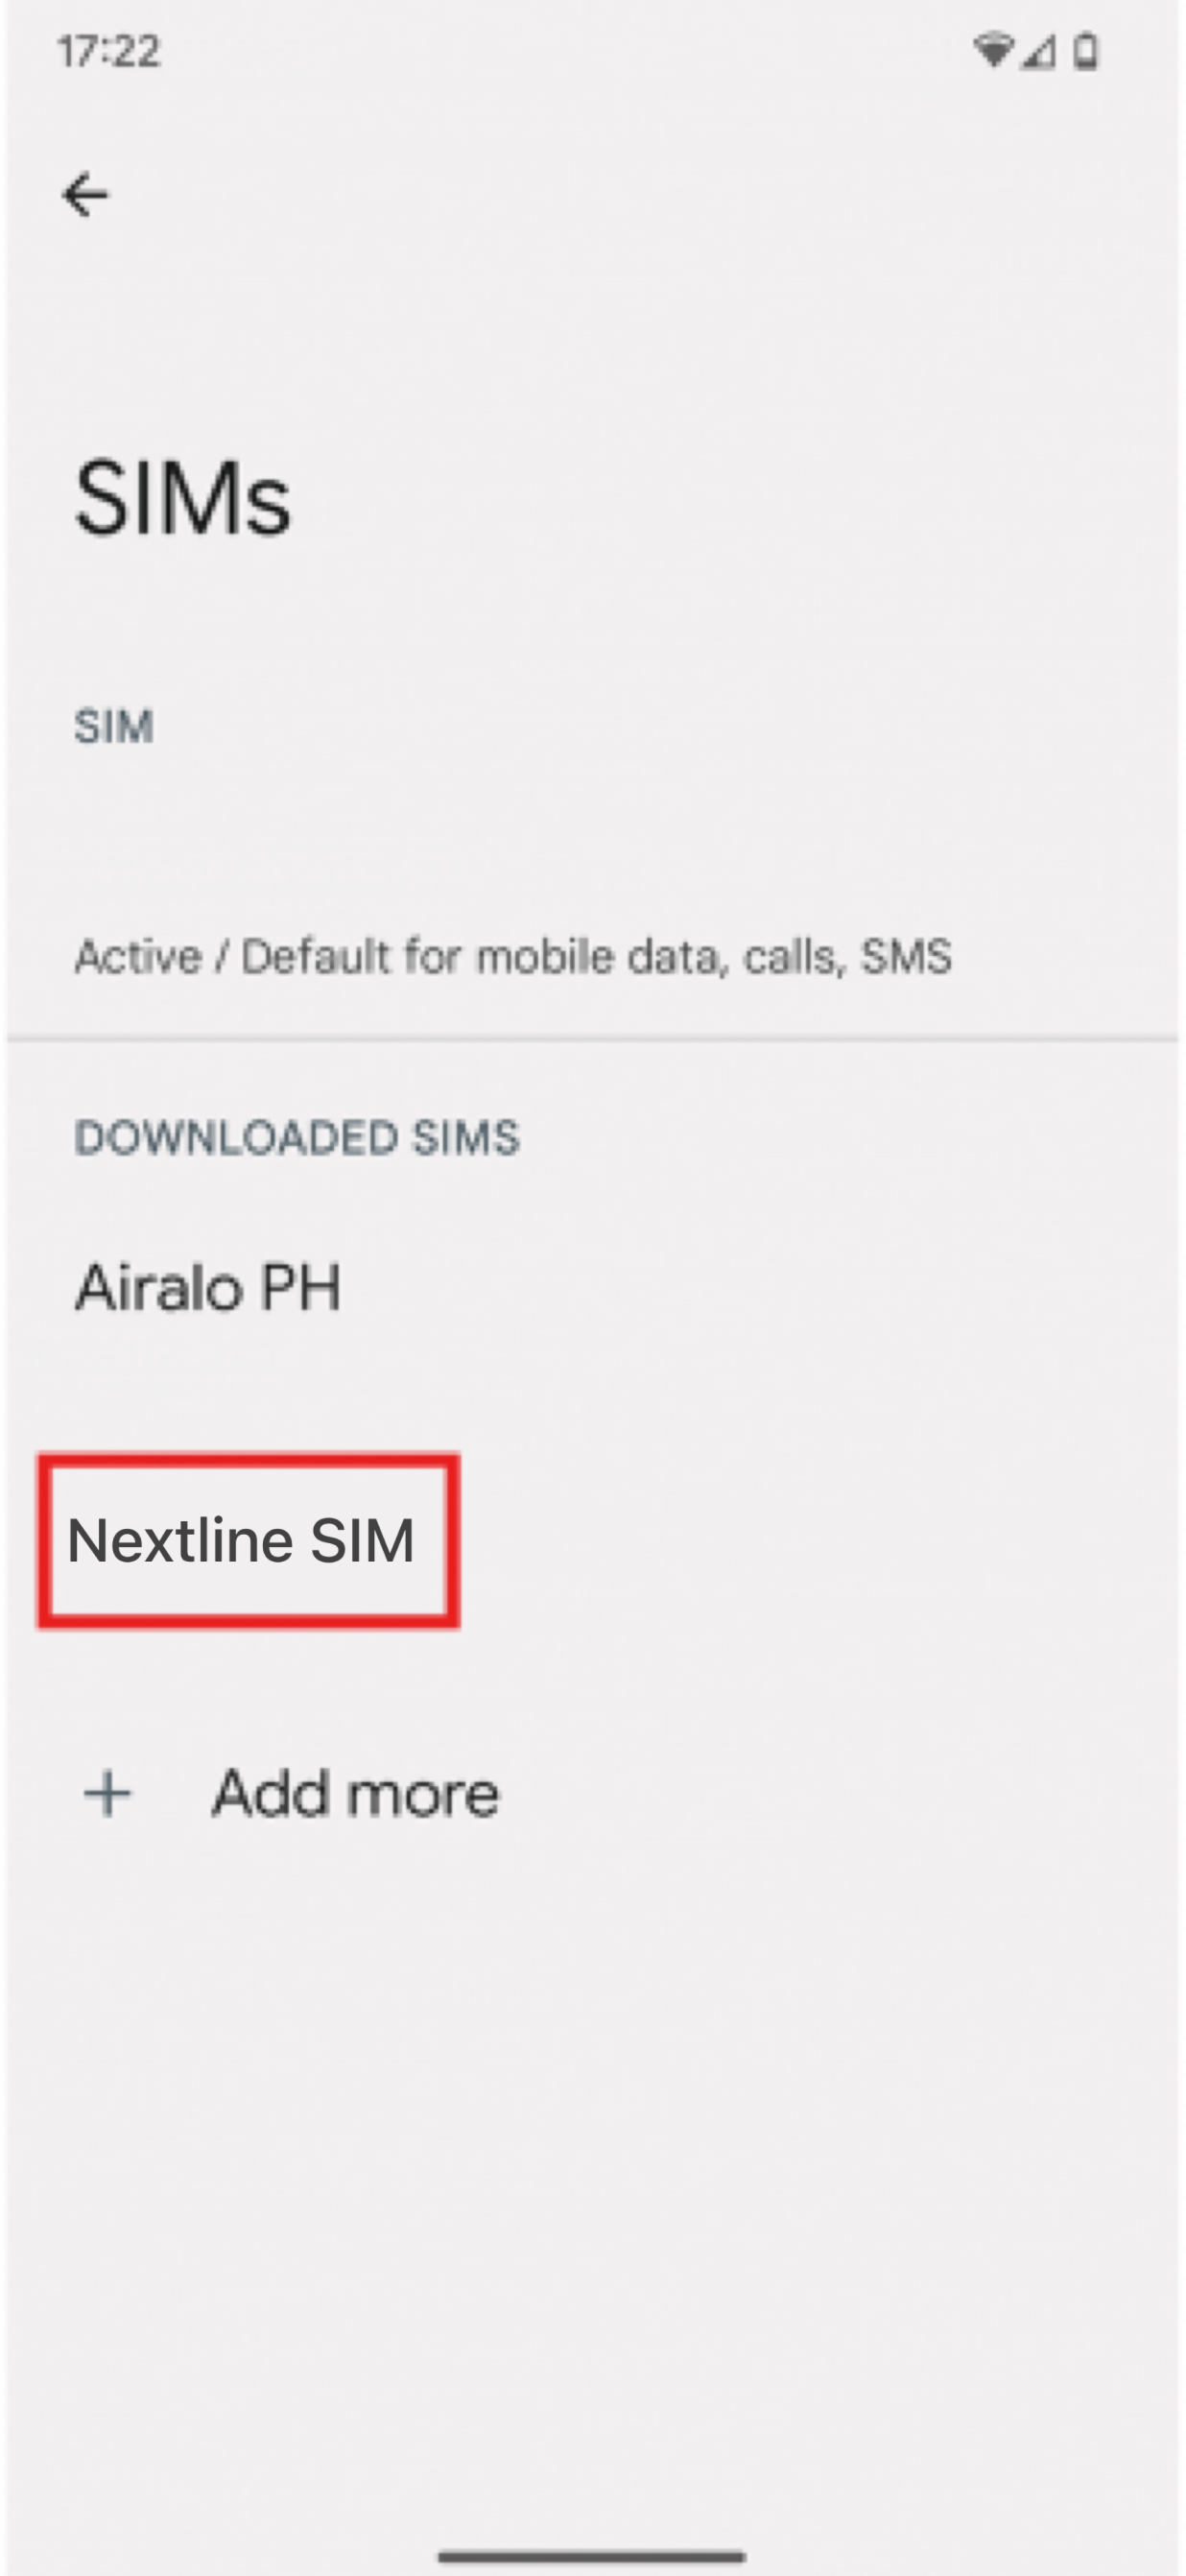
- Once the eSIM is successfully set up, go to Settings.
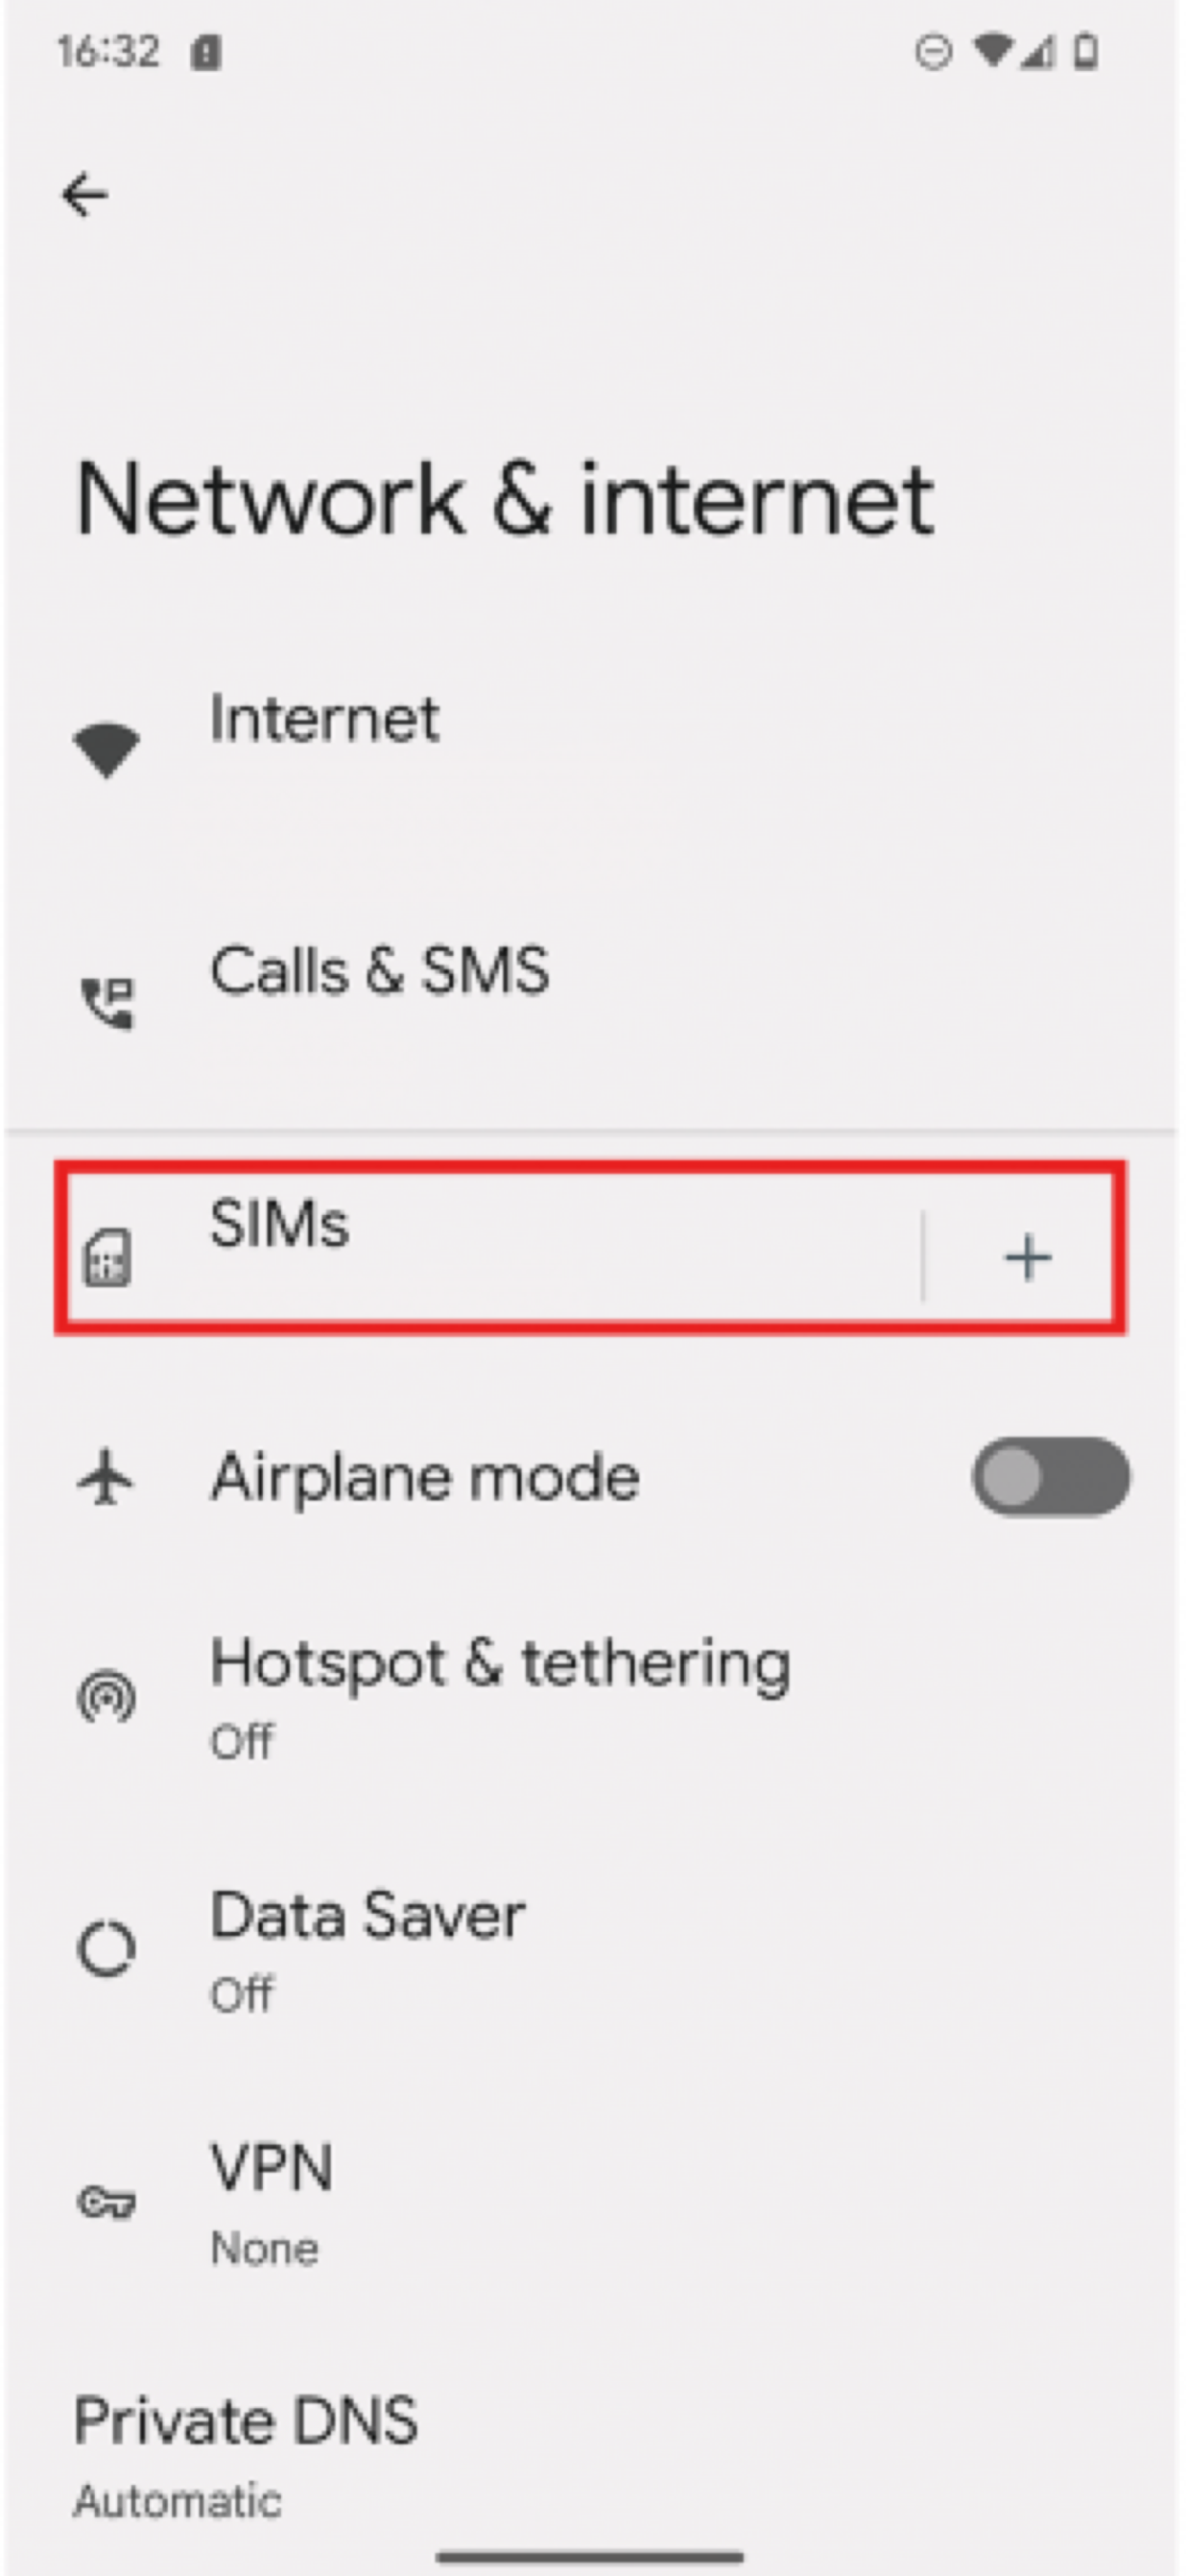
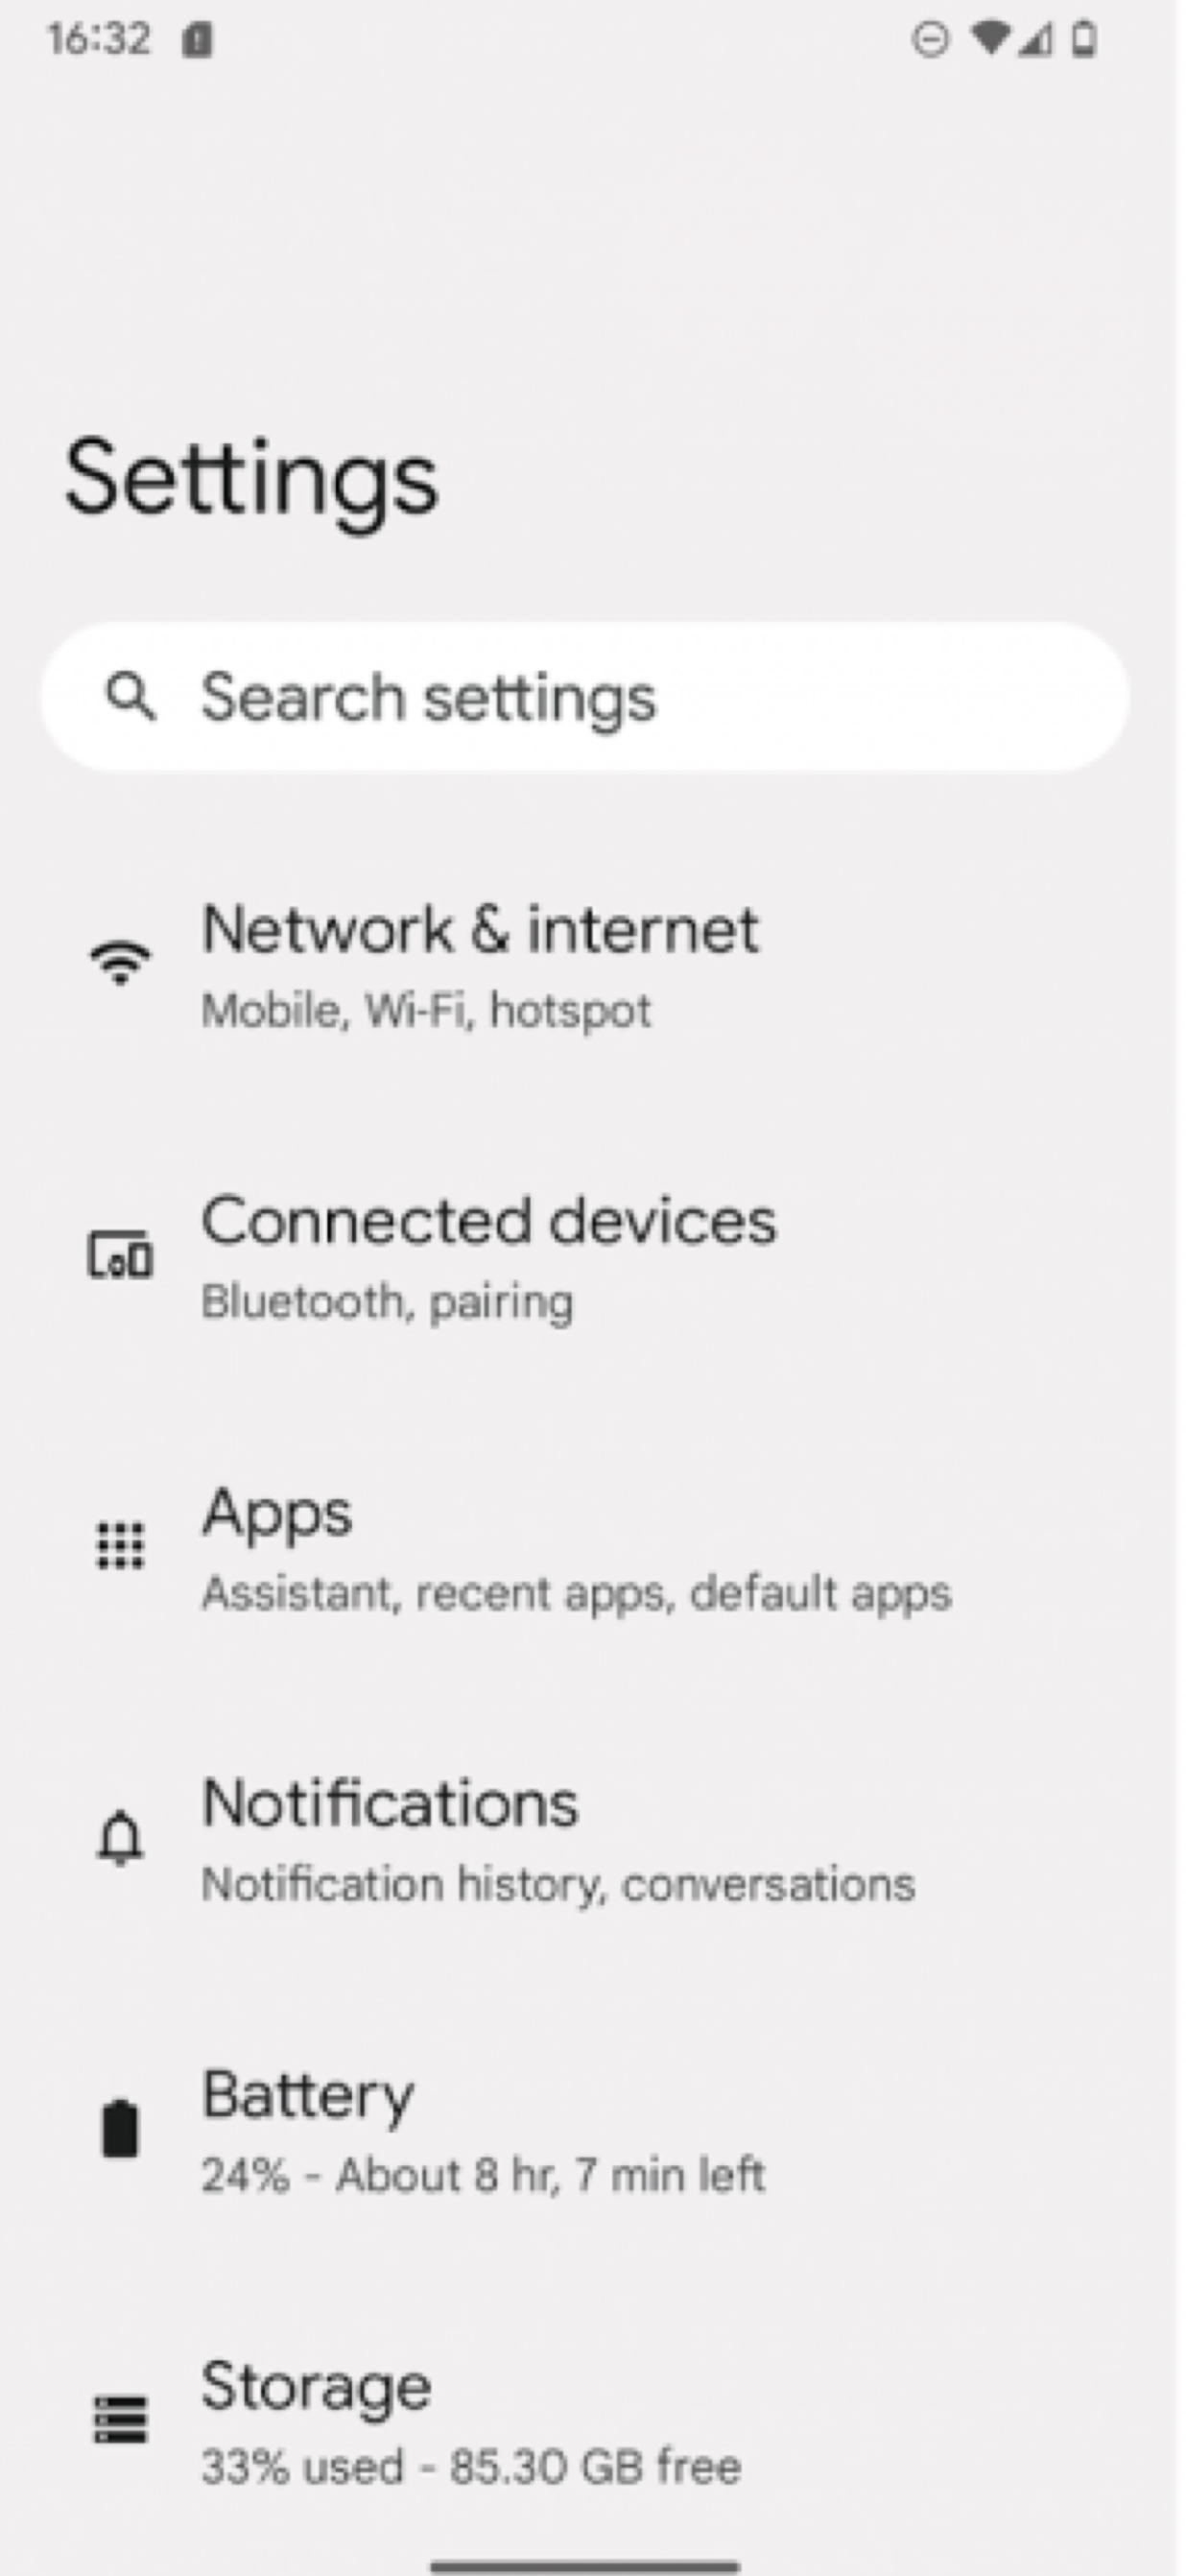
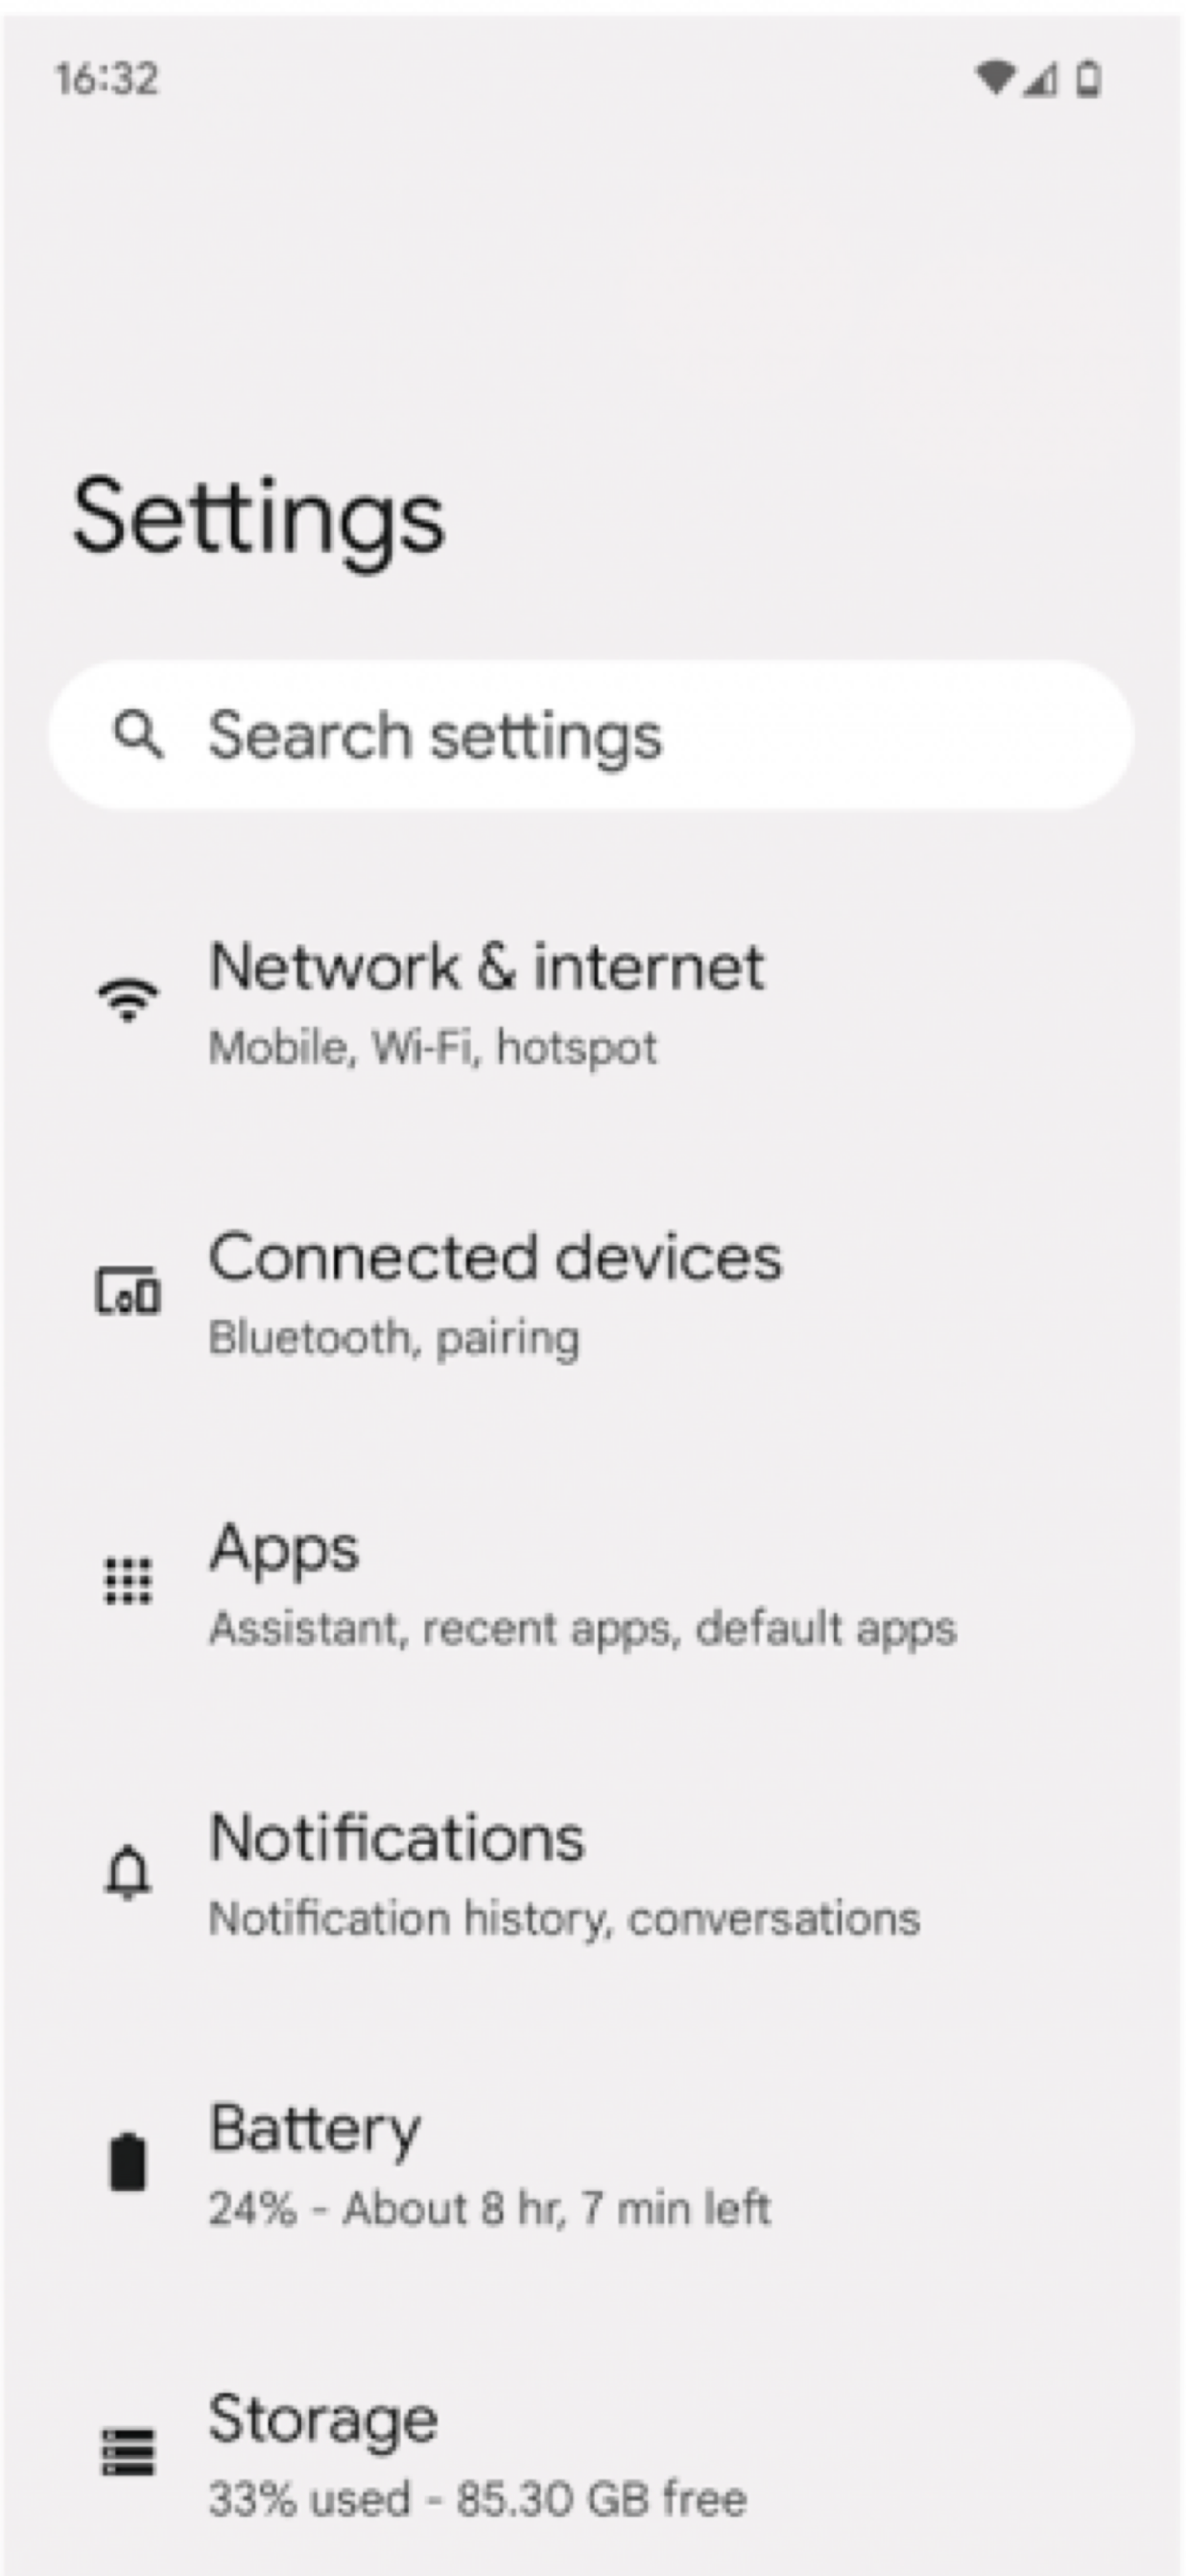
- TAP Network and Internet.
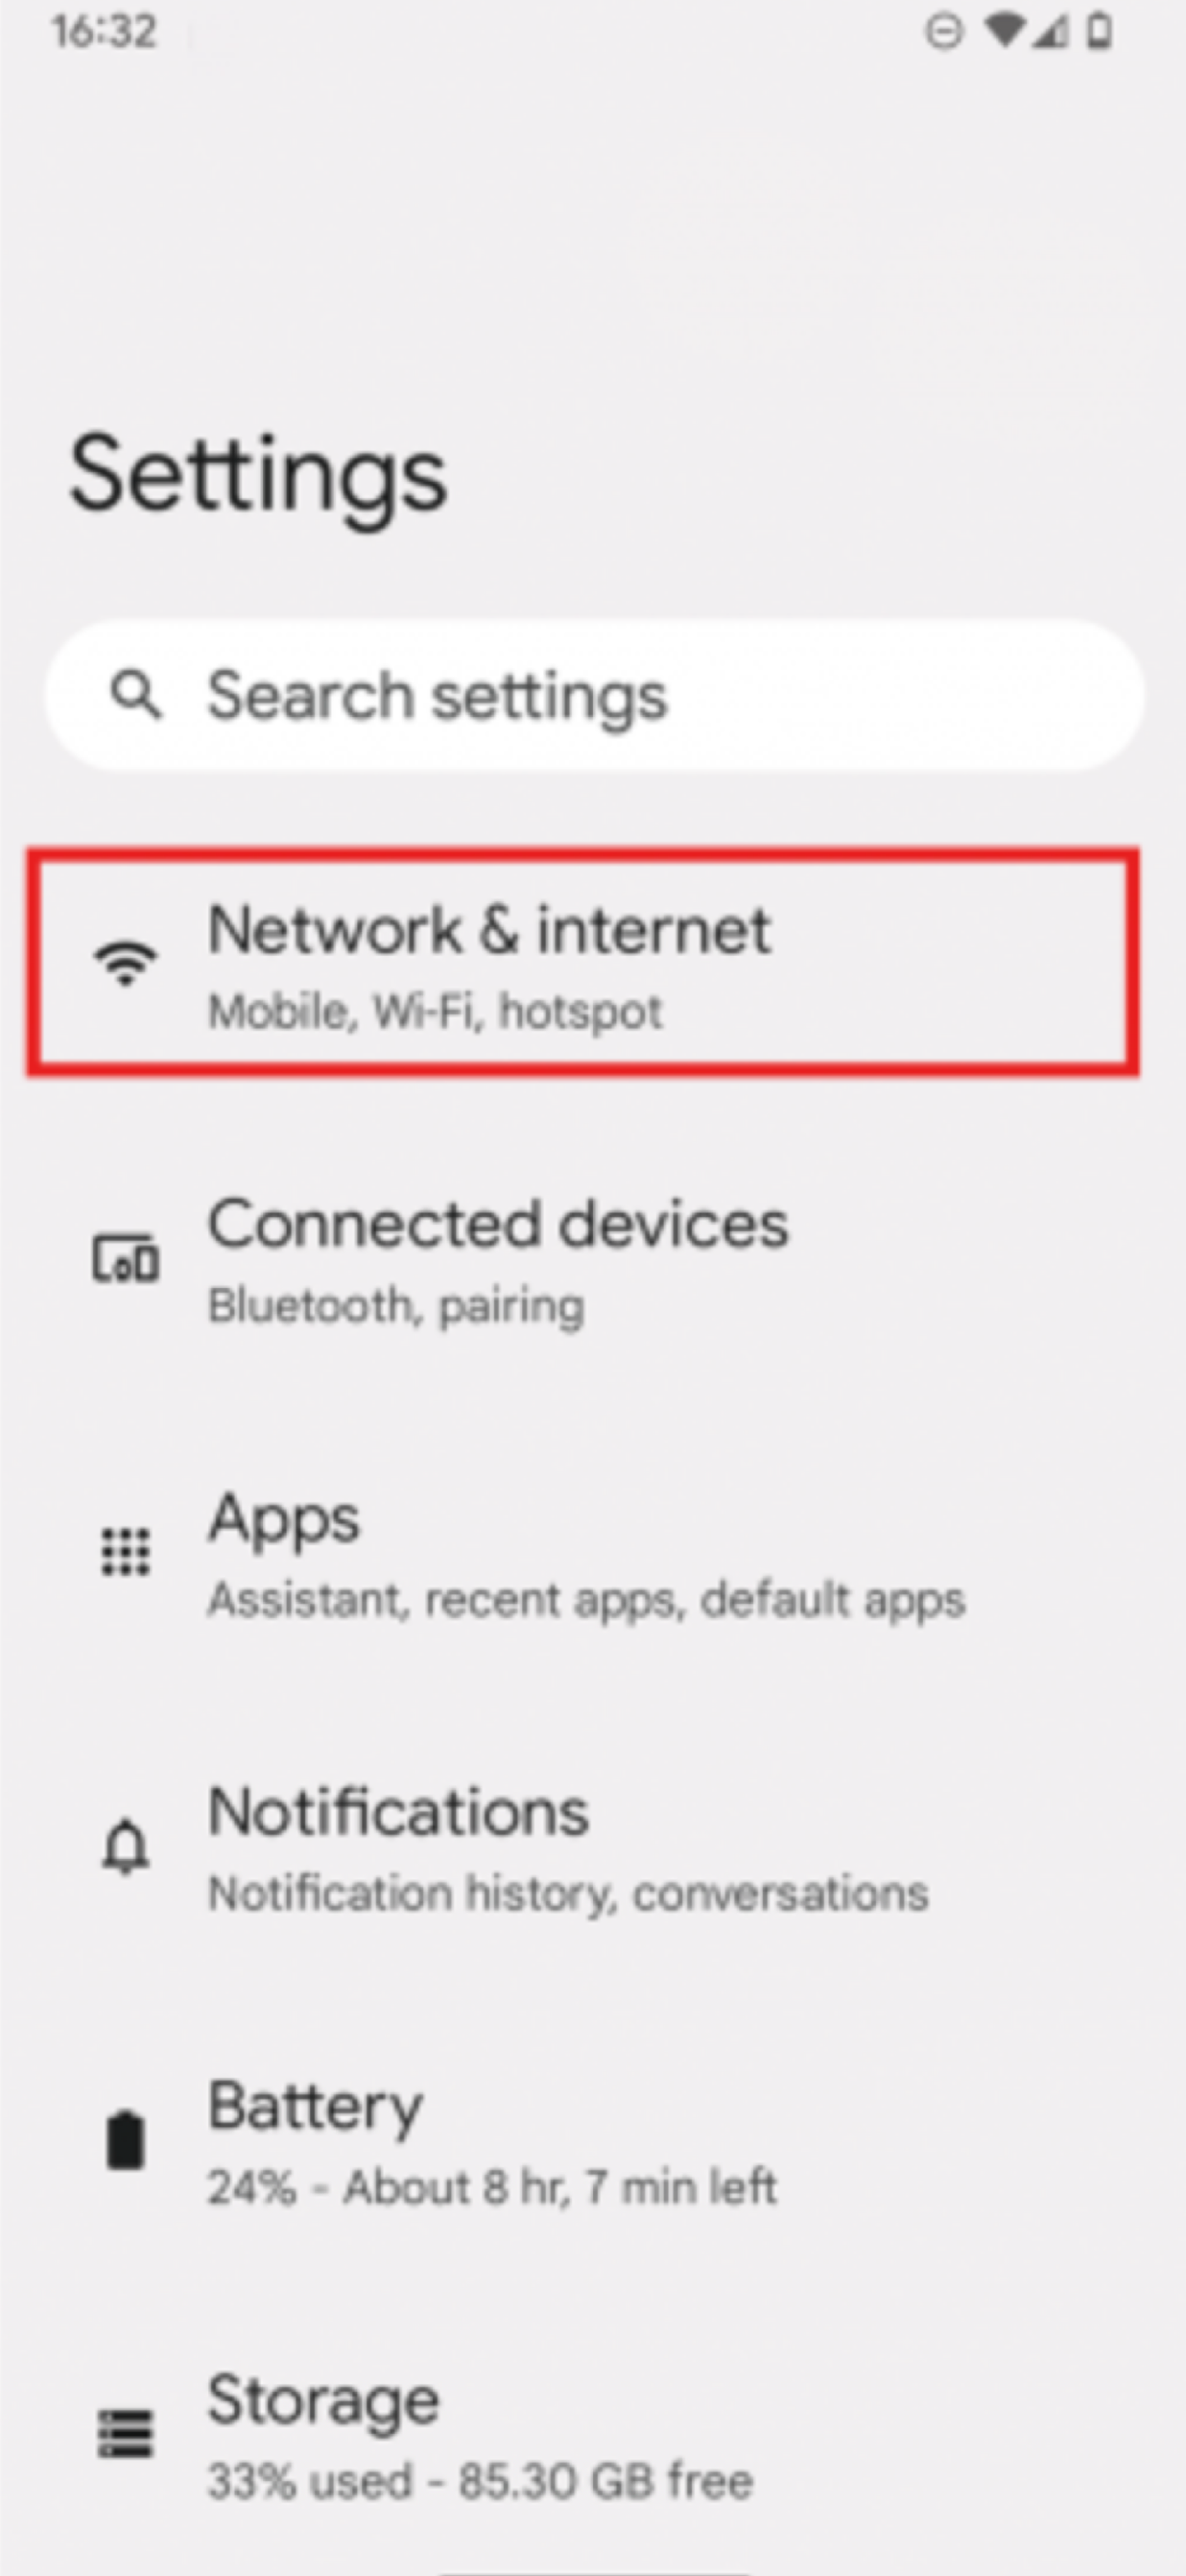
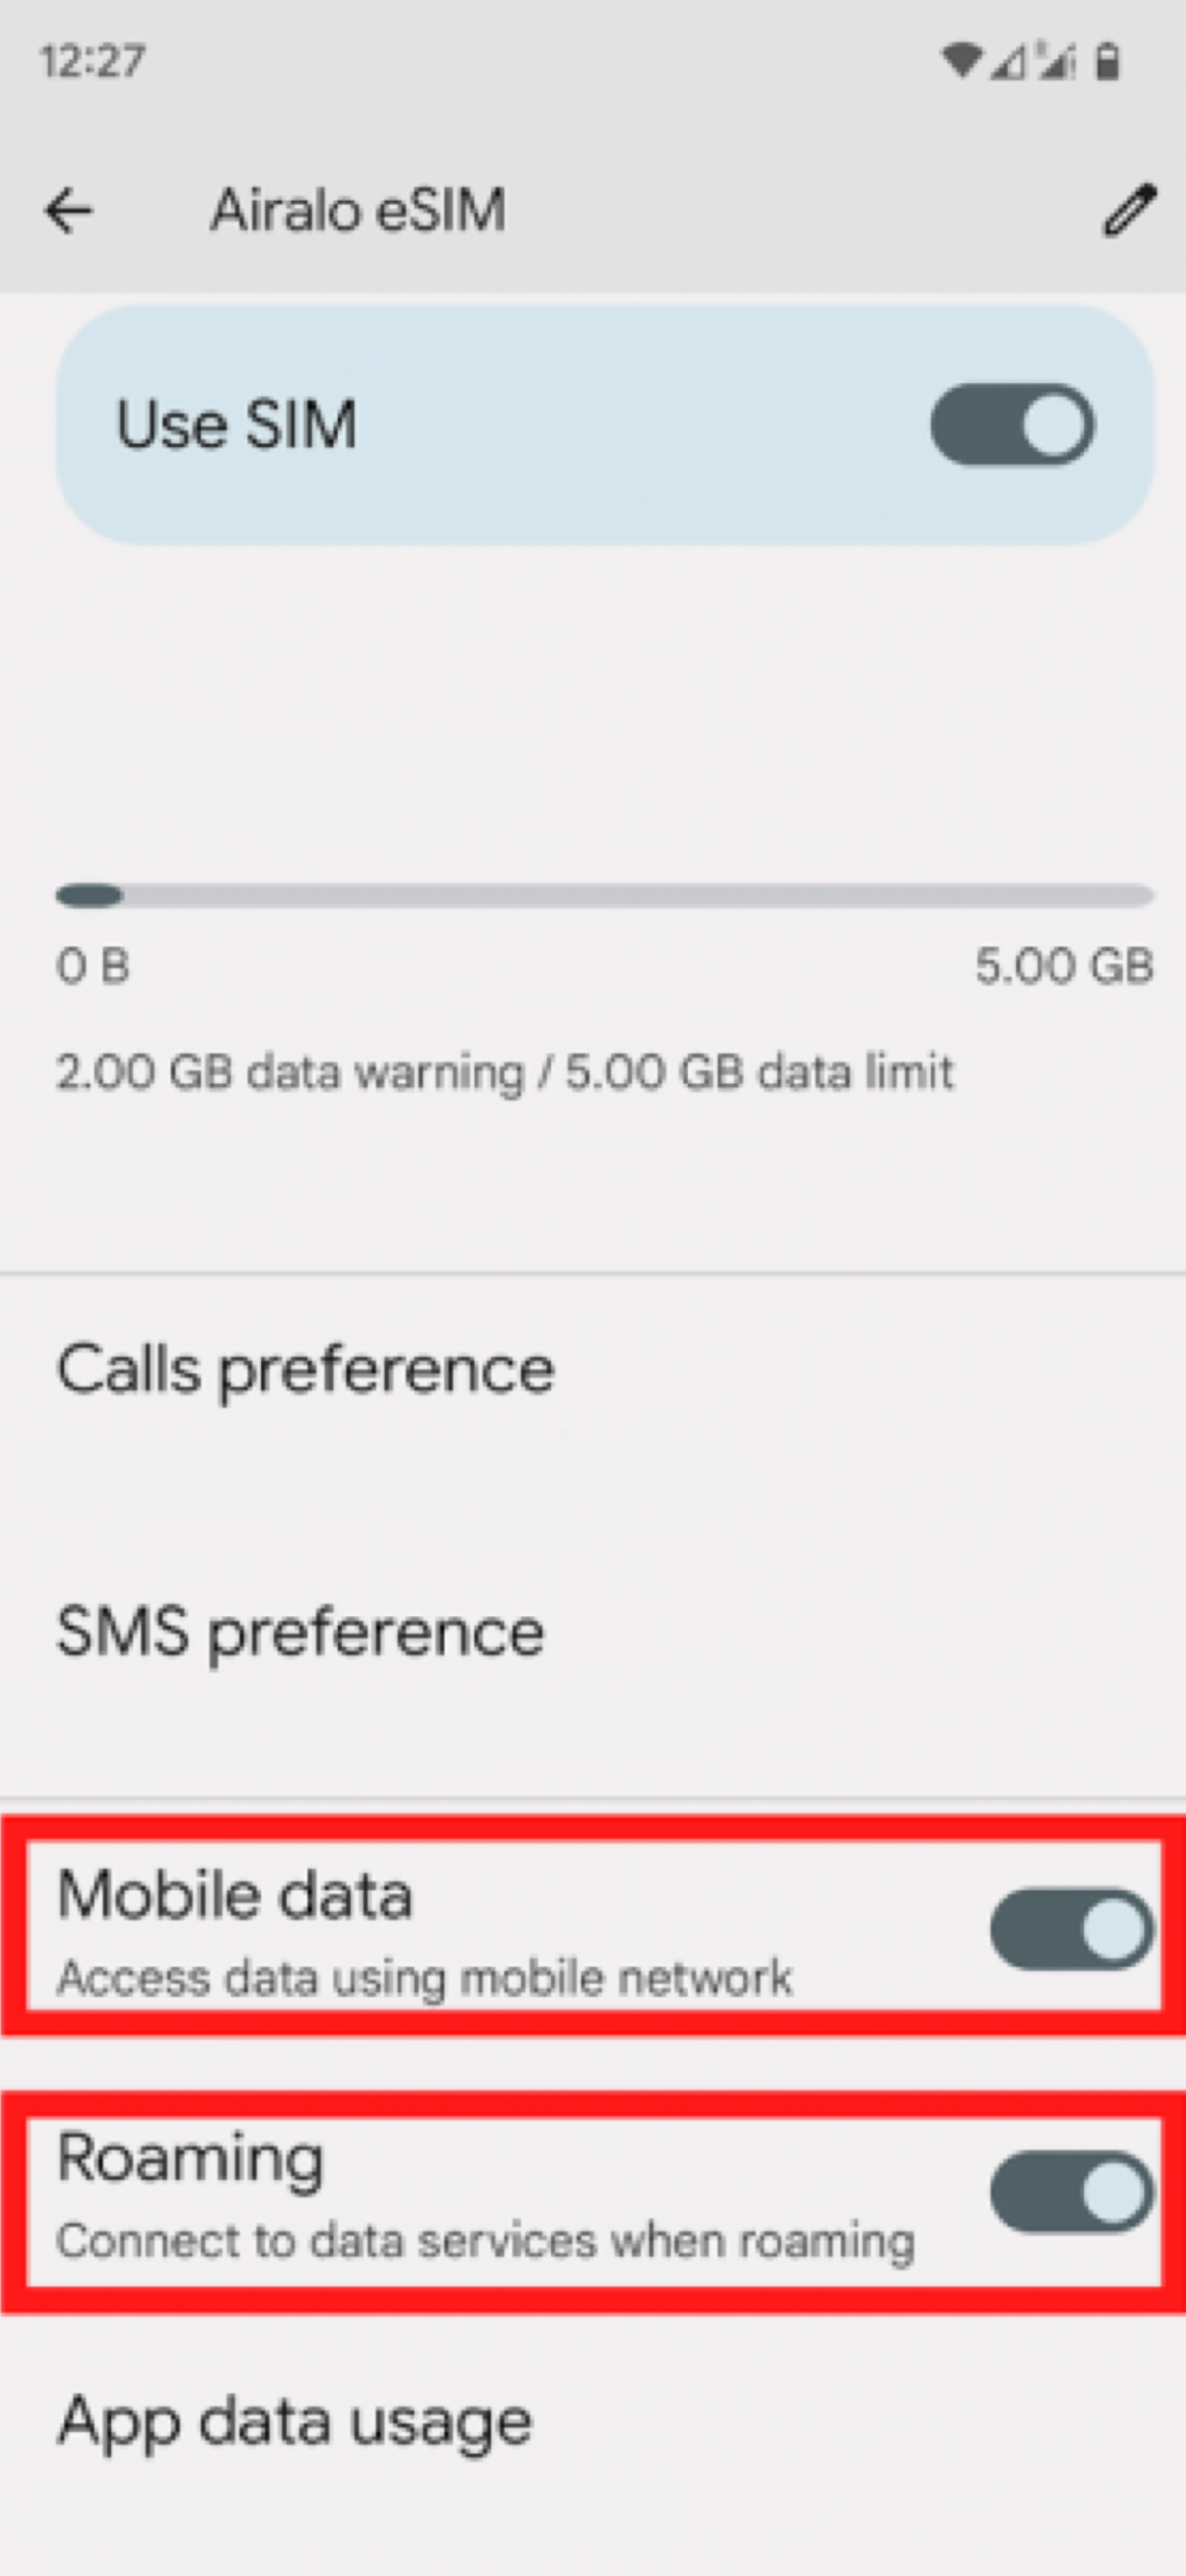
- To check if your Pixel device supports eSIM, please follow the steps in this article.
- Tap the eSIM you set up.
- Toggle the toggles for Mobile Data and Roaming to the ON position.
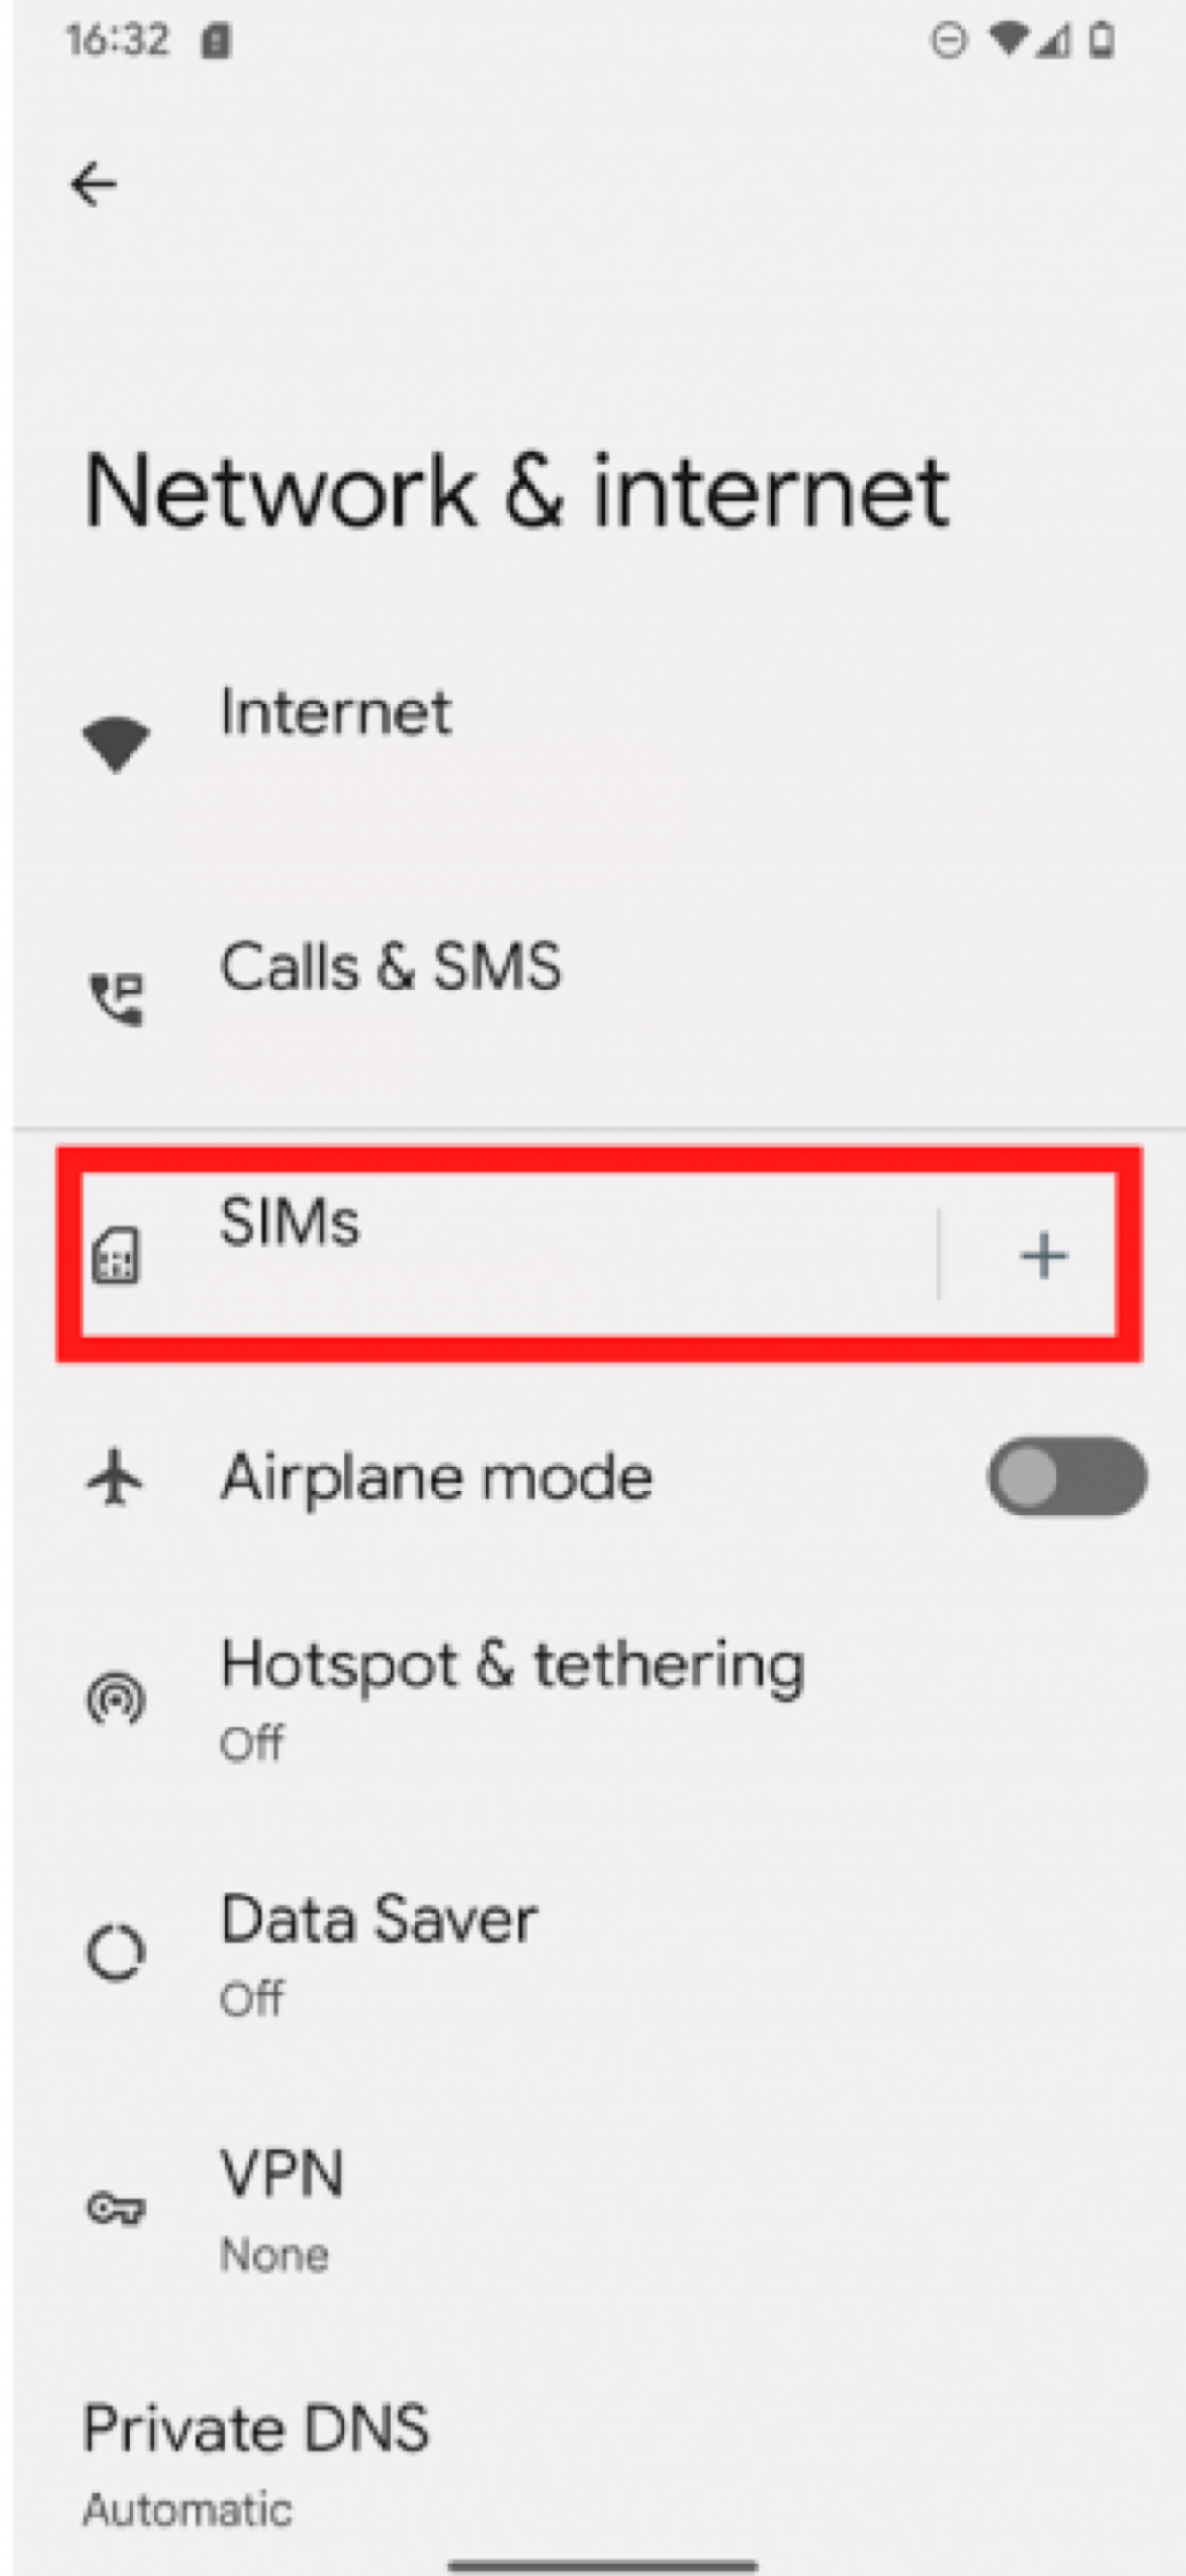
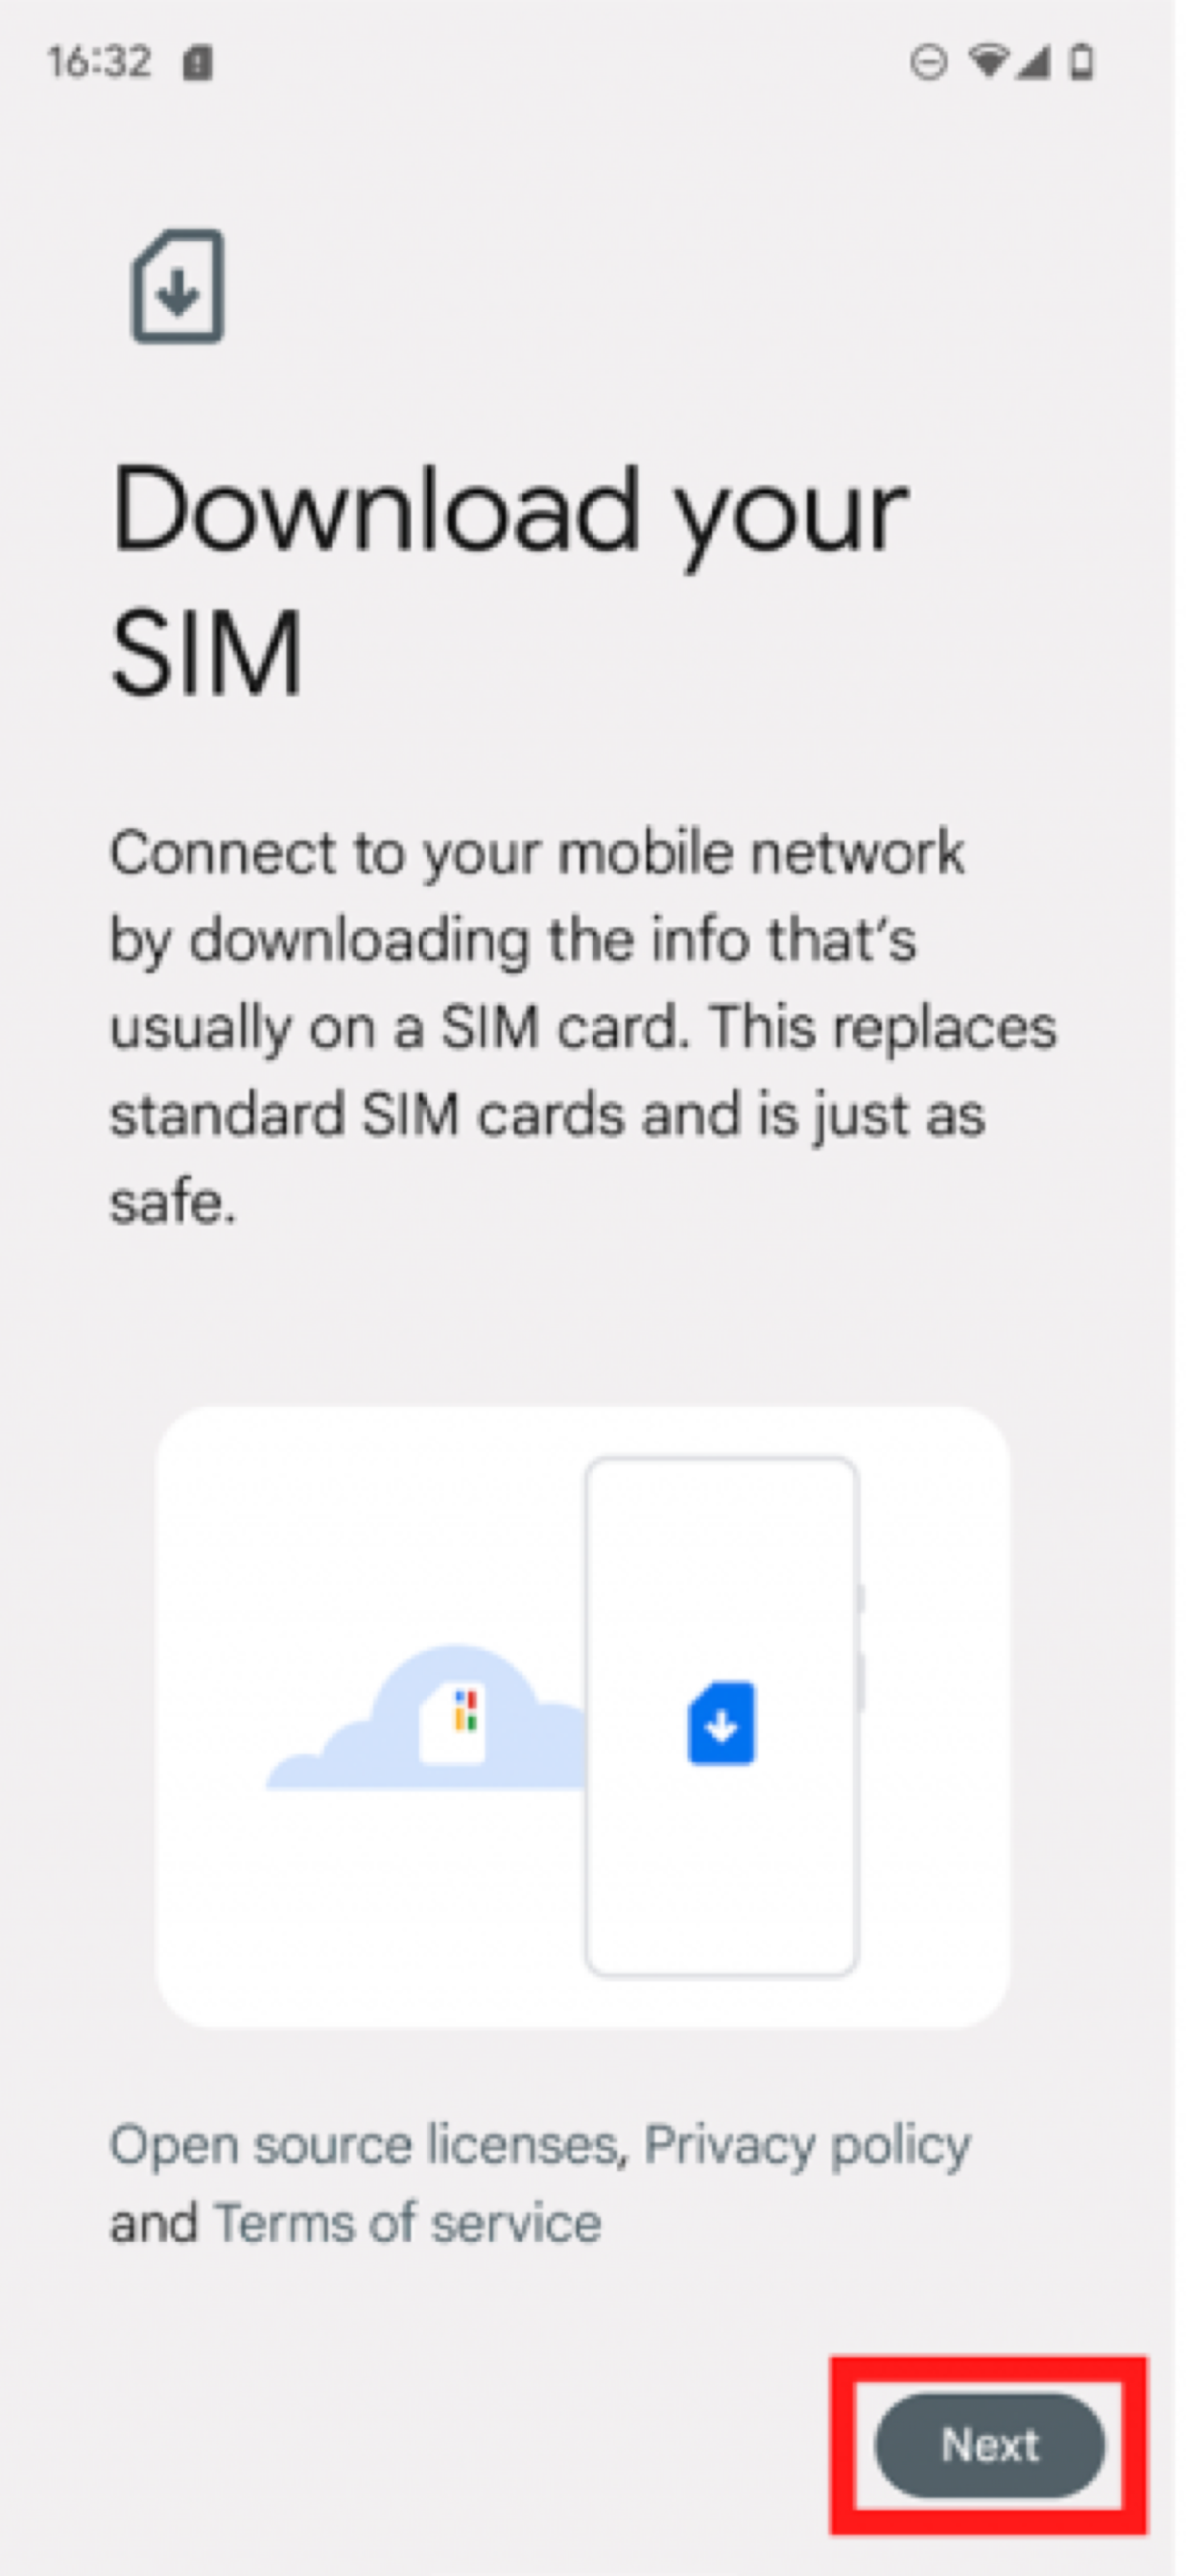
III. Installation via QR Code
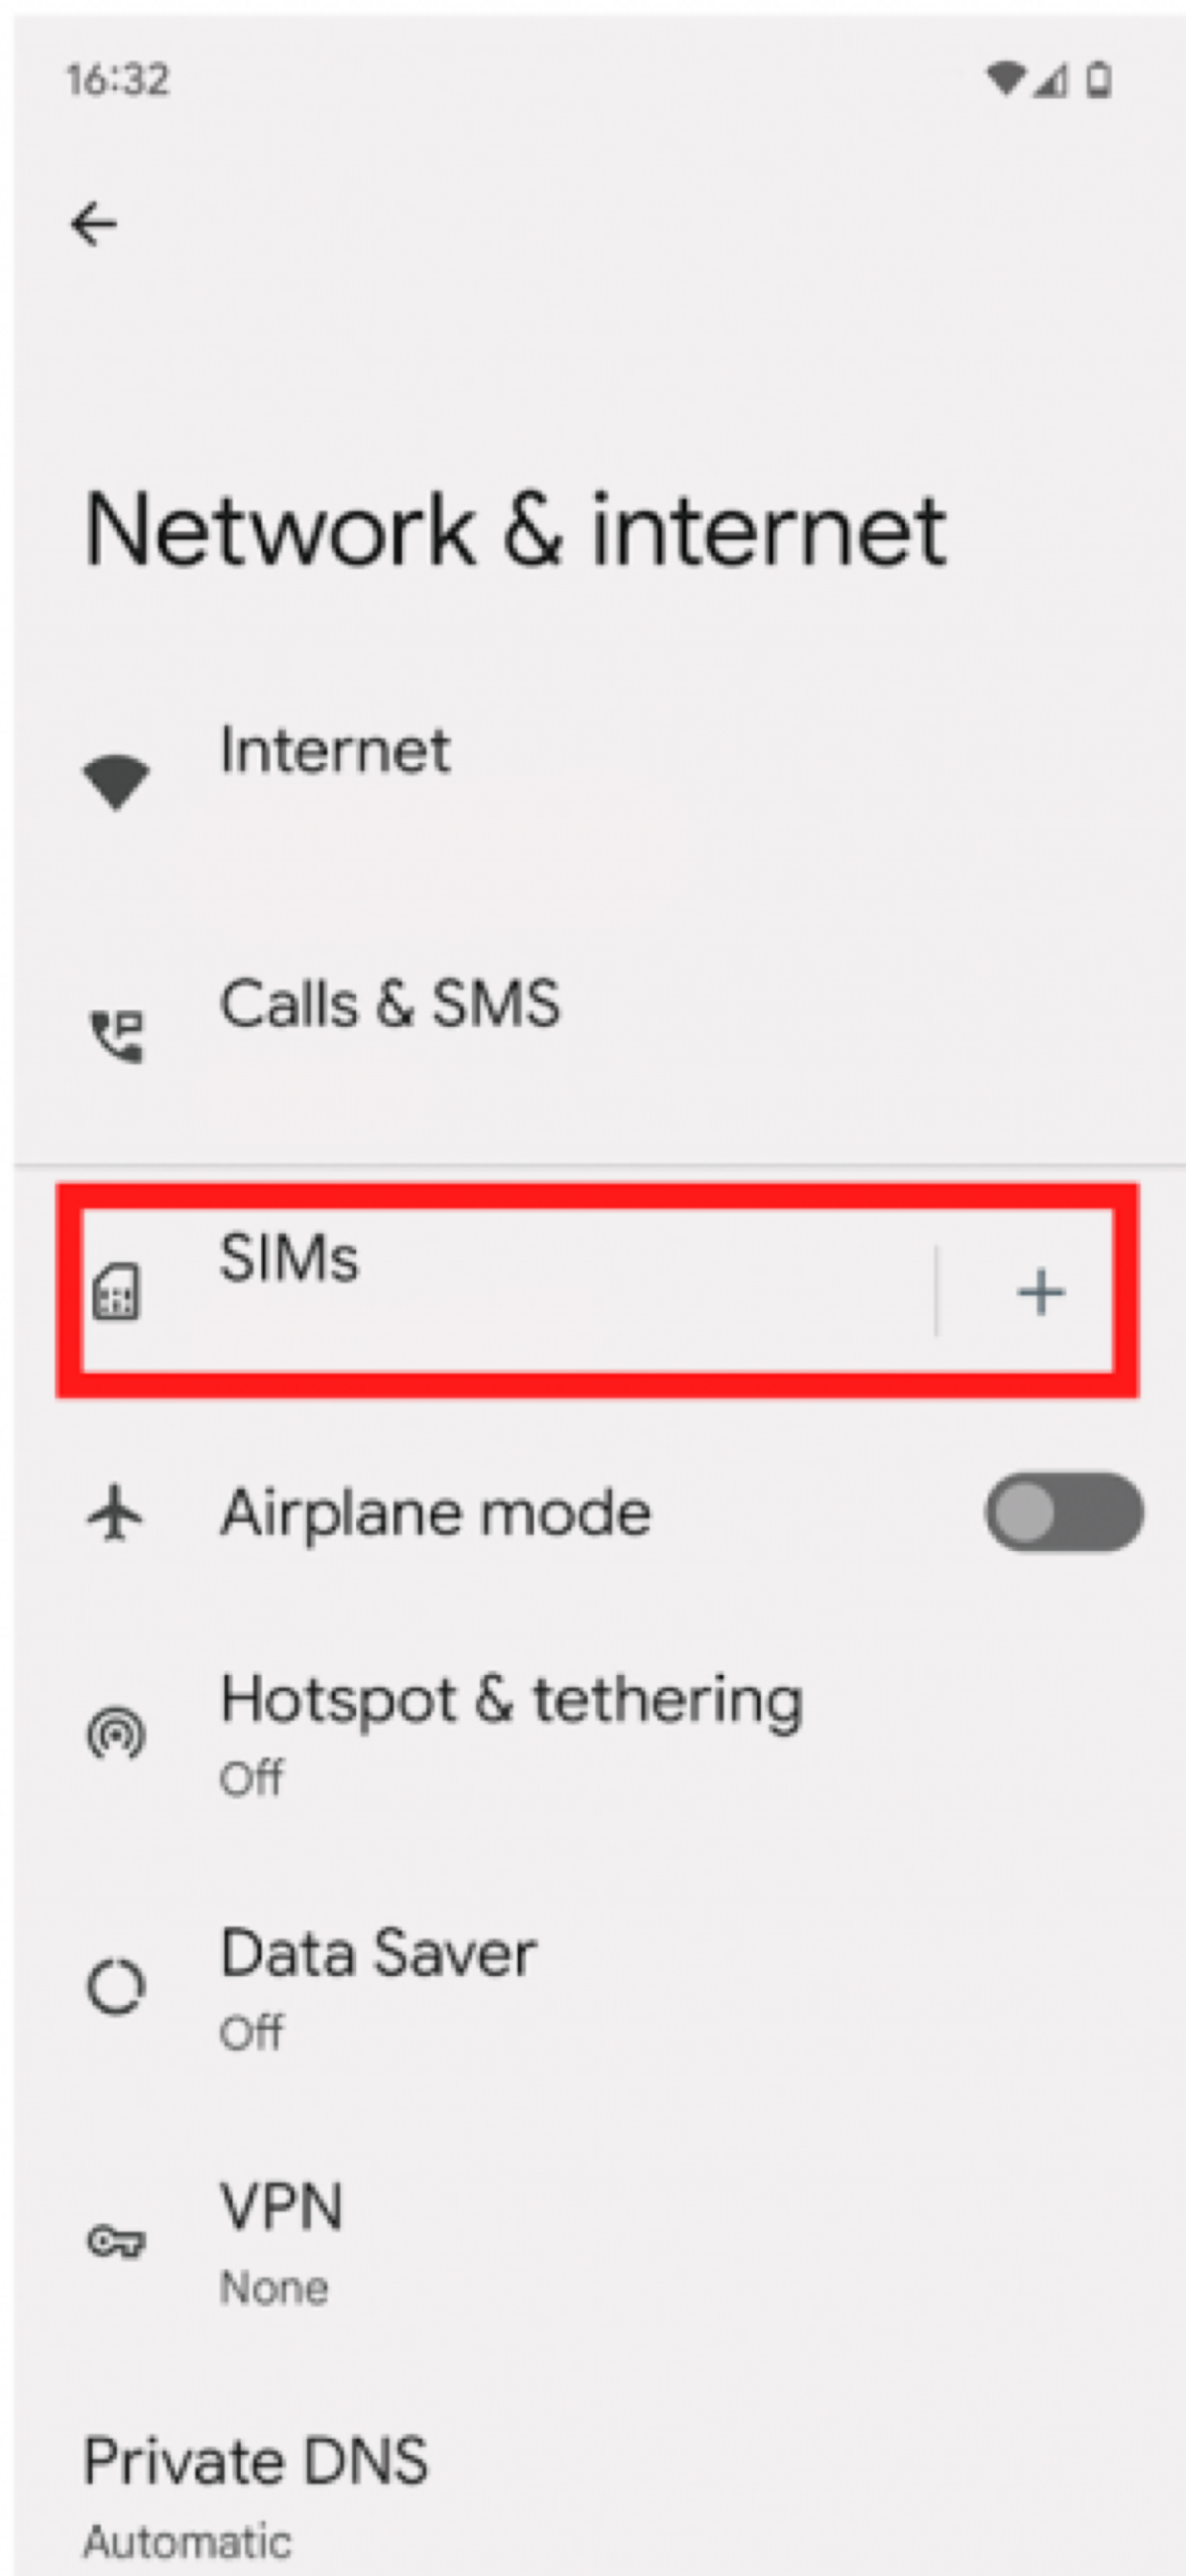
- In Settings, tap Network & Internet.
- Tap the + icon next to SIMs.
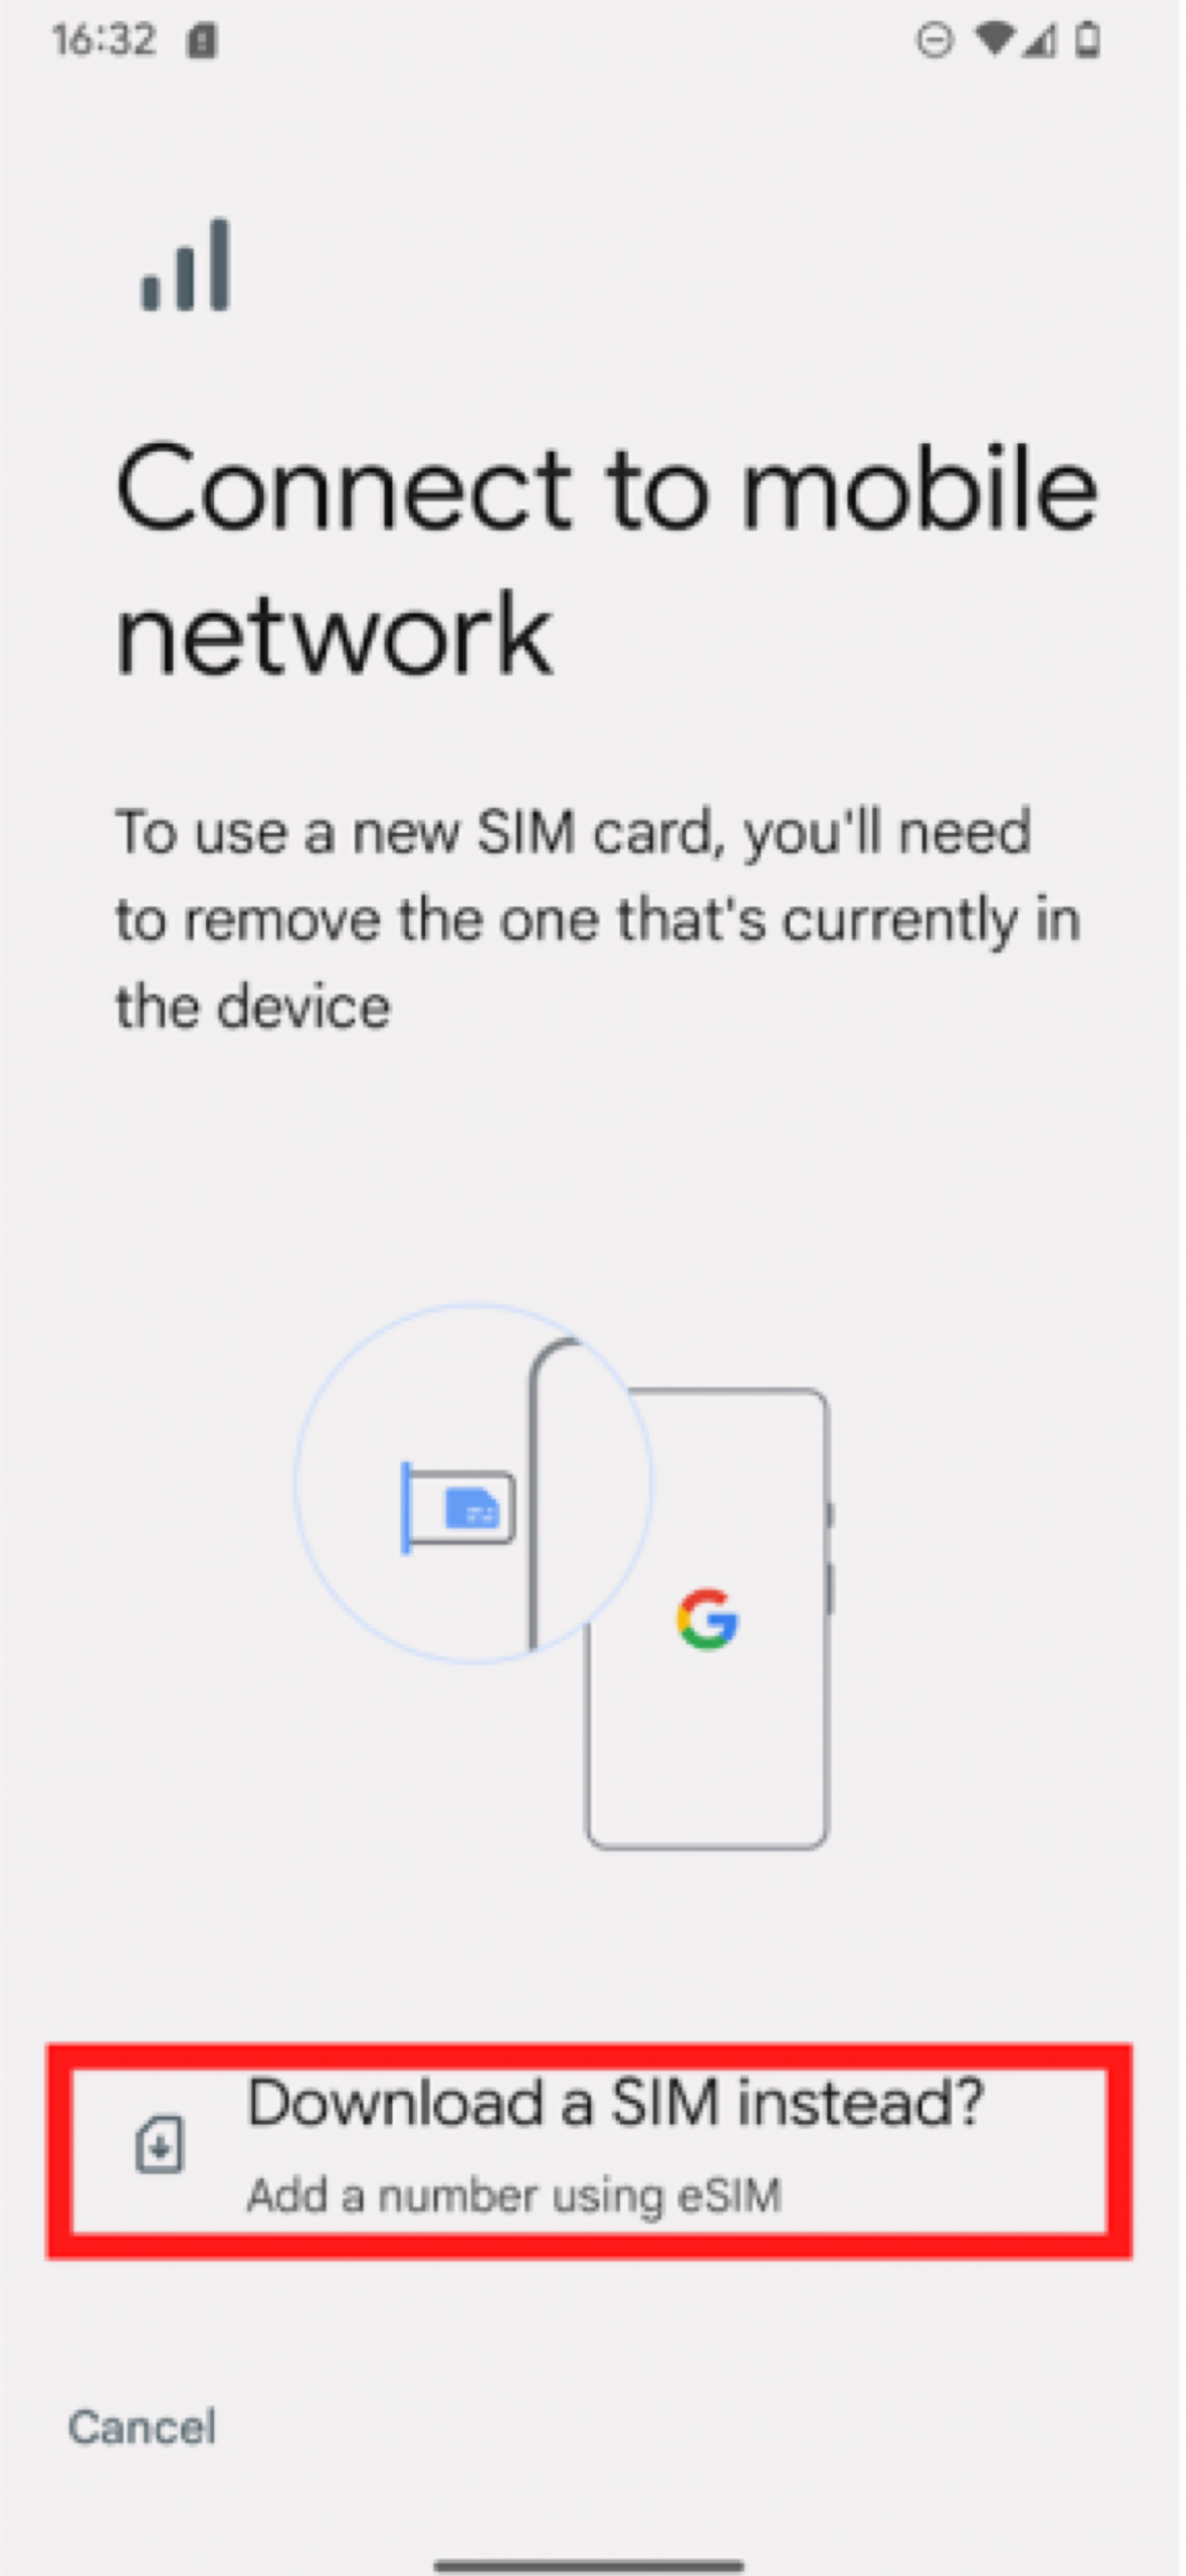
- TAP Download SIM instead

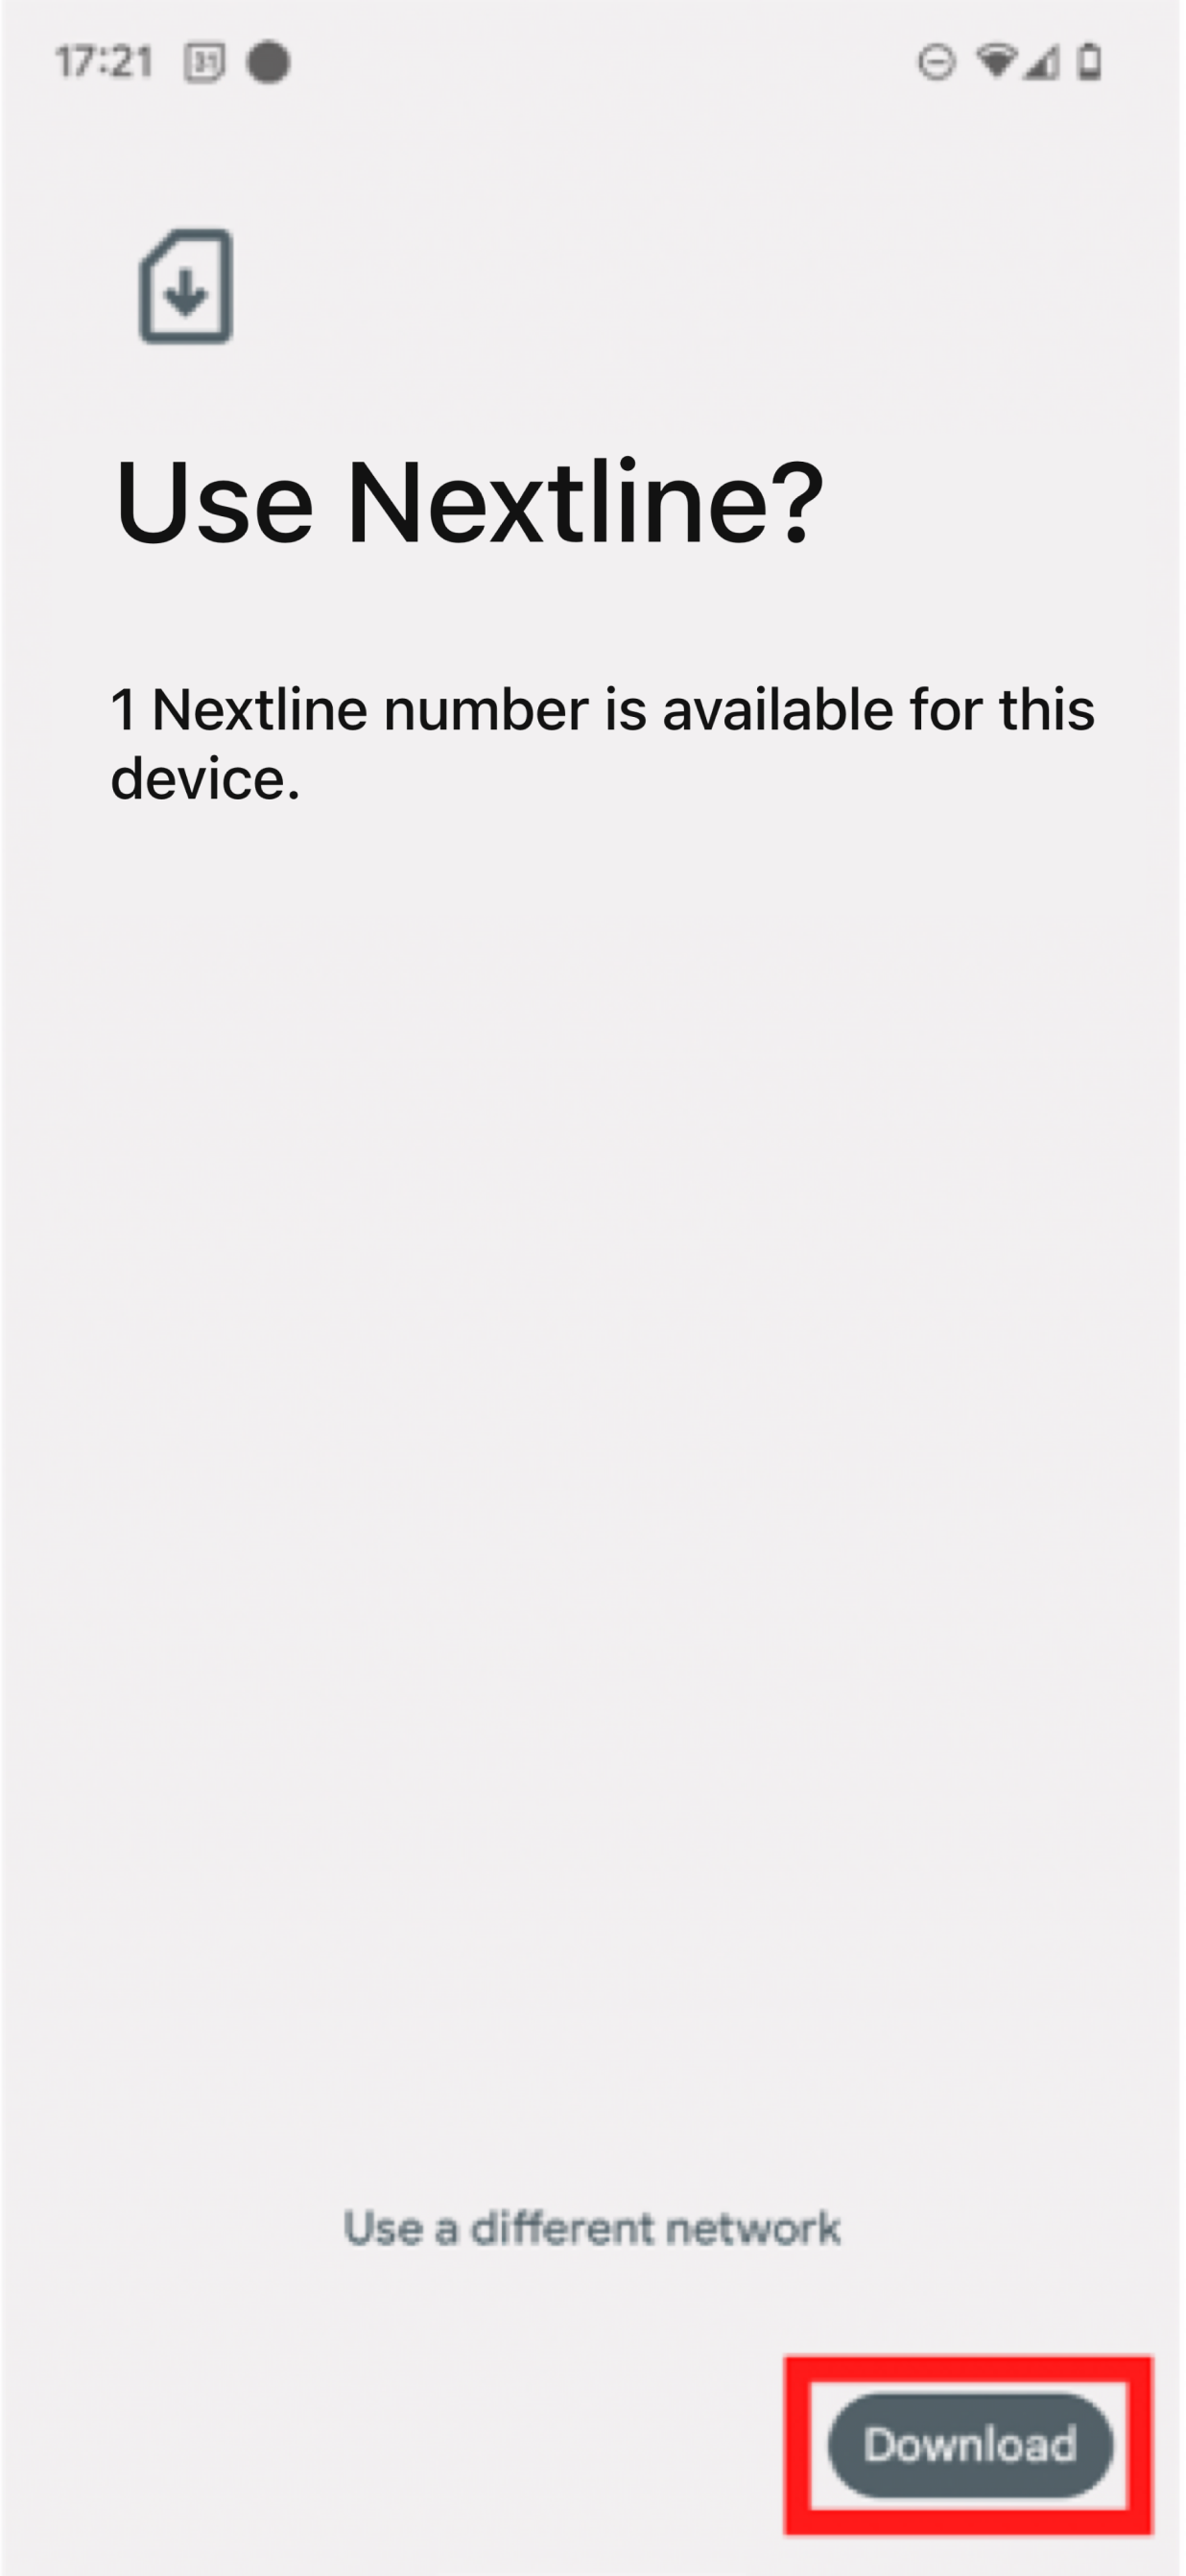
- Tap Next and scan the QR code located in the eSIM details in the Nextline app.
- Download the TAP file to install eSIM.

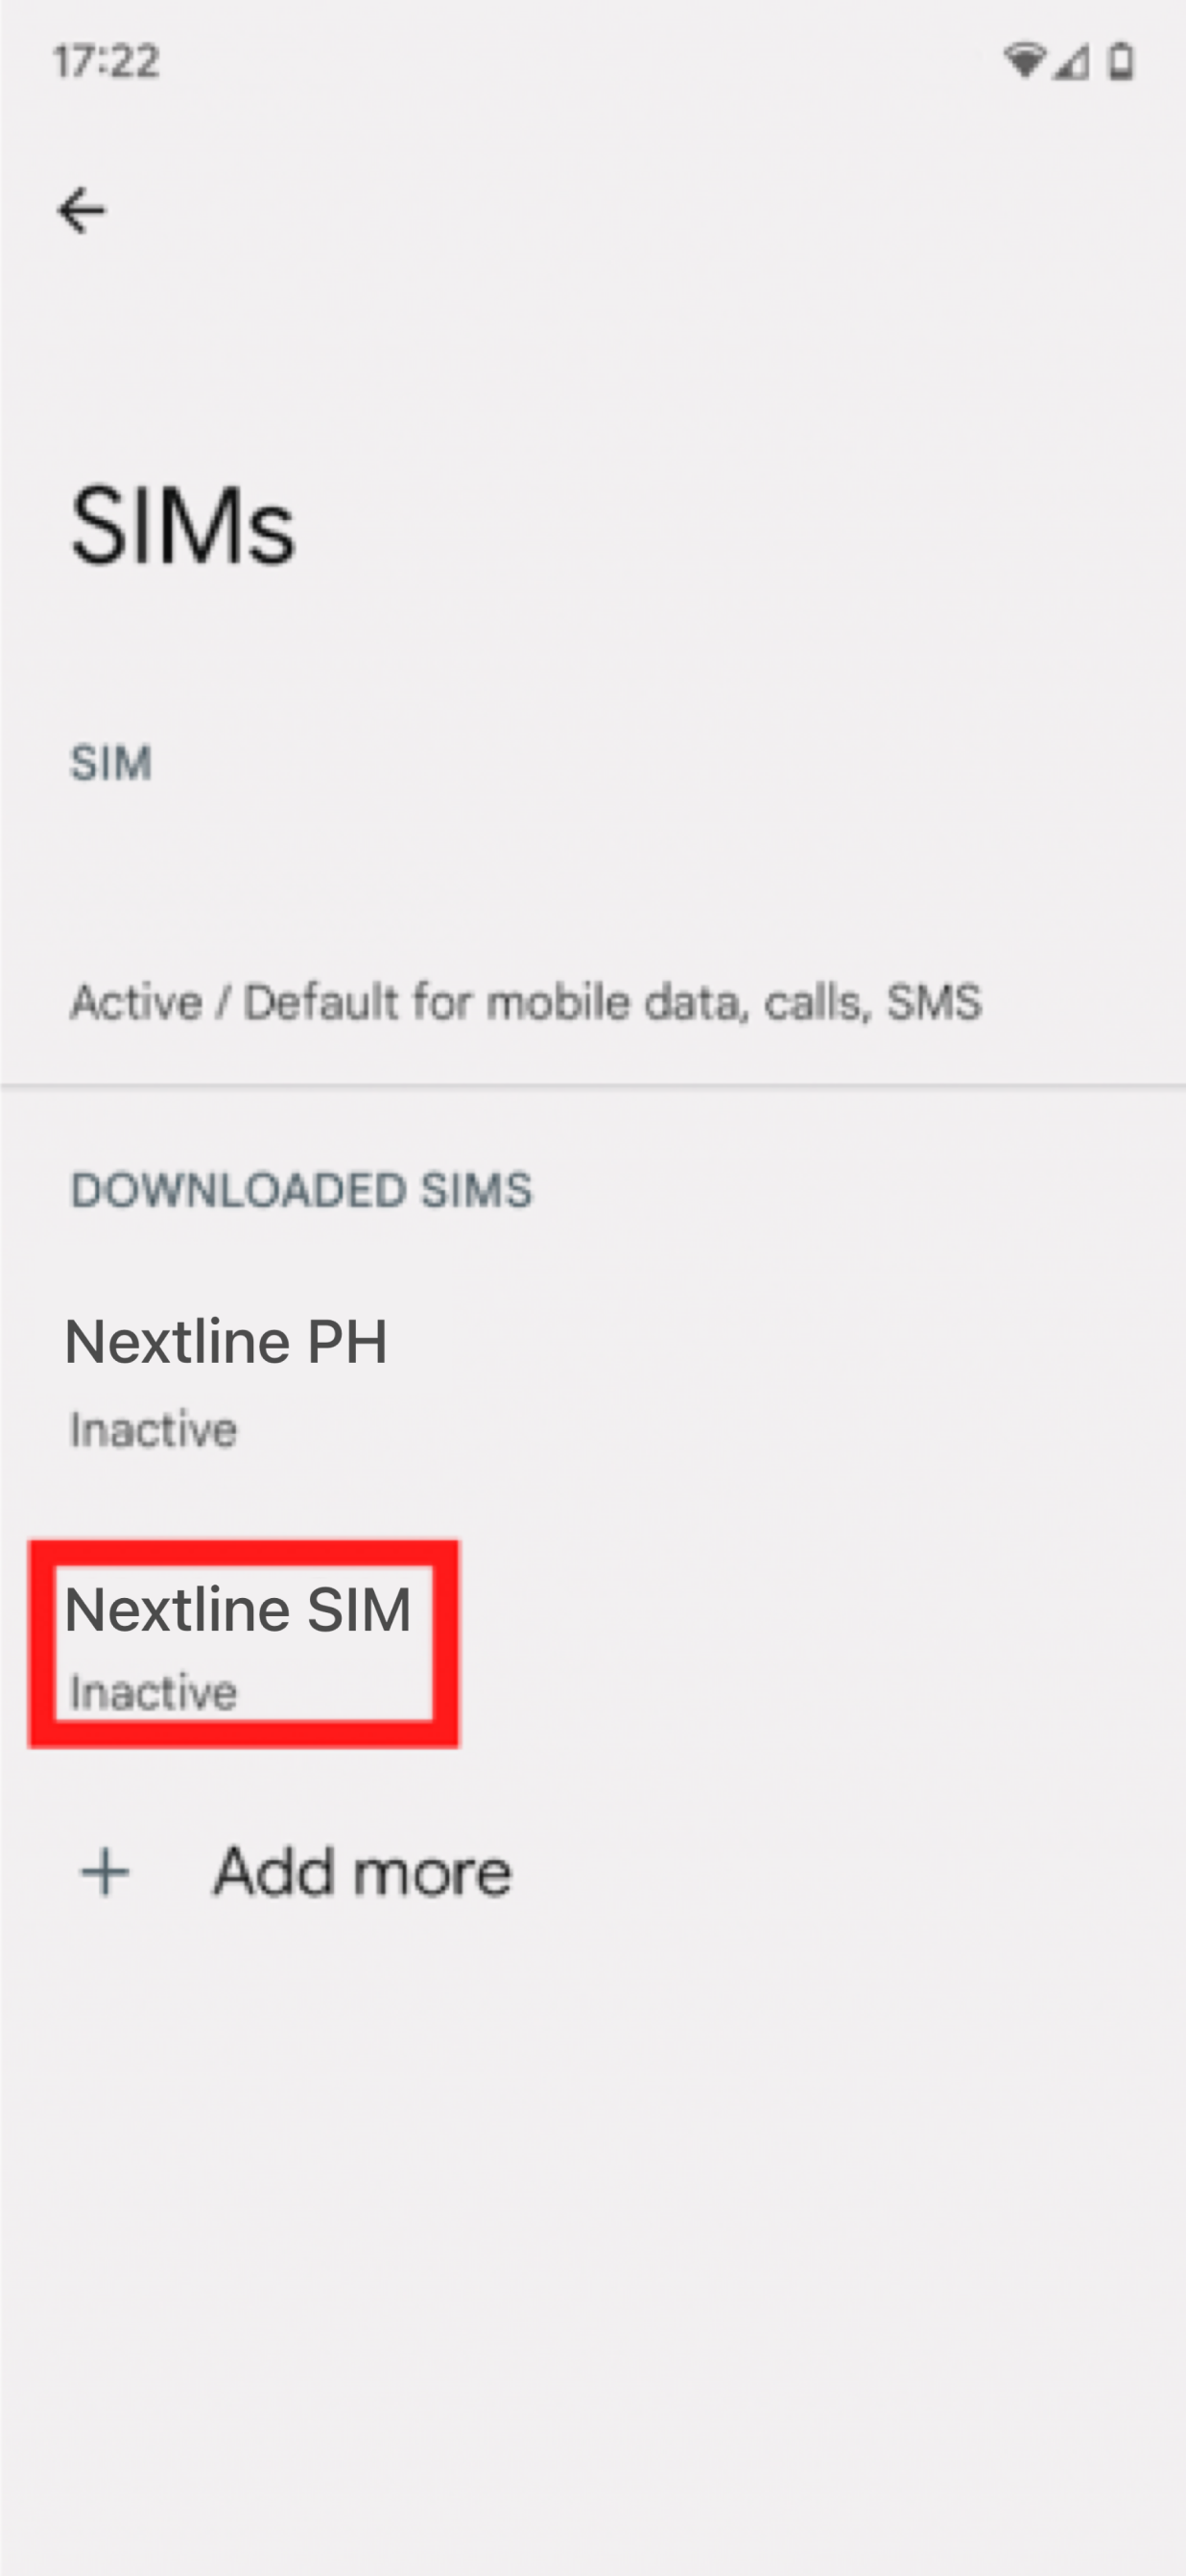
- Once the eSIM download is finished, go to Settings.
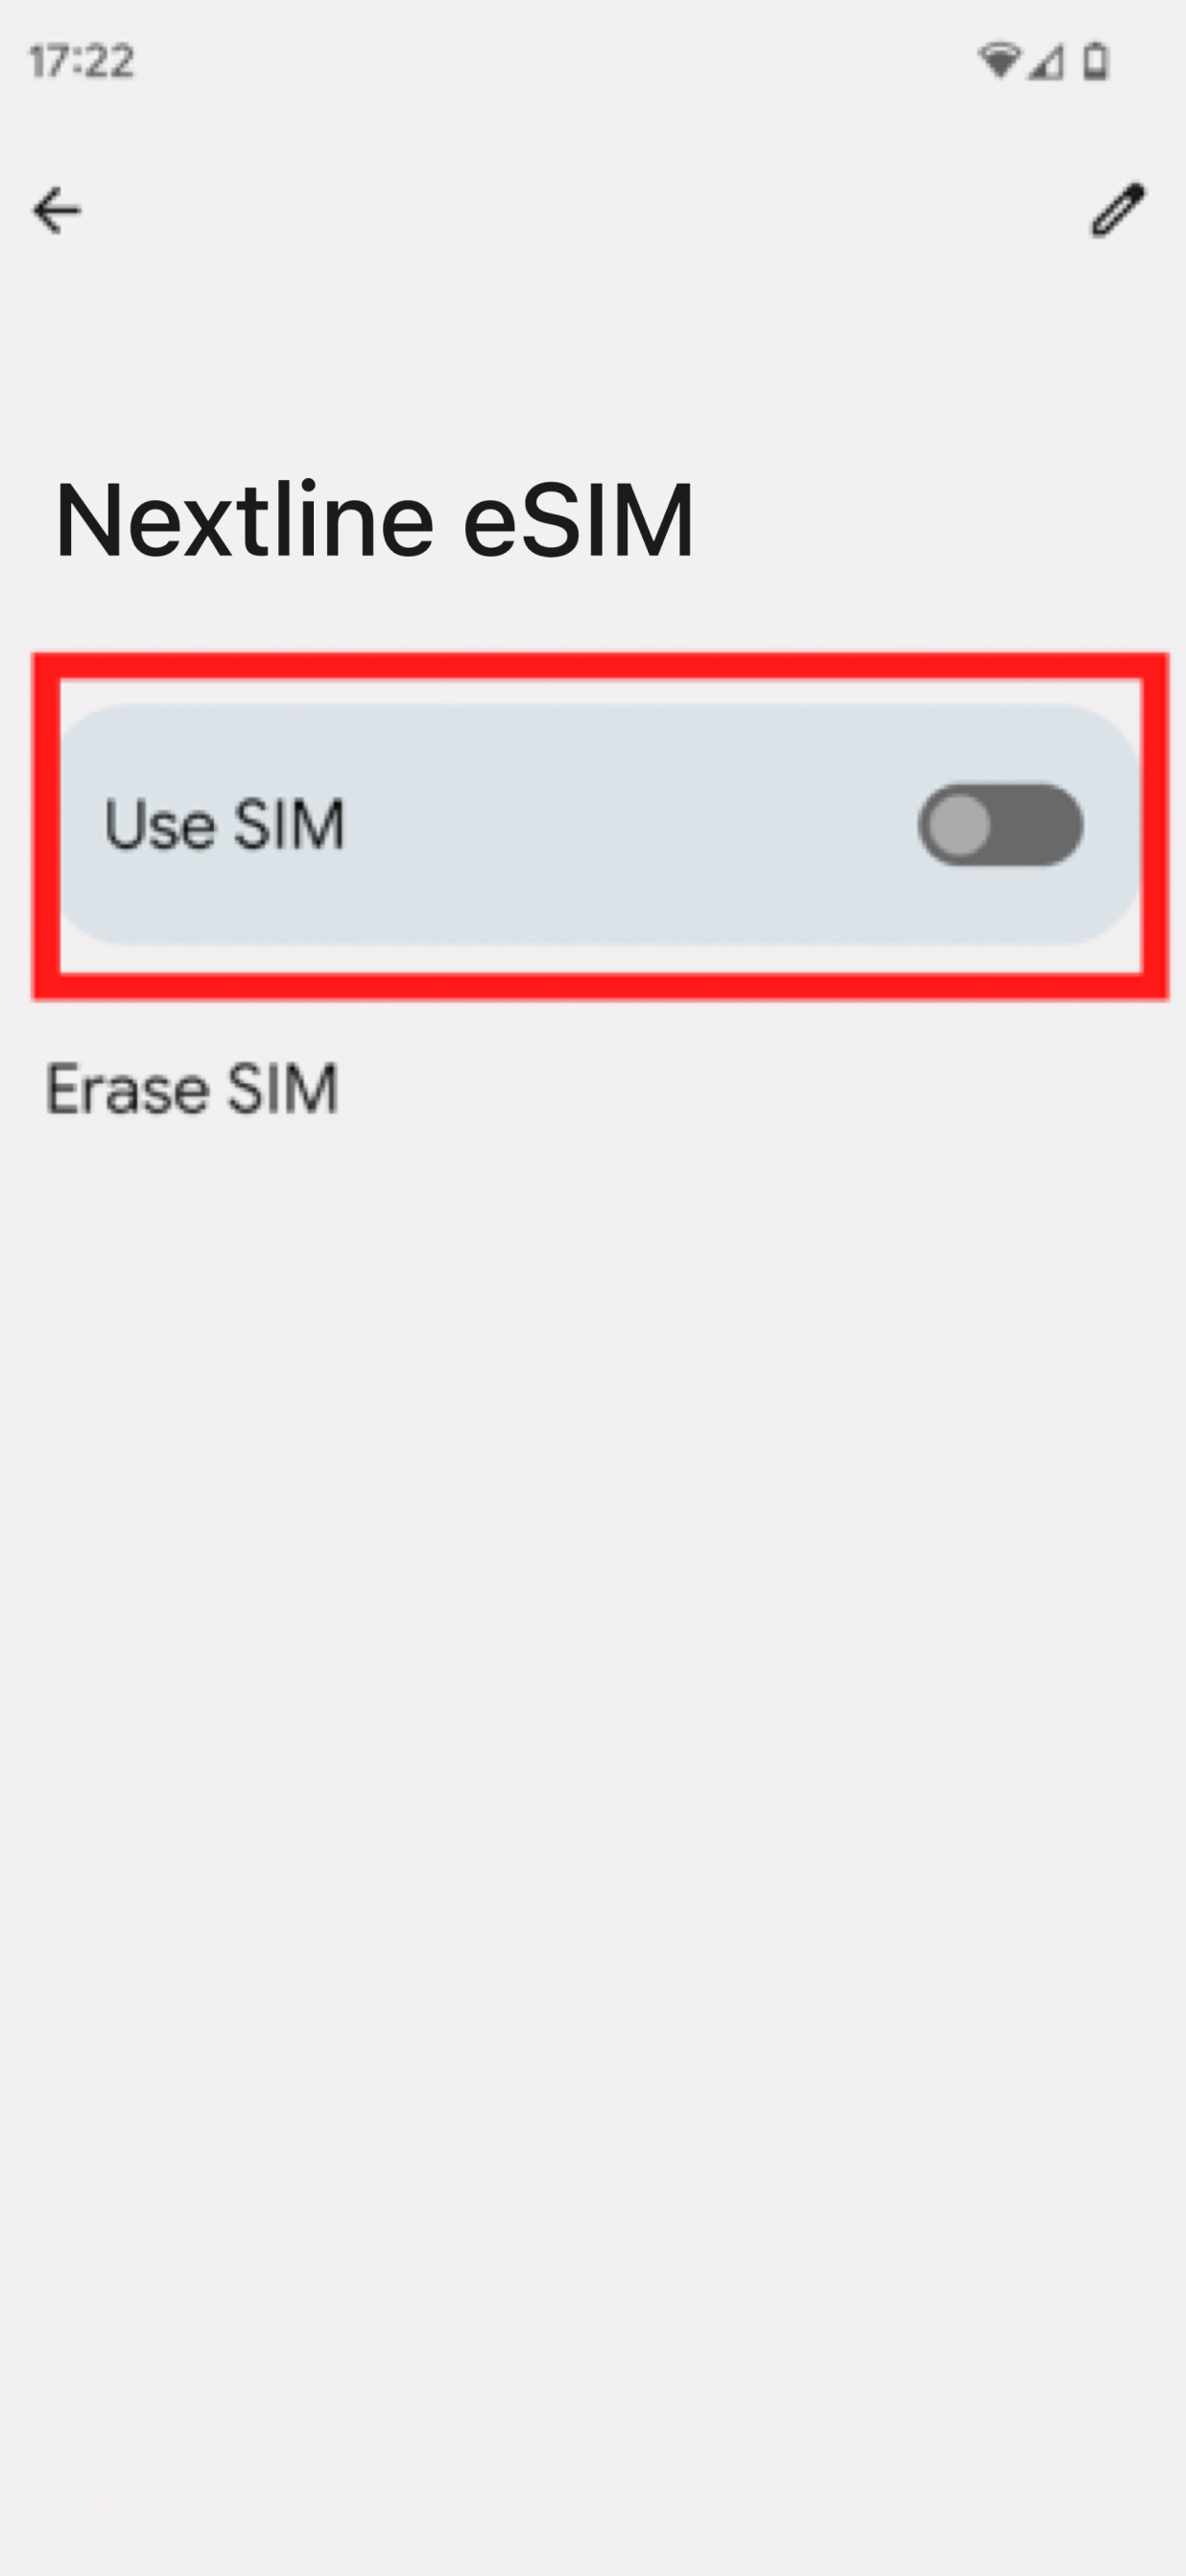
- Turn the toggle switch to ON to ensure eSIM is Enabled.
- Toggle the toggles for Mobile Data and Roaming to the ON position.
IV. Manual Installation
- In Settings, tap Network & Internet.
- Tap the + icon next to SIMs.
- TAP Download SIM instead.
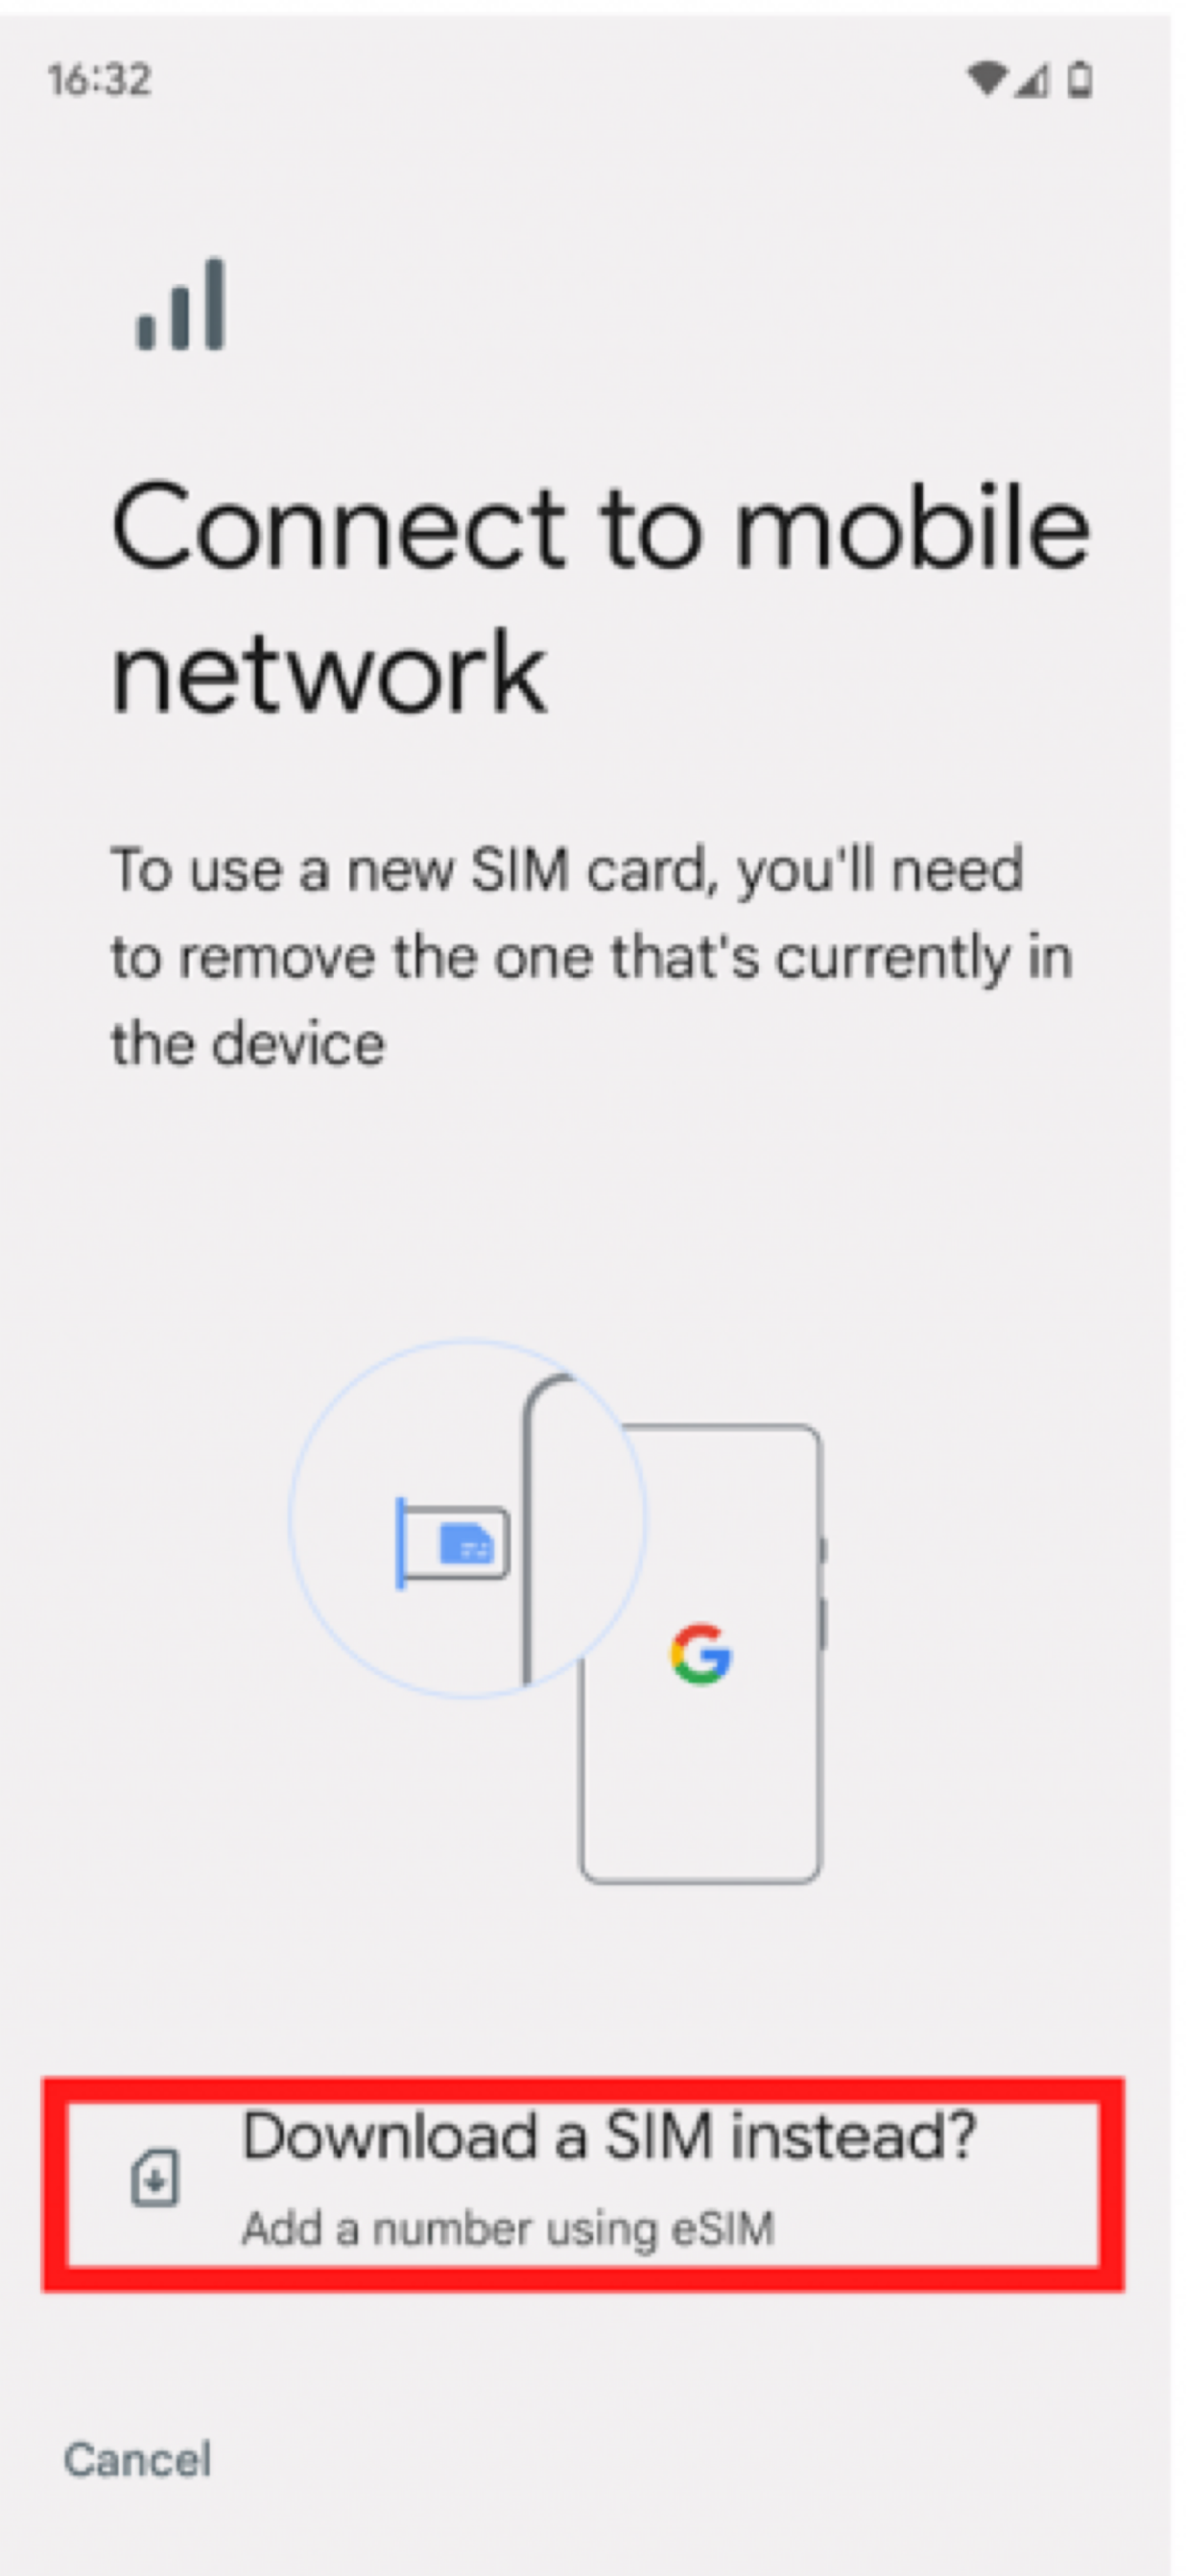
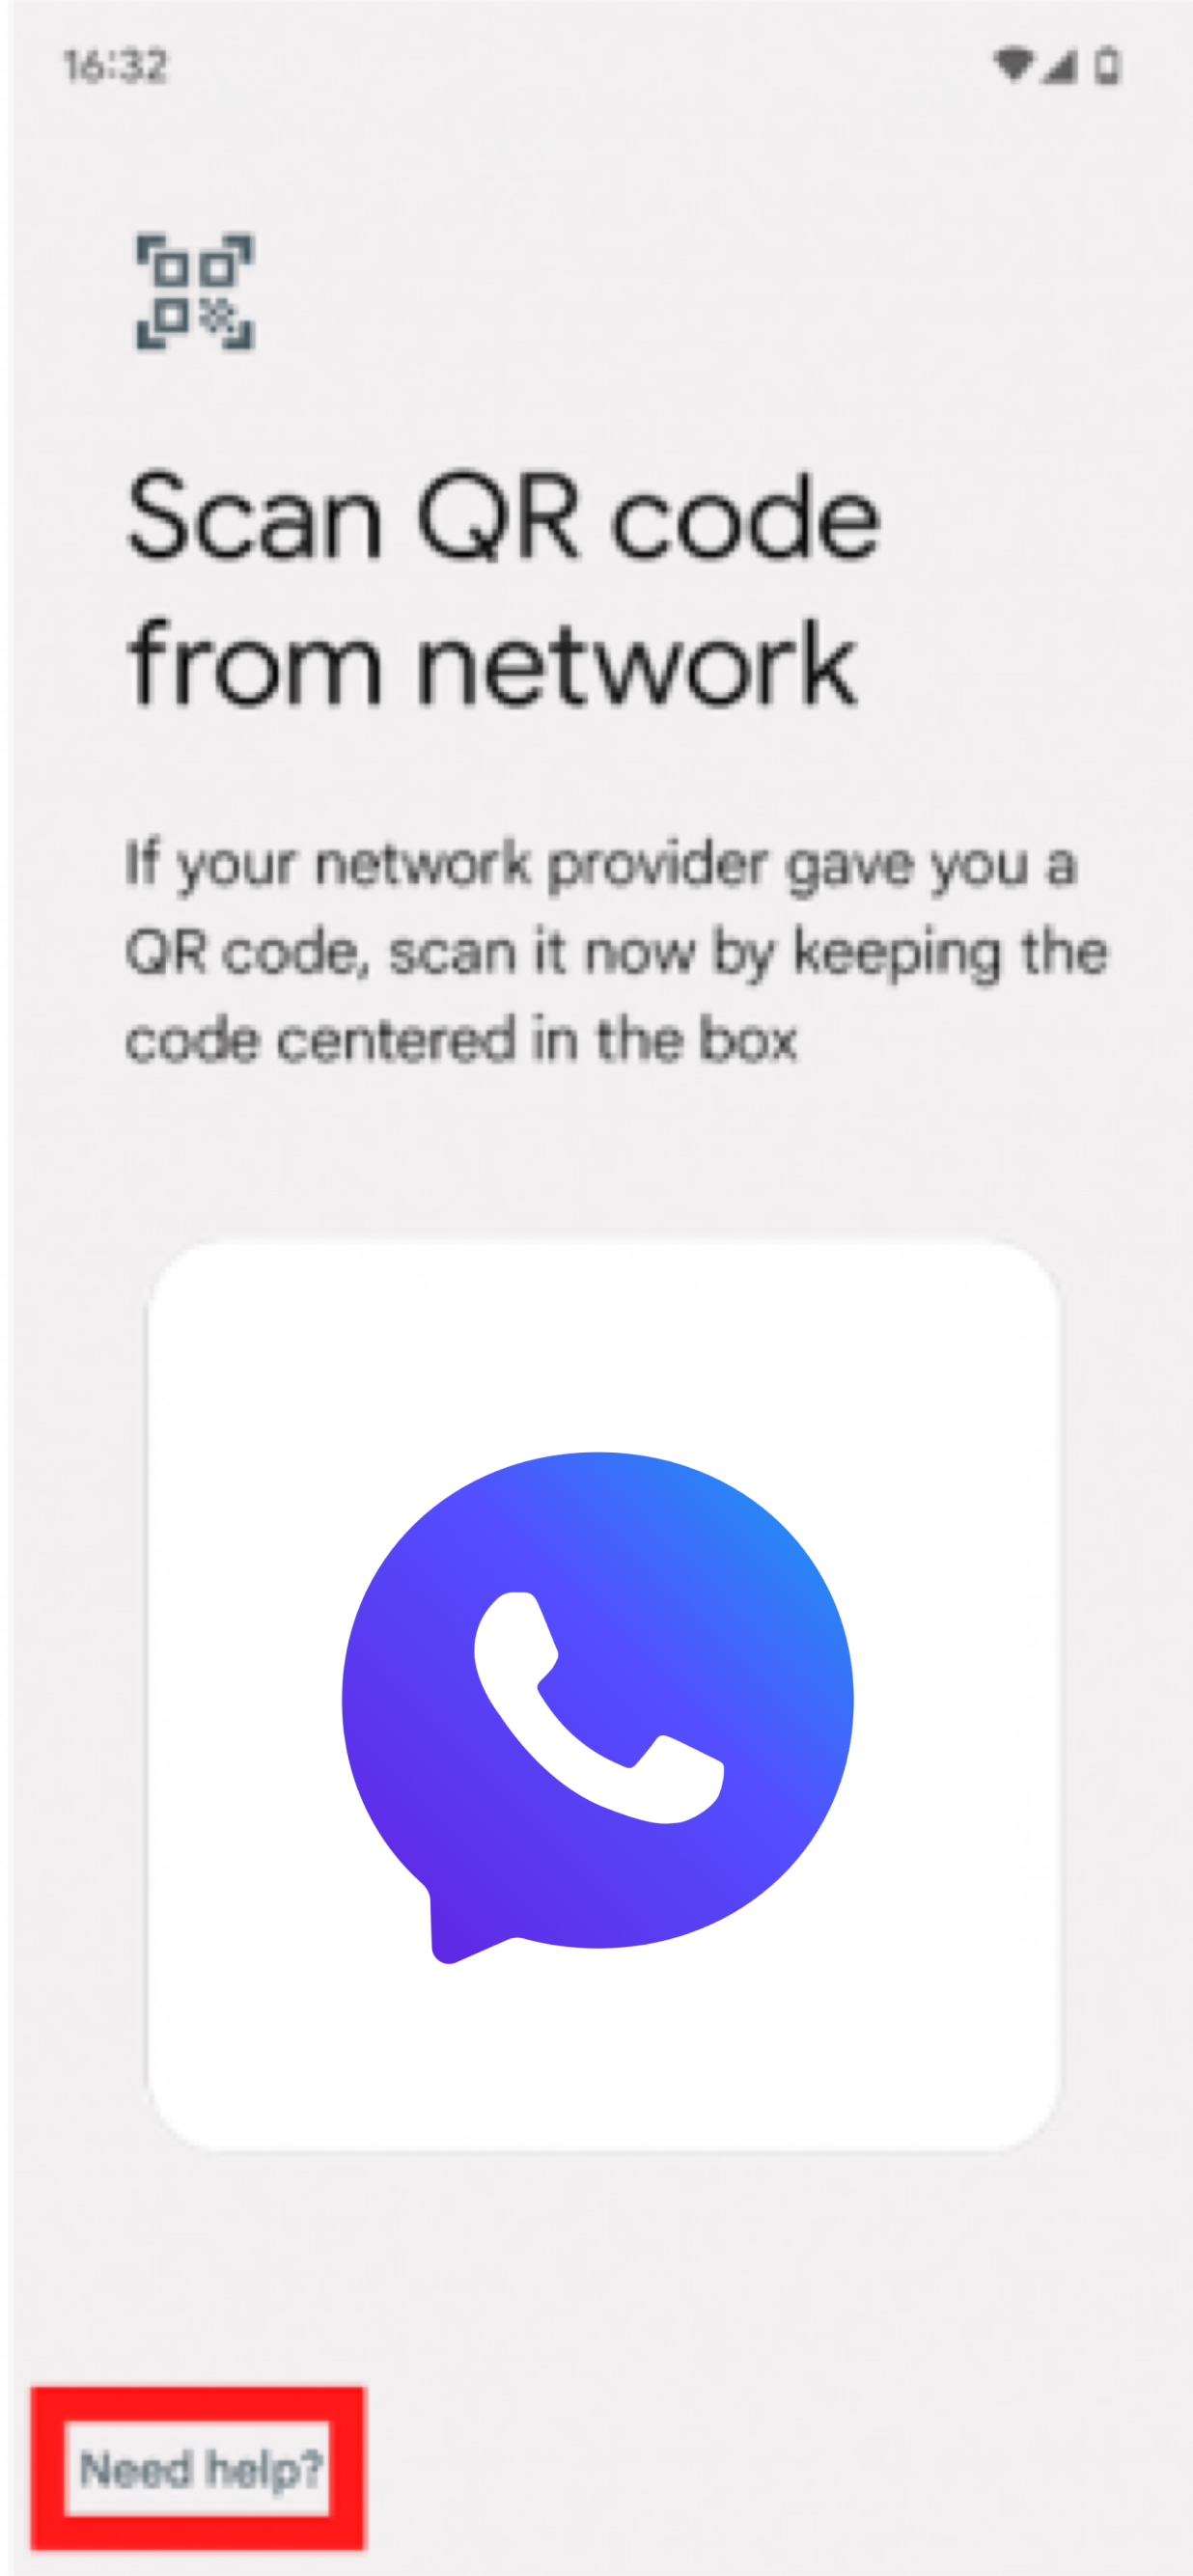
- Tap Next and Need help.
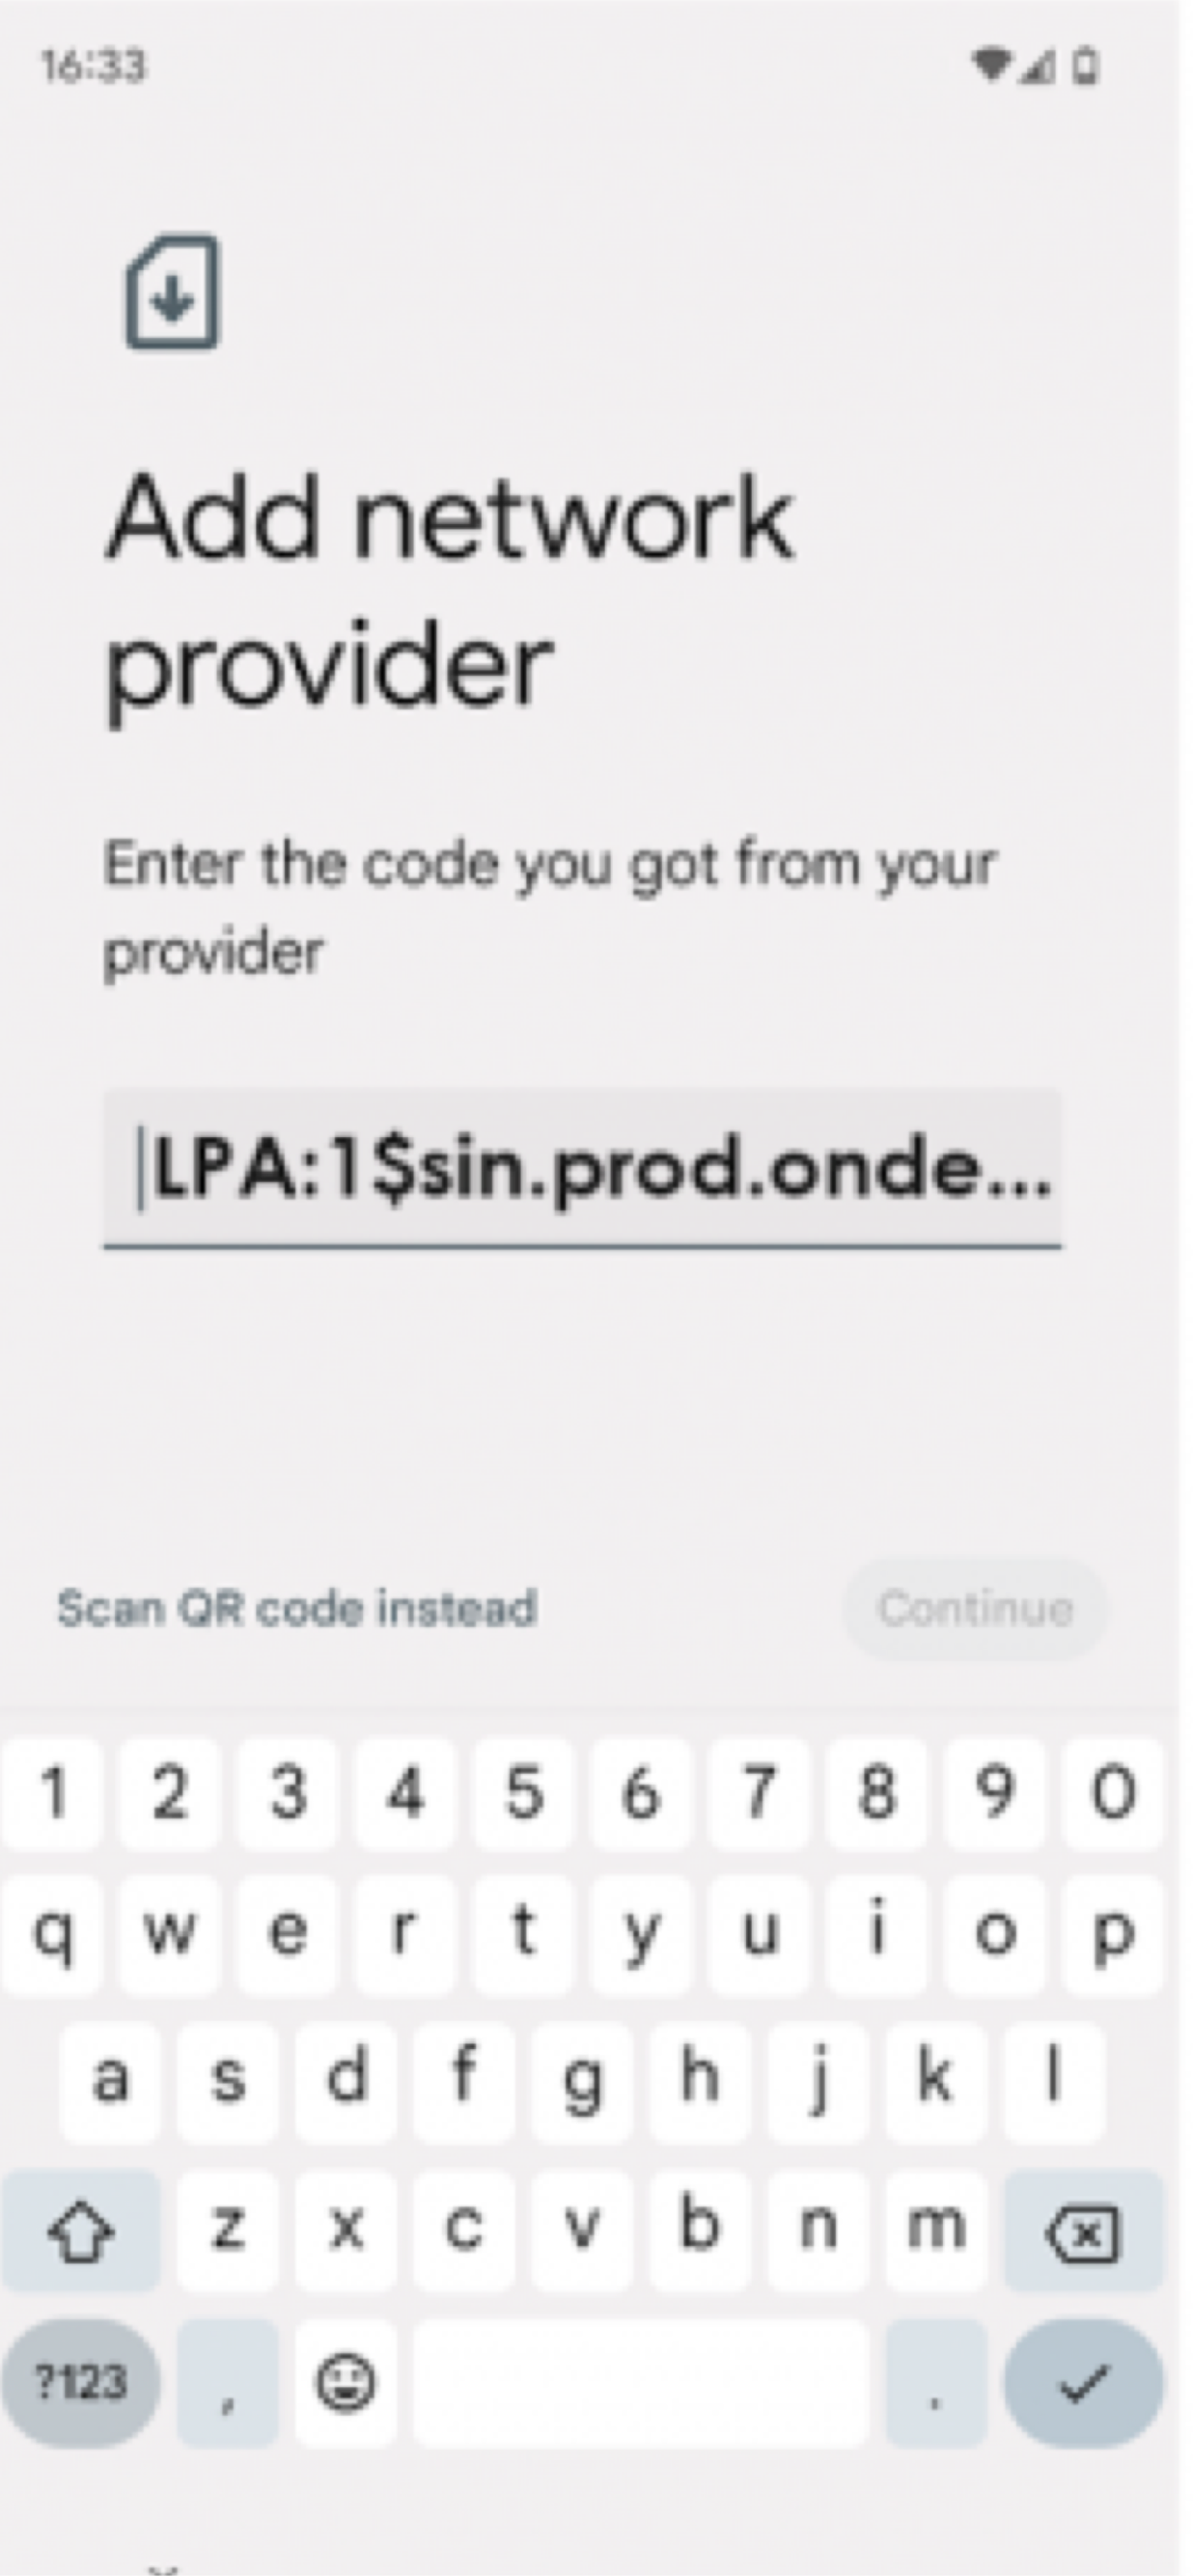
- Tap Enter manually and enter or paste the code found in the eSIM details in the Nextline app.
- Tap Continue to set up eSIM.


- Once the eSIM is set up, tap Settings.
- Turn the toggle switch to ON to ensure eSIM is Enabled.
- Turn ON the toggles for Mobile Data and Roaming.


- Your eSIM profile should now be installed on your Google Pixel device.
- Your eSIM profile should now be installed on your Google Pixel device.